Video Editing for Social Media: A Complete Workflow Guide

Master video editing for social media with a proven workflow covering scripting, pacing, captions, resizing, and export settings for every major platform.
Short-form video now accounts for 58% of social media time, while another industry summary reports roughly 2.5 times more engagement than long-form content on social platforms. (Vidico's short-form video statistics) That changes the editing problem. You're not polishing one clip for one feed. You're building a repeatable system that can turn raw footage into captions, alternate crops, platform-native hooks, and publish-ready files without forcing an editor to start over every time.
Why Social Video Editing Demands a New Workflow
Short-form posts grew by 70% in one year among Metricool users, reaching nearly 6 million published videos. (Vidico's summary of short-form video data) That volume changes the editor's job. TikTok, Instagram Reels, YouTube Shorts, and Facebook Reels all favor fast, vertical content, so each source recording may require tighter pauses, subtitles, alternate framing, and several publish-ready versions.
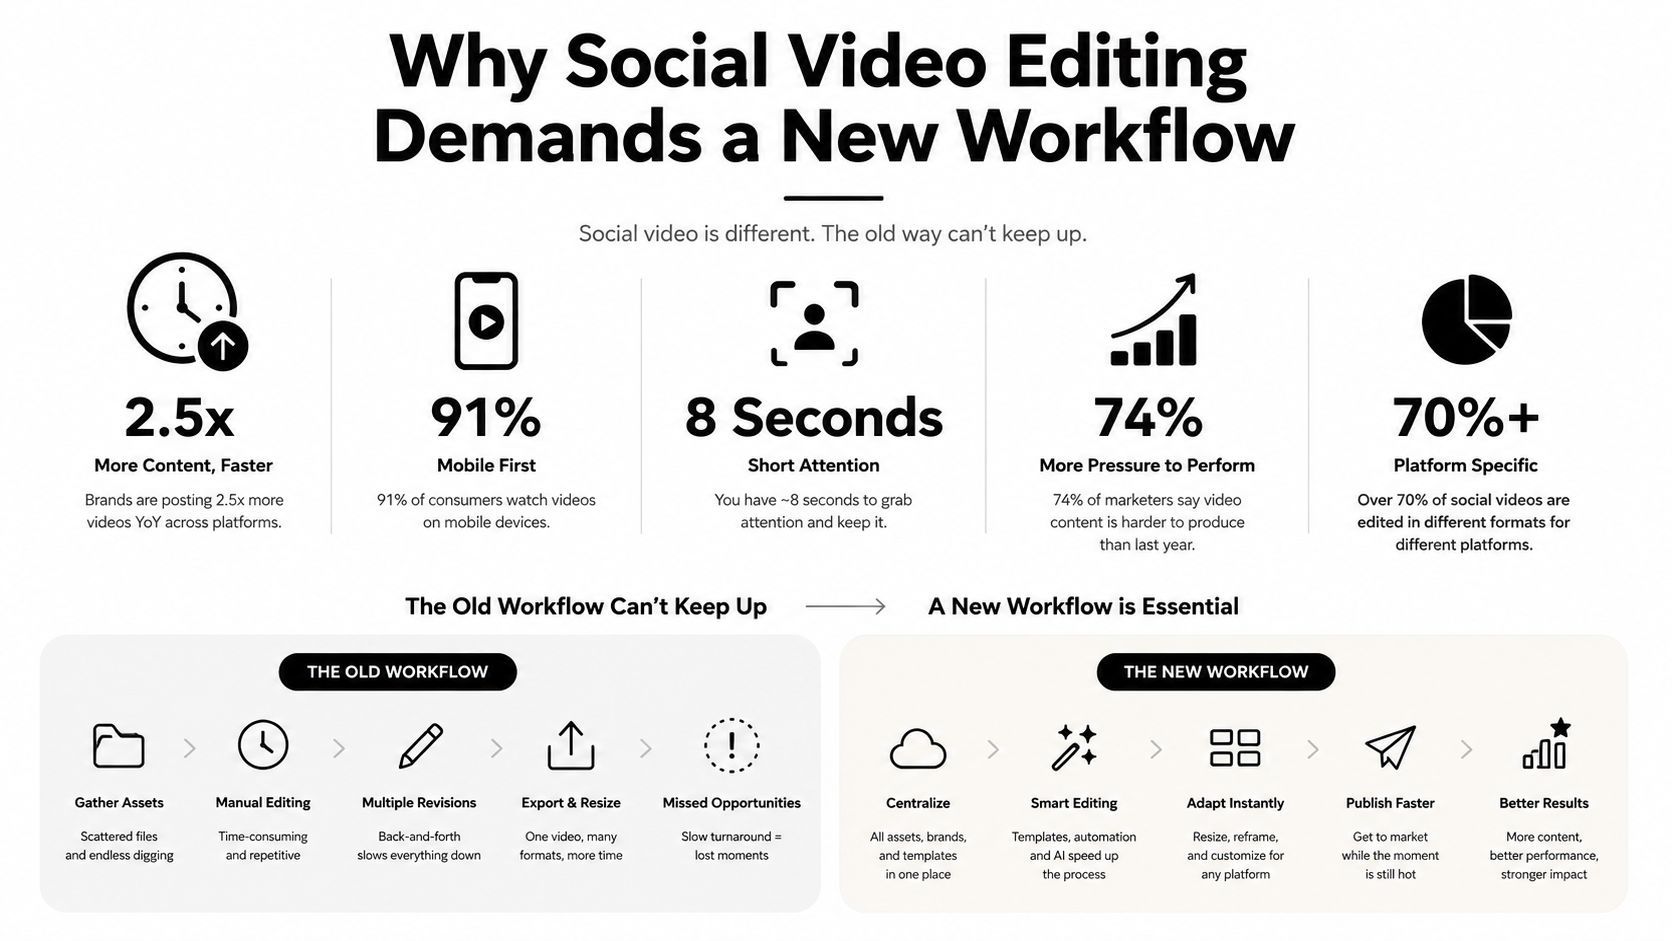
Audience viewing habits add pressure. One 2026 roundup reported that 87.5% of online adults watch short-form video weekly, with average weekly viewing of 6 hours 37 minutes. (PostPlanify's 2026 short-form video statistics) The same source cited more than 60% of the global online population watching swiping short-form video daily, while YouTube Shorts passed 200 billion daily views by early 2026, up from 70 billion in March 2024.
That demand does not require frantic cuts or elaborate effects in every clip. It requires a workflow that protects the decisions affecting viewing while reducing repetitive labor. Clear messaging, readable captions, accurate framing, and dependable exports usually contribute more than cinematic transitions that consume hours.
The production-system mindset
Treat each shoot as a source library. Keep original camera files, clean audio, b-roll, graphics, music, captions, and approved brand elements organized so editors can build variations without hunting through a crowded timeline.
A repeatable system divides production into five stages:
- Plan the message and destinations.
- Organize and select usable footage.
- Build a master edit.
- Create platform-specific versions.
- Review, export, and publish.
Practical rule: If the same task appears in every project, turn it into a preset, template, naming convention, or batch operation.
The trade-off is practical. A highly polished one-off edit can look impressive, but a simpler version the team can reproduce consistently has greater value across several feeds. Video editing for social media works best as a production system that keeps quality steady and removes avoidable decisions from each new timeline.
Planning Scripts and Platform Specs Before You Edit
Random cutting creates rework. Before opening Premiere Pro, DaVinci Resolve, CapCut, Final Cut Pro, or another editor, define the message, destinations, required versions, and footage each version will need. Planning becomes more valuable when one recording must supply several clips, crops, lengths, and calls to action.
A usable script has three jobs:
- Hook: Give viewers a specific reason to continue. Lead with the problem, result, claim, or visual demonstration instead of a long introduction.
- Body: Deliver one clear idea with supporting examples, screen recordings, product footage, or b-roll.
- Call to action: Tell viewers what to do next, such as comment, save, visit a landing page, or watch the next clip.
Write the hook so it works as on-screen text by itself. The same line can become cover copy, a caption, or a shorter opening on another platform, reducing script and edit variations.
Build the edit around destinations
Platform limits change over time. As noted earlier, a current summary lists TikTok videos up to 10 minutes, while Instagram Reels and YouTube Shorts are listed at up to 3 minutes. Treat those limits as boundaries, not targets. A concise version often communicates better than one that fills every available second.
| Platform | Aspect Ratio | Max Duration | Closed Captions |
|---|---|---|---|
| TikTok | 9:16 | Up to 10 minutes | Check current platform options |
| Instagram Reels | 9:16 | Up to 3 minutes | No closed-caption support |
| YouTube Shorts | 9:16 | Up to 3 minutes | Supported |
| Facebook Reels | 9:16 | Platform settings vary | Supported |
Keep a destination sheet with the aspect ratio, duration ceiling, caption treatment, safe area, and export preset for each feed. That sheet prevents editors from making the same platform decisions repeatedly and makes revisions easier when specifications change.
Prepare footage before the first cut
Create bins or folders for A-roll, b-roll, audio, graphics, music, project files, exports, and platform versions. Name clips by subject and take instead of retaining camera-generated filenames. Mark strong takes, clean pauses, useful reaction shots, and moments that could open or close a clip.
Record the intended crop during planning. A speaker at the extreme edge of a wide frame may be impossible to center in a vertical version. If one shoot will supply several formats, leave visual space for cropping and keep faces, text, products, and other important details away from the edges. A quick vertical framing check before filming can prevent unusable derivatives later.
Trimming and Pacing Techniques That Hold Attention
The first editing pass should remove anything that doesn't earn its place. That includes greetings, repeated explanations, throat-clearing, empty pauses, verbal detours, and transitions that delay the useful part of the message.
Don't cut every breath. Removing all natural rhythm makes a speaker sound artificial and can make complex information harder to follow. The aim is controlled compression, not maximum speed.
Use a repeatable trimming pass
Start with the spoken message, then add visual support. A practical sequence looks like this:
- Create a dialogue assembly: Place the strongest take on the timeline and remove false starts.
- Tighten pauses: Shorten silence between ideas while leaving enough space for comprehension.
- Remove duplication: If the speaker makes the same point twice, keep the clearer version.
- Add visual changes: Use b-roll, screen captures, product details, or a crop change where the image needs renewed energy.
- Review without sound: Check whether the visual sequence and captions still communicate the main point.
Consider a 90-second talking-head explanation about a software feature. The raw version may include a greeting, a repeated benefit, a long search for the right phrase, and an ending that restates the opening. A 45-second version can preserve the feature, the use case, the proof through a screen recording, and the call to action by removing those delays rather than deleting the core message.
Make jump cuts feel intentional
Jump cuts work when they compress a clear thought. They become distracting when the speaker shifts position unpredictably or the cut lands in the middle of a word. Use a modest crop change, b-roll, or a cutaway to disguise continuity problems, but don't use zoom punches as decoration.
Pattern interrupts should support the sentence. A close crop can emphasize a key phrase. A screen recording can prove the claim. A product detail can replace a static talking head while the narration continues. Every visual change should answer a question: does this make the idea clearer, faster, or easier to remember?
Editing test: Watch the cut with the sound muted. If the visual change has no purpose and the captions don't explain the shift, remove it.
Pacing also depends on information density. A tutorial needs enough time for viewers to read labels and understand actions. A reaction or trend clip may benefit from tighter cuts. Don't copy another creator's rhythm without matching the complexity of your own message.
The final pass should check the opening independently. If the first usable idea arrives after a long setup, move it forward. A strong video often starts with the answer, the tension, or the visible result, then supplies context afterward.
Adding Captions for Accessibility and Silent Viewing
Captions serve two audiences at once. They help people who can't hear the audio, and they help viewers who encounter the video while sound is off. University guidance recommends human review of auto-generated captions, accurate capture of spoken words, and platform-specific planning because caption support differs across social networks. (UC Berkeley's social media caption guidance)
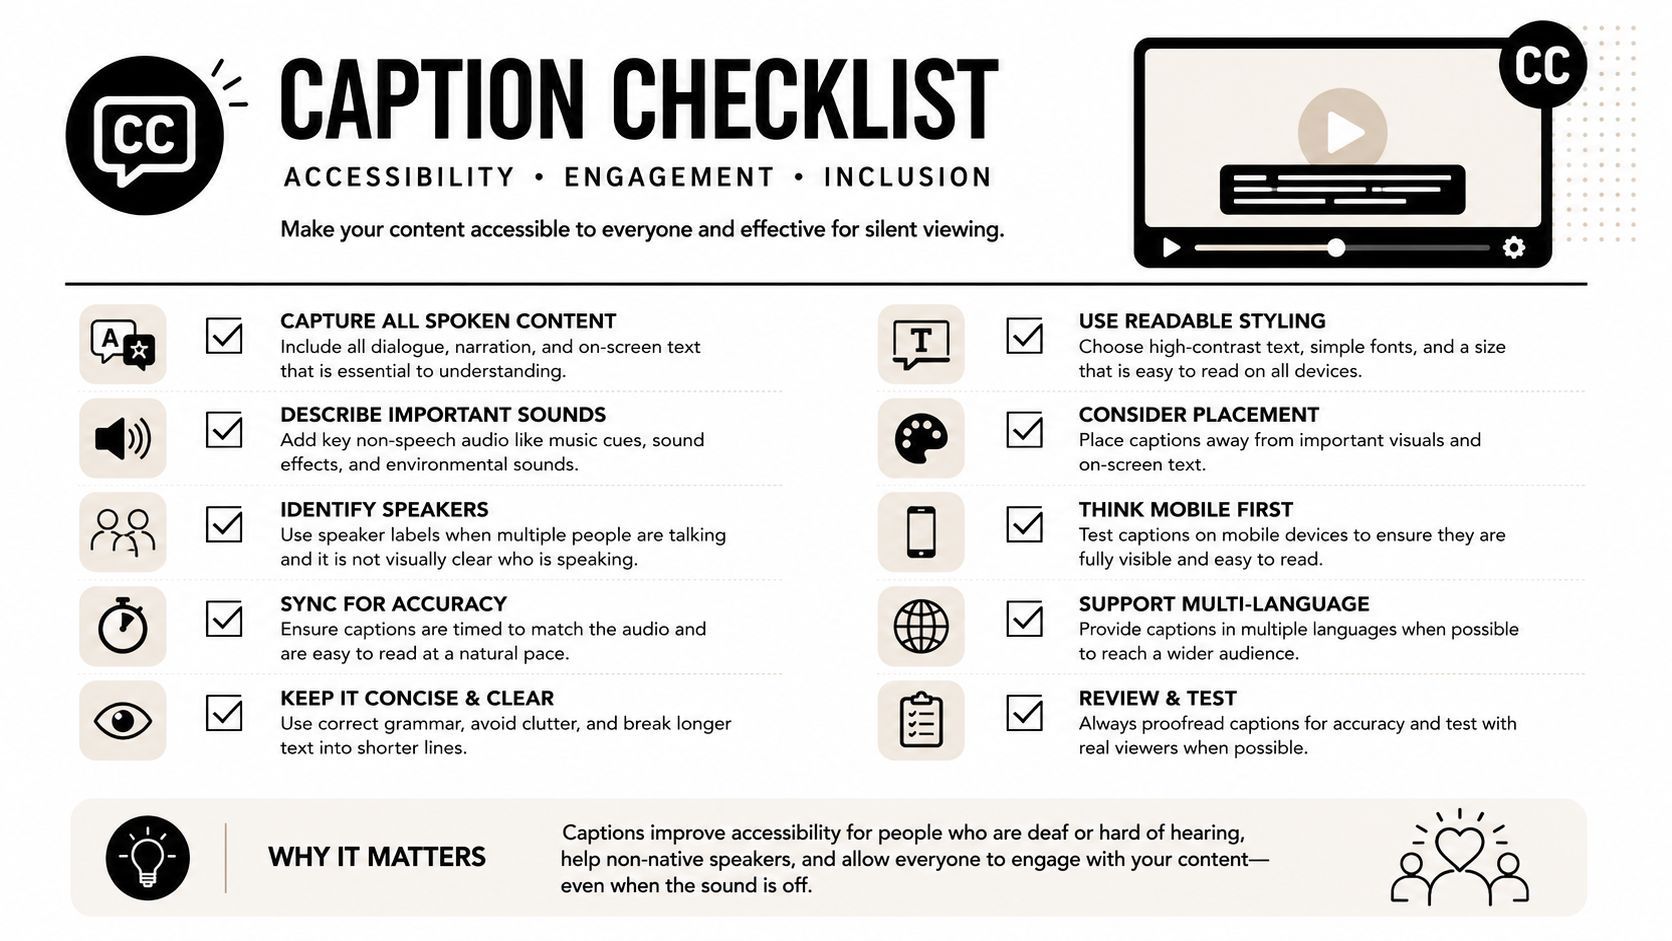
Instagram Reels doesn't support closed captions, while Facebook Reels, LinkedIn, and YouTube do. For Reels and Stories, burned-in captions are therefore the dependable option because the text remains visible inside the video itself. Native caption tools can still help on supported platforms, but they shouldn't replace an accuracy review.
Choose the right caption type
Burned-in captions are permanently rendered into the video. They work across platforms and give you control over styling, timing, emphasis, and placement. Their weakness is that viewers can't turn them off, and a bad design becomes part of the file everywhere it goes.
Closed captions are separate text tracks that viewers can toggle. They preserve a cleaner image and can support accessibility controls, but platform support and upload behavior vary. Exporting a video with attractive burned-in text doesn't automatically create a valid closed-caption track.
Auto-captioning is useful for speed, not final approval. Review names, technical terms, numbers, punctuation, speaker changes, and words that sound alike. A single incorrect term can change the meaning of a tutorial or product explanation.
Design for reading, not decoration
Keep caption lines short enough to scan. Use high contrast, a readable sans-serif font, and a background treatment that separates text from busy footage. Place captions within the safe area, away from the lower interface controls and any important facial expressions or product details.
Word-by-word highlighting can direct attention, but animation should remain restrained. If every syllable jumps, the caption layer competes with the speaker. Create a caption preset with your brand font, colors, outline, maximum line length, and default position, then adjust it only when the shot requires a different treatment.
Batching helps when one shoot produces several clips. Transcribe the selected takes together, correct recurring terminology once, then apply the approved style to each sequence. Keep an uncaptioned master so you can generate platform-specific versions without baking an unsuitable layout into every export.
The following video offers another practical reference for caption decisions and review:
Resizing and Repurposing Across Multiple Platforms
Repurposing succeeds when each export is edited for its destination, not merely resized. A 9:16 master can supply a Facebook feed crop, square cut, or horizontal teaser, but every branch needs its own framing, caption placement, opening text, and visual hierarchy.
Publishing volume makes a scalable system necessary. Analysts summarized by MarketingTechNews' summary of Metricool's 2025 report found that short-form publishing grew 71% year over year, accounts using it rose 51%, and TikTok posts increased 156%.
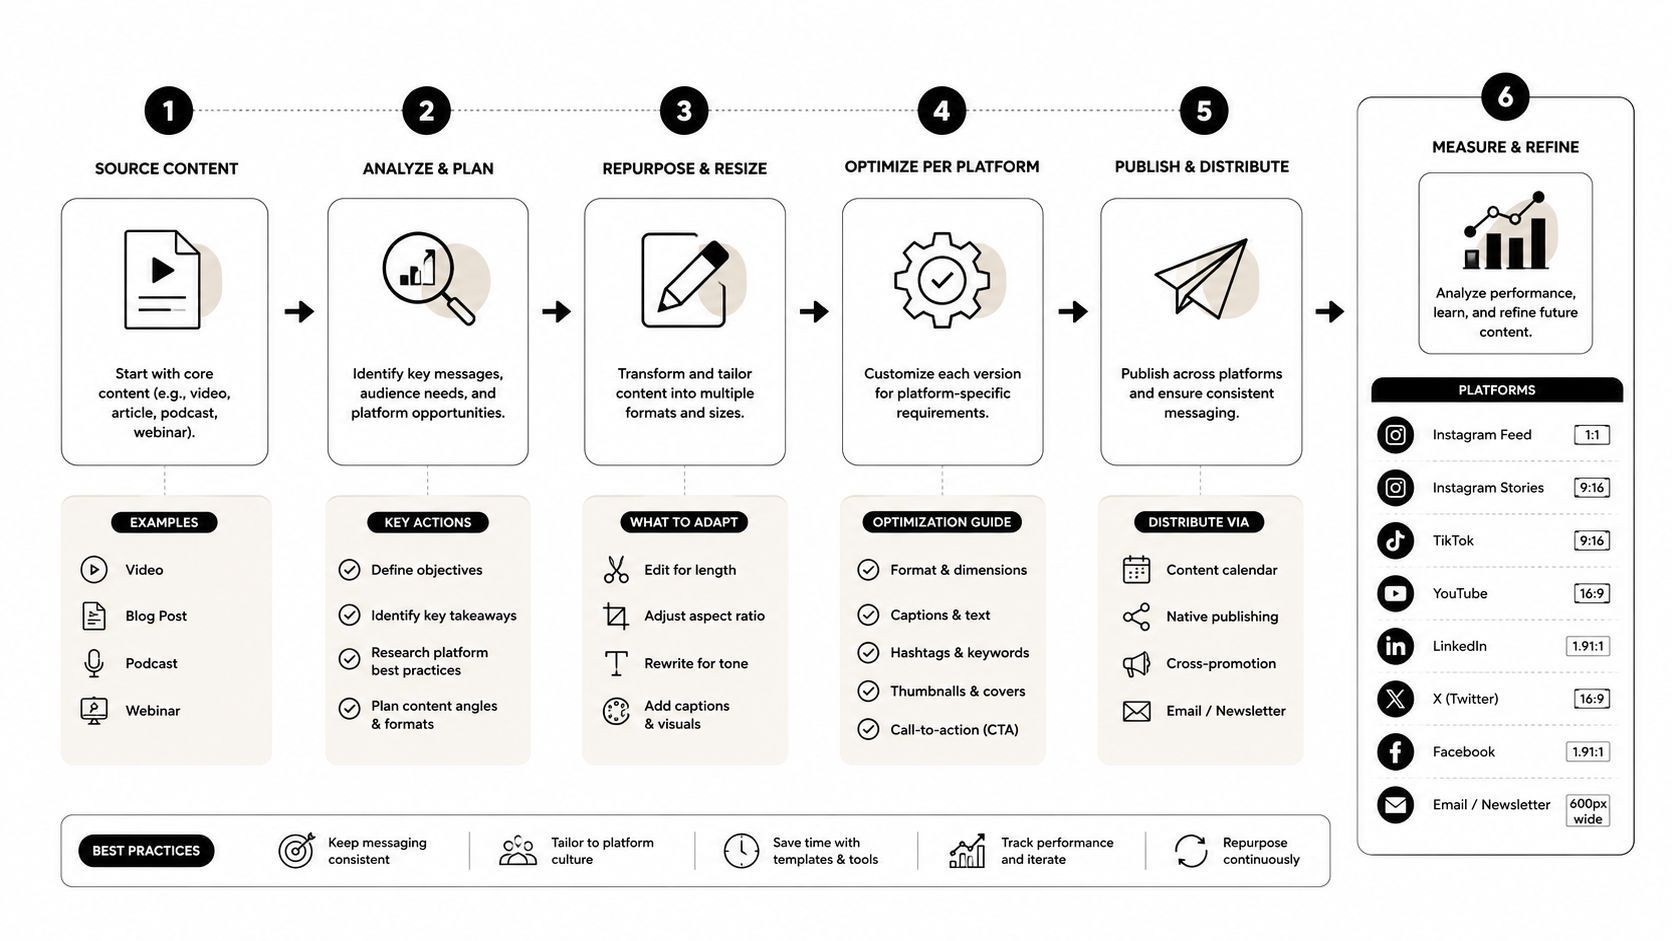
Create one master, then branch deliberately
Keep the master edit clean and flexible. Store dialogue, music, b-roll, graphics, and captions on separate tracks, so a crop or platform change does not require rebuilding the story.
For vertical output, keep the speaker or product inside the crop and leave room for readable captions. Square and 4:5 versions usually need manual repositioning rather than an automatic center crop. For a 16:9 teaser, place vertical footage inside a designed layout with supporting text or b-roll instead of enlarging it until faces and objects clip awkwardly.
Check every branch against four questions:
- Does the opening make sense without the original platform context?
- Are captions clear in this aspect ratio?
- Has cover text moved away from interface overlays?
- Does the call to action match the destination?
Repurposing should also change the hook. A TikTok cut may begin with a direct question, an Instagram version with a visible result, and a YouTube teaser with the problem before directing viewers to the longer explanation.
Tools such as ShortGenius can help assemble clips, add captions, resize outputs, apply brand elements, and organize multi-channel production. Use automation for repetitive assembly, then inspect framing and wording manually. Speed saves little if an automated crop hides the product or removes the sentence that gives the clip meaning.
For campaigns connecting attention to action, review examples of high-converting Instagram campaigns, then align the edit with the landing-page promise. The video and destination should make the same offer and set the same expectation.
Batch exports need predictable names, such as project-topic-platform-version. Keep approved masters separate from drafts, and record the hook, crop, and caption treatment assigned to each destination. This organization reduces upload errors and makes the next variation faster to produce.
Finalizing Thumbnails Hooks and Export Settings
A finished timeline isn't a finished social asset. Viewers decide whether to stop before they experience the careful pacing, clean audio, or useful explanation inside the video. The final review therefore starts with the opening frame and the first spoken idea.
Strengthen the entry point
Build the first moments around a visible action, a clear statement, or a meaningful result. Remove logos and greetings from the opening unless the brand recognition itself carries the message. The hook should work as both sound and text, because many viewers encounter the clip without sound.
Thumbnail treatment depends on the placement. Use one dominant subject, strong contrast, and a short phrase that adds information rather than repeating the title. Check the image at small size, since a detailed composition can lose its meaning when surrounded by competing feed content.
A useful pre-publish check includes:
- Opening frame: Does the first image create a clear question or expectation?
- Cover text: Is it readable against the background and positioned away from interface elements?
- Audio: Can viewers understand the speaker without excessive music or effects?
- Captions: Have names, terms, punctuation, and timing been reviewed?
- Composition: Does the crop keep the subject and product details visible?
- Export: Does the file match the intended aspect ratio, codec, resolution, and platform requirements?
- Metadata: Do the title, description, hashtags, and call to action match the actual content?
Export for reliability
For most social workflows, an H.264 MP4 export is a practical delivery format because it balances quality, compatibility, and manageable file size. Use the sequence's intended frame dimensions, avoid unnecessary re-encoding, and watch the final file from beginning to end after export. A caption that looked correct in the editor can shift, disappear, or collide with a platform overlay after rendering.
Keep a high-quality master and separate delivery files. Don't overwrite the master with a compressed social export. If a platform changes its presentation or you need a new crop later, the clean source will save time.
Scheduling should follow your audience's behavior and your publishing capacity rather than a universal posting rule. Prepare the caption, cover, tags, destination link, and version name together, then verify every upload in the platform preview before publishing.
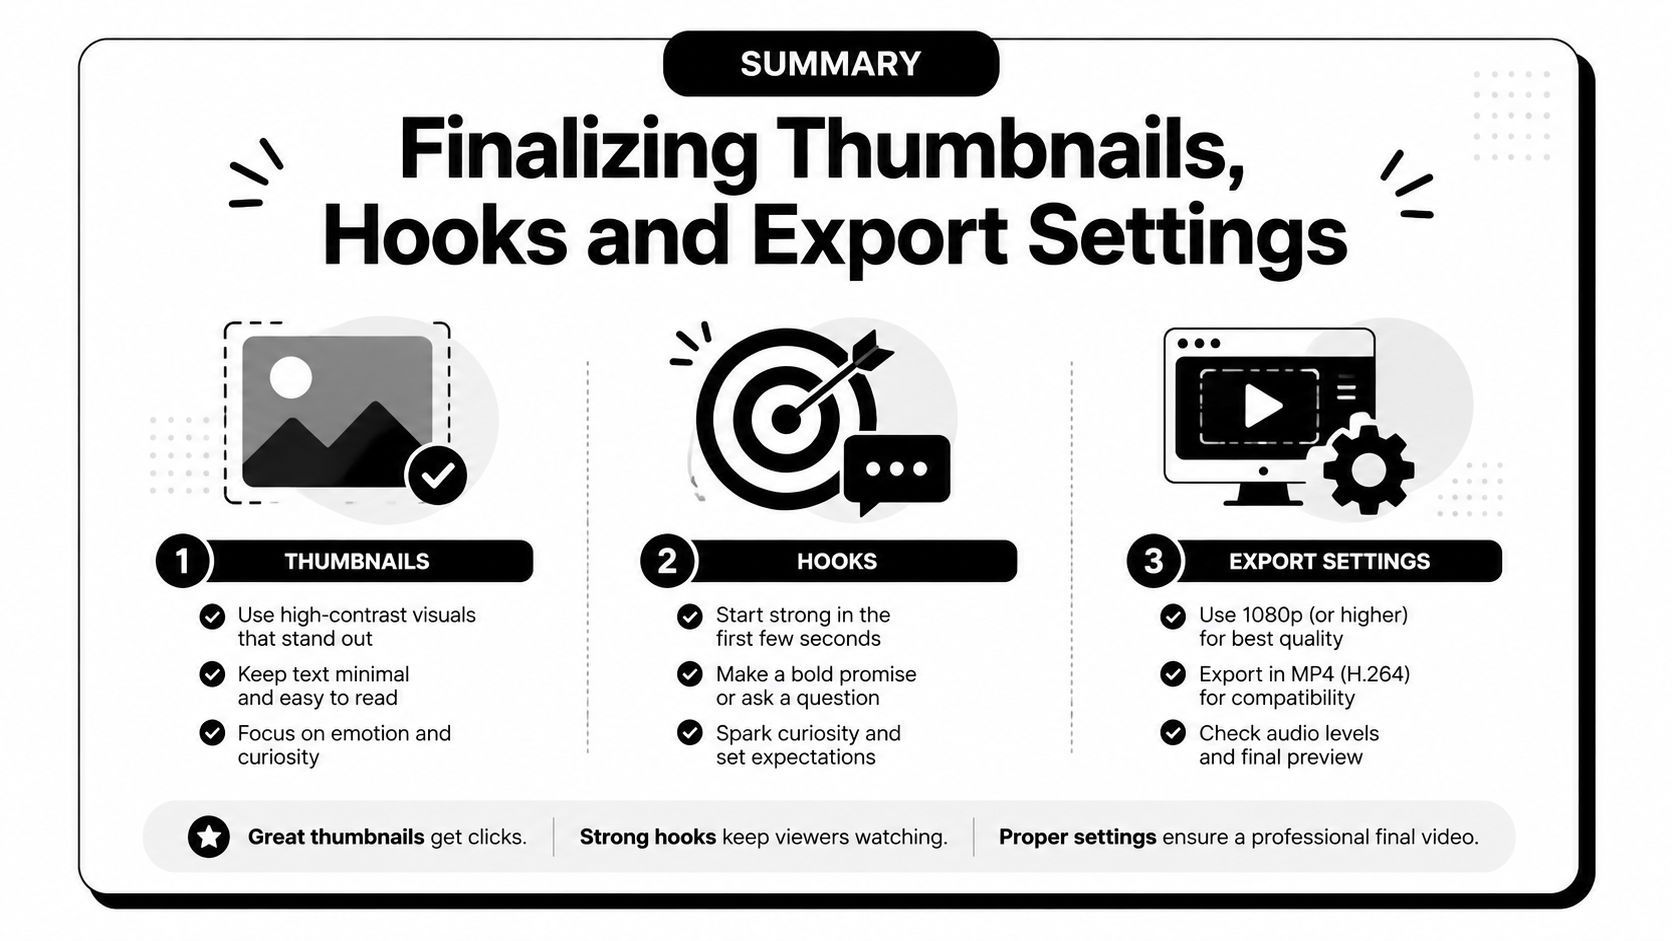
A scalable video editing for social media workflow doesn't eliminate judgment. It places judgment where it matters, in the message, the hook, the crop, the caption accuracy, and the final review, while templates and automation handle repeatable production work.
ShortGenius (AI Video / AI Ad Generator) helps creators and teams turn scripts and source material into assembled social videos with b-roll, captions, voiceovers, resizing, and platform-ready variations. Visit ShortGenius (AI Video / AI Ad Generator) to build a faster repurposing workflow without sacrificing the manual review that keeps each published version accurate and on-brand.