Reels Size Instagram Reference with Specs and Tips

Master the definitive reels size instagram specs, safe zones, export settings, and AI resizing workflows for flawless, high-engagement Reels.
You export a Reel, it looks sharp in your editor, and then Instagram softens it, chops the bottom text, or turns your carefully placed title into something half-hidden behind the interface. That's the moment most creators realize “just make it vertical” isn't enough.
Getting Reels size Instagram specs right is partly about resolution, but the bigger issue is layout discipline. A Reel has to survive several viewing contexts at once: full-screen playback, feed preview, profile grid, and interface overlays that can cover text and calls to action. If your workflow only checks the canvas size, you'll still lose important details.
This guide treats Reels like a production format, not a loose template. It covers the actual spec categories that matter, the less obvious crop behavior across feed and grid, export settings that hold up after upload, practical mistakes that waste good footage, and an AI resizing workflow for adapting one vertical master into multiple placements without rebuilding the edit from scratch.
Introduction
Most Reel problems don't start on Instagram. They start in the edit.
A creator cuts on a wide sequence, scales footage until it “looks fine,” adds subtitles near the bottom, exports a large file, and assumes the platform will take care of the rest. Then the upload goes live and the result is familiar: blurred edges, awkward framing, hidden captions, or a cover image that looks different from the actual playback frame.
That's why the Reels size Instagram conversation has to go beyond one number. Yes, the canvas matters. But so do duration limits, playback requirements, crop behavior in the feed, and the safe placement of text, faces, and CTAs.
What works is a repeatable workflow. Build on the right canvas, frame for multiple displays, export for Instagram's encoder, and resize only from a clean master. That process saves more time than fixing broken uploads after the fact.
Specification Categories and Overview
Instagram Reel specs are easier to manage when you stop treating them as one setting and start treating them as a stack of constraints. Some affect image quality. Others affect visibility. A few affect whether the upload even performs the way you intended.
This breakdown is the mental model I use before any edit starts.
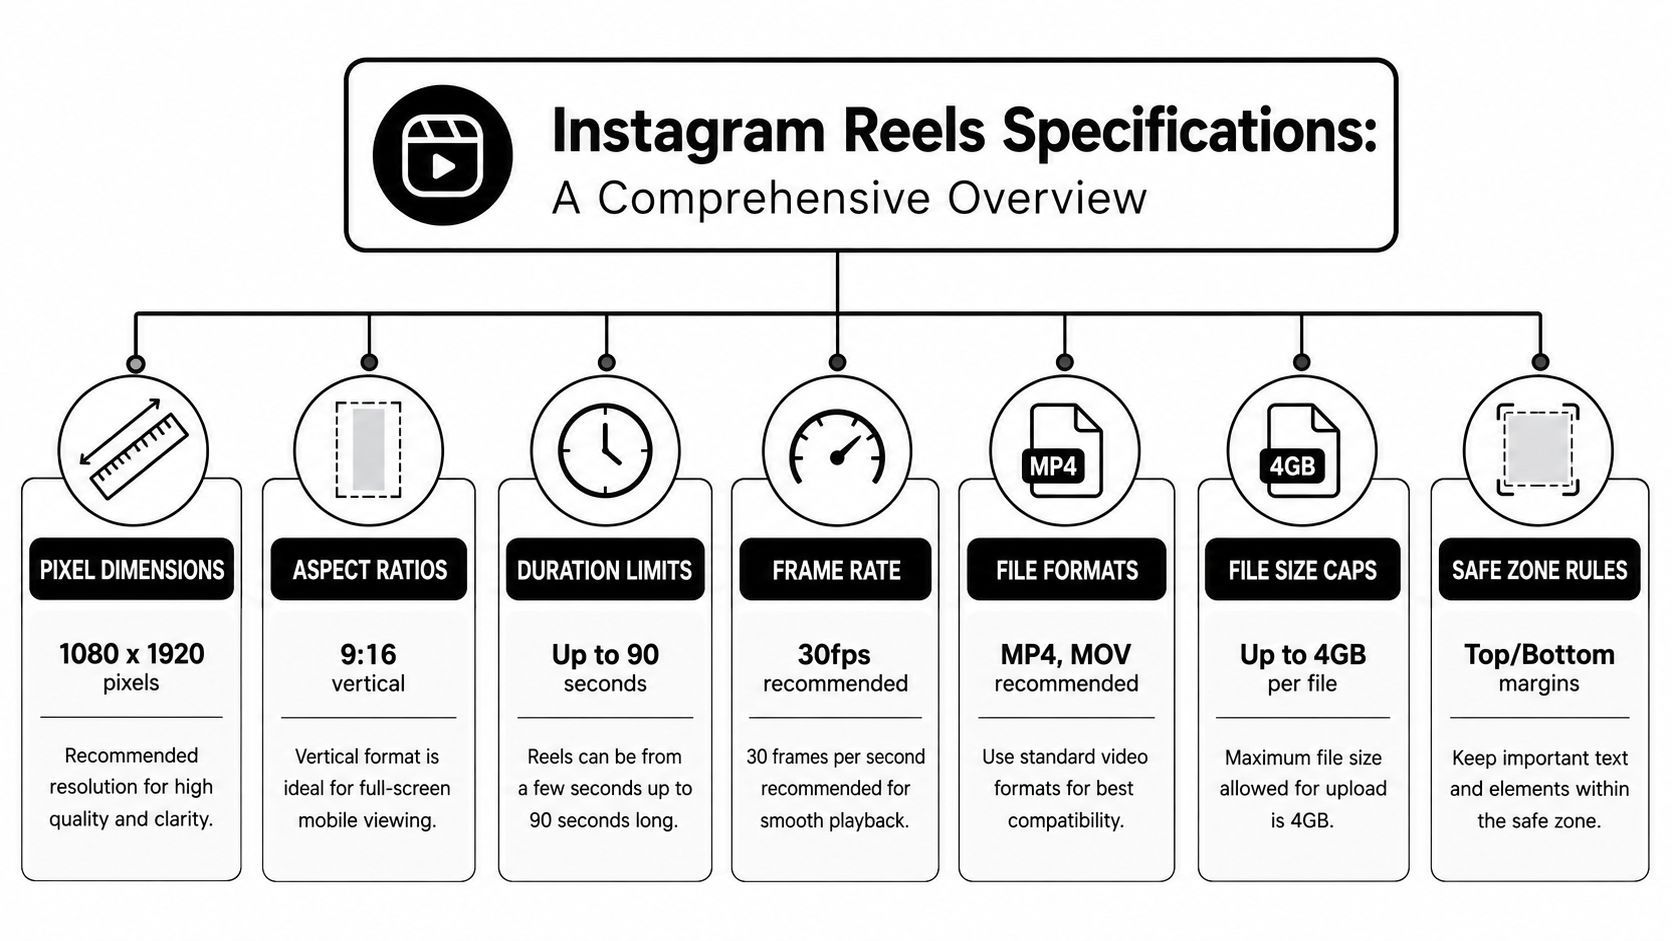
Core production categories
At the top level, Reel specs fall into these groups:
- Canvas specs. Resolution and aspect ratio define the working frame. If this is wrong, every later adjustment becomes corrective instead of intentional.
- Playback constraints. Duration and frame rate affect whether the piece feels native on the platform and whether playback stays smooth.
- Compression inputs. File format, codec, bitrate, and file size shape how Instagram re-encodes your upload.
- Display rules. Feed preview, profile grid, and full-screen playback don't show the same crop, so composition has to survive more than one view.
- Safe-zone planning. Text, faces, logos, and CTAs need placement rules, not guesswork.
How the categories interact
The common mistake is optimizing one category while ignoring the next one downstream.
For example, a creator can shoot beautiful source footage, but if it's exported on the wrong canvas, Instagram has to intervene. A technically valid upload can still fail if important text sits too low. A longer video can meet upload rules but still feel sluggish in a feed built around fast decisions and repeat views.
Practical rule: Treat your Reel like a full-screen vertical asset first, then pressure-test it for feed and grid before export.
A simple hierarchy helps:
| Category | What it controls | Why it matters |
|---|---|---|
| Canvas | Frame shape and resolution | Prevents distortion and unnecessary scaling |
| Duration | Runtime | Affects pacing and how likely viewers are to finish or loop |
| Motion | Frame rate | Keeps movement clean and playback stable |
| Compression | Codec, format, bitrate, file size | Reduces visible degradation after upload |
| Display | Feed and grid appearance | Protects framing outside full-screen view |
| Safe zone | Placement of text and key visuals | Prevents overlays and crops from hiding the message |
Once you think this way, Reel production gets calmer. You're no longer editing for a single screen. You're editing for a format that changes shape depending on where the viewer encounters it.
Pixel Dimensions and Aspect Ratio Details
A Reel can look perfectly framed in your editor and still feel off the moment it hits Instagram. The reason is simple. You are not designing for one view. You are designing for a full-screen 9:16 canvas that also gets previewed in tighter crops across feed and grid.
The production spec is still straightforward: export at 1080 pixels wide by 1920 pixels tall in a 9:16 aspect ratio. That is the working canvas for Reels, and it keeps Instagram from doing more resizing than necessary.
Higher-than-1080 exports are where creators often waste time. A 4K vertical file sounds safer on paper, but in practice Instagram still has to shrink and recompress it. That extra step can soften edges, text, and skin detail instead of preserving them. I usually keep the final master at 1080×1920 unless I need a larger archive version for other platforms or future recuts.
Under-resolution uploads fail in a different way. If the source is too small, you are asking your editor to upscale first and Instagram to compress second. That stack usually shows up as muddy detail, weak text rendering, and a less stable image during motion.
The better workflow is to build for the delivery canvas from the start:
- Set the sequence to 1080×1920
- Reframe shots inside that canvas during editing
- Check text size and subject placement before export
- Export a Reel master instead of relying on Instagram to resize for you
If you also run paid placements, compare your organic creative against Koast's ad dimension insights. Ad placements and organic Reels often share the same base canvas, but they do not always crop and overlay the same way.
The hidden issue is preview behavior. Full-screen playback uses the entire 9:16 frame. Feed preview is tighter, commonly showing a 4:5 crop, which means the top and bottom get trimmed in the places where many creators put captions, product labels, or hand gestures.
That is where spec charts stop being enough.
A Reel with perfect technical dimensions can still be poorly framed for distribution. If a face sits too high, the feed crop can crowd it. If a callout sits too low, preview views can make it feel cramped before the viewer ever opens the Reel. Grid thumbnails add another layer, because they reward centered composition far more than cinematic edge placement.
My rule is simple. Use the full 1080×1920 canvas for motion and visual energy, but compose as if the center has to survive tighter crops. In practice, that means keeping text, faces, logos, and product proof away from the extreme top and bottom unless they are decorative.
This is also where an AI resizing workflow saves time. Instead of manually rebuilding every variation, tools such as ShortGenius can help resize, reframe, and preview vertical assets faster so you can catch crop problems before upload. The point is not automation for its own sake. The point is seeing how the same Reel holds up in full-screen, feed, and grid before Instagram makes those decisions for you.
Duration and Frame Rate Details
A Reel can meet Instagram's upload rules and still drag because the timing is off.
Length affects retention, replays, and whether the cut survives preview surfaces without feeling slow. Instagram supports short Reels and, for some accounts and workflows, much longer uploads. In day-to-day production, the useful question is simpler. Does the idea earn every second on screen?
Length limits in real production
I usually pick runtime after the hook is clear, not before. A joke, reveal, product movement, or quick transformation often works best as a tight cut. A tutorial, reaction, or story can run longer, but only if each beat adds new information.
A practical editing rule is to remove setup that the visual already explains. If the viewer can understand the point from the first shot, the caption or voiceover should move straight to the payoff.
Use duration based on the job:
- Short Reels fit reveals, before-and-afters, visual hooks, and simple product moments.
- Mid-length Reels fit one idea with a quick setup and payoff.
- Longer Reels fit walkthroughs, commentary, and tutorials that need sequence and explanation.
Shorter is not automatically better. Dead time is the core issue. A 20-second Reel with clean pacing will usually outperform a 10-second Reel padded with pauses, slow title cards, or repeated clips.
Frame rate is a quality control choice
For frame rate, 30 FPS is the safe default. It matches how Reels are commonly viewed and helps avoid motion issues after Instagram recompresses the file.
Problems usually start in mixed-camera edits. A creator shoots phone footage at 30 FPS, drops in B-roll at 24 FPS, adds screen recordings at another frame rate, then exports without checking the timeline settings. The upload may still go through, but motion can look uneven, text animation can feel less clean, and fast hand movement often shows the mismatch first.
Use this simple standard:
| Editing choice | What usually happens |
|---|---|
| Set the timeline to 30 FPS from the start | Motion stays consistent through export |
| Mix source clips without conforming frame rate | Playback can look choppy or inconsistent |
| Export lower than your edit timeline | Compression artifacts and motion issues become more noticeable |
If the footage was captured at 60 FPS for smoother motion or light slow motion, keep the edit intentional. Either deliver a true 30 FPS timeline or slow the clip on purpose. Randomly mixing 30 and 60 without adjustment is where many Reels start to feel amateur.
My production bias is simple. Cut for completion first, then polish for motion. If a Reel keeps attention and plays back cleanly at 30 FPS, it is doing its job.
Safe Zone and Crop Guidance
You finish a Reel, it looks balanced in the editor, and the upload still cuts off the one thing that mattered. Usually it is the hook text in feed preview, the subtitle line sitting under Instagram's UI, or a face that looked centered in 9:16 but feels cramped once the profile grid takes over.
Safe-zone planning fixes that. Spec charts tell you the canvas size. They usually do not tell you how differently the same Reel is shown in the Reels viewer, the home feed, and your grid. Those display changes are where good edits start looking careless.
Put the message in the center, not just the frame
I treat the middle of the Reel as the protected area. Keep the hook, face, product, price, and CTA clustered around the central square region of the vertical canvas. The top and bottom can still carry motion, background action, texture, or supporting text, but the core message should survive a tighter crop.
That trade-off matters. A dramatic full-height composition can look stronger in the editor, but if the sale price, subtitle line, or talking head sits too close to the edge, feed and grid views will punish it.
A practical placement order:
- Faces and speaking subjects should stay near center so eye contact still works in tighter previews.
- Hook text should sit above the lower interface area and below the top edge, with enough padding on both sides.
- CTAs need space around them. If the button language or URL cue sits near the bottom, it is the first thing to get crowded.
- Logos, disclaimers, and fine detail belong in safer positions only if they need to be read. Otherwise treat them as secondary.
The hidden crop problem is not only vertical
Many creators check top and bottom clearance, then forget the grid crop. That is the miss.
A Reel can look fine in full-screen playback and still fail on your profile because the grid preview is tighter and less forgiving. If the thumbnail moment depends on text pushed wide to the left or right, or on a subject framed low for style, the grid can turn a clear composition into a confusing one. The same problem shows up in feed previews, where the visible area often feels more square than the original edit.
I use a simple rule. If the Reel has to sell the idea at a glance, the center square has to make sense on its own.
Bottom overlays cause the most avoidable mistakes
Instagram places interface elements over the lower part of the screen. Burned-in captions often collide with that area first, especially when they are large, multiline, or animated.
Keep lower-third text higher than feels necessary in the editor. That extra margin rarely hurts the design, and it prevents the common upload surprise where subtitles, offer text, or a “follow for part 2” line lands under the UI.
If text feels barely safe, it is not safe.
A fast crop check before export
Run this check before rendering:
- View the edit with guides off and ask whether the main idea still reads in a center-heavy crop.
- Pause on the cover frame and check whether it still works in a square grid view.
- Look for subtitles, price points, and CTAs near the lower edge.
- Nudge any borderline text inward before export.
If you use AI resizing tools such as ShortGenius later in the workflow, this check still matters. AI can resize and reframe quickly, but it cannot always guess which word, face, or product label must remain visible across every Instagram surface. The fastest workflow is to compose with crop changes in mind first, then use AI to generate safe variations instead of repairing a weak layout after the fact.
Export Recommendations and Best Settings
A Reel can look sharp in your editor and still arrive on Instagram softer, tighter, or more cramped than expected after upload. Export settings decide how much quality you keep, but they also affect whether your framing survives compression and display shifts across feed, grid, and full-screen playback.
The export goal is a clean, predictable file. Instagram will recompress it anyway, so sending an oversized master usually adds weight without protecting detail.
The safest baseline is MP4 with H.264 video and AAC audio.
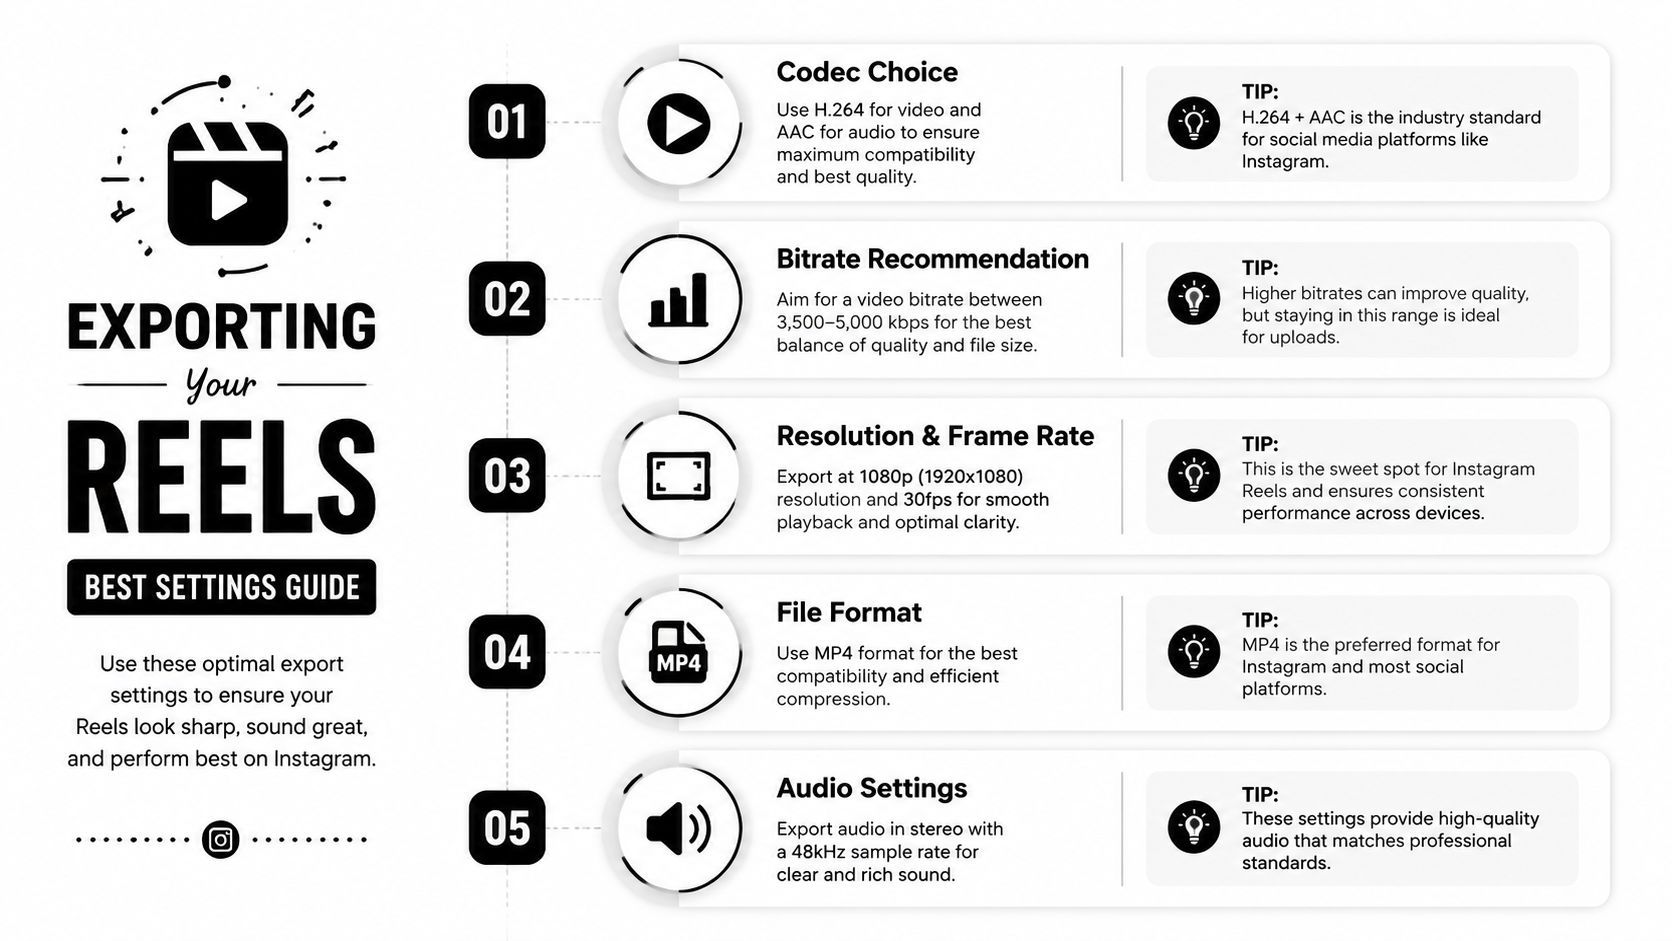
Export settings that hold up
Here is the preset I use for standard Instagram Reel delivery:
- Format: MP4
- Video codec: H.264
- Audio codec: AAC
- Canvas: match the final Reel sequence
- Frame rate: export at the same frame rate as the edit
- Bitrate: moderate, not excessive
Bitrate is where many creators overdo it. A heavily compressed source will not become cleaner with a huge export, and an oversized file gives Instagram more work on the final transcode. If the source is good, a moderate bitrate usually holds up better than bloated settings pushed far past platform needs.
File size matters for workflow too. Keep exports reasonably light so uploads finish cleanly on mobile and do not invite another round of avoidable compression because the file was built for archival, not social delivery.
Practical editor workflow
Set the vertical canvas at the start of the edit. That sounds basic, but it solves a lot of delivery problems before export.
In Premiere Pro, I keep the sequence in the final Reel dimensions, export with H.264, and check the rendered file on a phone before upload. Desktop preview is not enough. Text that looks comfortably placed in-program can still feel low once Instagram adds its interface.
In Final Cut Pro or DaVinci Resolve, the same rule applies. Build for the final frame first, then export exactly what you approved. If the Reel will also be reused elsewhere, make a platform-specific version instead of one master file and a stack of last-minute crops.
That trade-off is worth it. One universal export saves a few minutes. Separate exports usually save the post.
Where export and cropping intersect
Export quality is only half the job. The other half is preserving composition across Instagram surfaces that do not display the Reel the same way.
A frame can be technically correct at export and still fail in the feed preview or profile grid because the subject sits too high, text runs too low, or the cover was chosen without checking the tighter visible area. This is why I treat export as the final quality pass, not just a render button. I check the actual output, pause on the cover, and confirm the center composition still carries the message if Instagram trims the presentation.
If you use ShortGenius to resize or adapt the same creative for multiple placements, export a clean vertical master first. Then let the AI handle alternate versions and reframing passes. That workflow is faster than trying to rescue a weak crop after compression has already softened the file.
A quick troubleshooting table helps catch the usual problems:
| Problem | Likely cause | Fix |
|---|---|---|
| Soft image after upload | Export built from weak scaling or an oversized render | Export from the final target canvas |
| Visible artifacting | Re-exported files stacked through multiple rounds of compression | Use the cleanest master and limit export passes |
| Audio issues | Codec or export mismatch | Stick with AAC in an MP4 |
| Text feels cramped after posting | Framing problem, not an encoding problem | Reposition elements before export |
Common Mistakes to Avoid
A Reel can look right in the editing timeline and still fail once Instagram starts trimming it for different surfaces. I see this most often with videos that were built for full-screen playback, then judged only by that view. The feed preview and profile grid expose mistakes fast.
The costly errors are rarely technical in an obvious way. They are framing mistakes, timing mistakes, and workflow mistakes that force a weak crop at the end.
Mistakes that keep showing up
- Starting from a horizontal master and forcing vertical later. The file may still export cleanly, but the composition usually breaks. Faces sit too high, captions get squeezed, and the center of the frame stops doing the work.
- Placing text where only the full-screen viewer can see it comfortably. A Reel can be readable in playback and messy in the feed preview or on the grid cover. Those are different checks.
- Choosing a cover without testing the tighter crop. This is one of the most overlooked problems. A cover that looks balanced in the full frame can cut off a face, title, or product once it lands on the profile grid.
- Rendering oversized files from the wrong canvas. Large exports do not protect quality if the edit was scaled poorly upstream. They just give Instagram more file to recompress.
- Letting the edit arrive late. Long intros, slow title cards, and delayed hooks hurt retention before the viewer even reaches the point.
One habit causes several of these at once. Creators finish the edit, export it, upload it, and only then notice that the speaking subject sits too low for the feed or that the cover text gets clipped on the grid.
That is avoidable.
My rule is simple. Approve a Reel in three views before posting: full-screen playback, feed preview, and profile grid cover. If the message only works in one of those, the framing is not finished yet.
The mistake behind the mistake
A lot of weak Reels are not bad edits. They are bad adaptations.
Teams often build one version, then try to make every placement accept it. A better workflow is to build a strong vertical master, keep the subject and key text near the center, and create alternate crops before export if the same asset needs to work elsewhere. If you use ShortGenius for resizing, let it handle the first reframing pass, then review manually for cover crop and feed visibility. AI saves time, but it will not always know which word, face, or product edge matters most.
The practical test is blunt. If someone can understand the Reel without relying on tiny lower text or edge detail, the asset is usually safe. If the story depends on the perimeter of the frame, expect problems after upload.
Cross-Posting and Display Variations
A single Reel doesn't appear the same way everywhere inside Instagram. That's why one master can look perfect in playback and still feel off on your profile or in the main feed.
The platform asks creators to think in layers. Full-screen viewing is immersive. Feed presentation is more selective. Grid display is even stricter. If you ignore those differences, your content can feel inconsistent even when the file itself is technically correct.
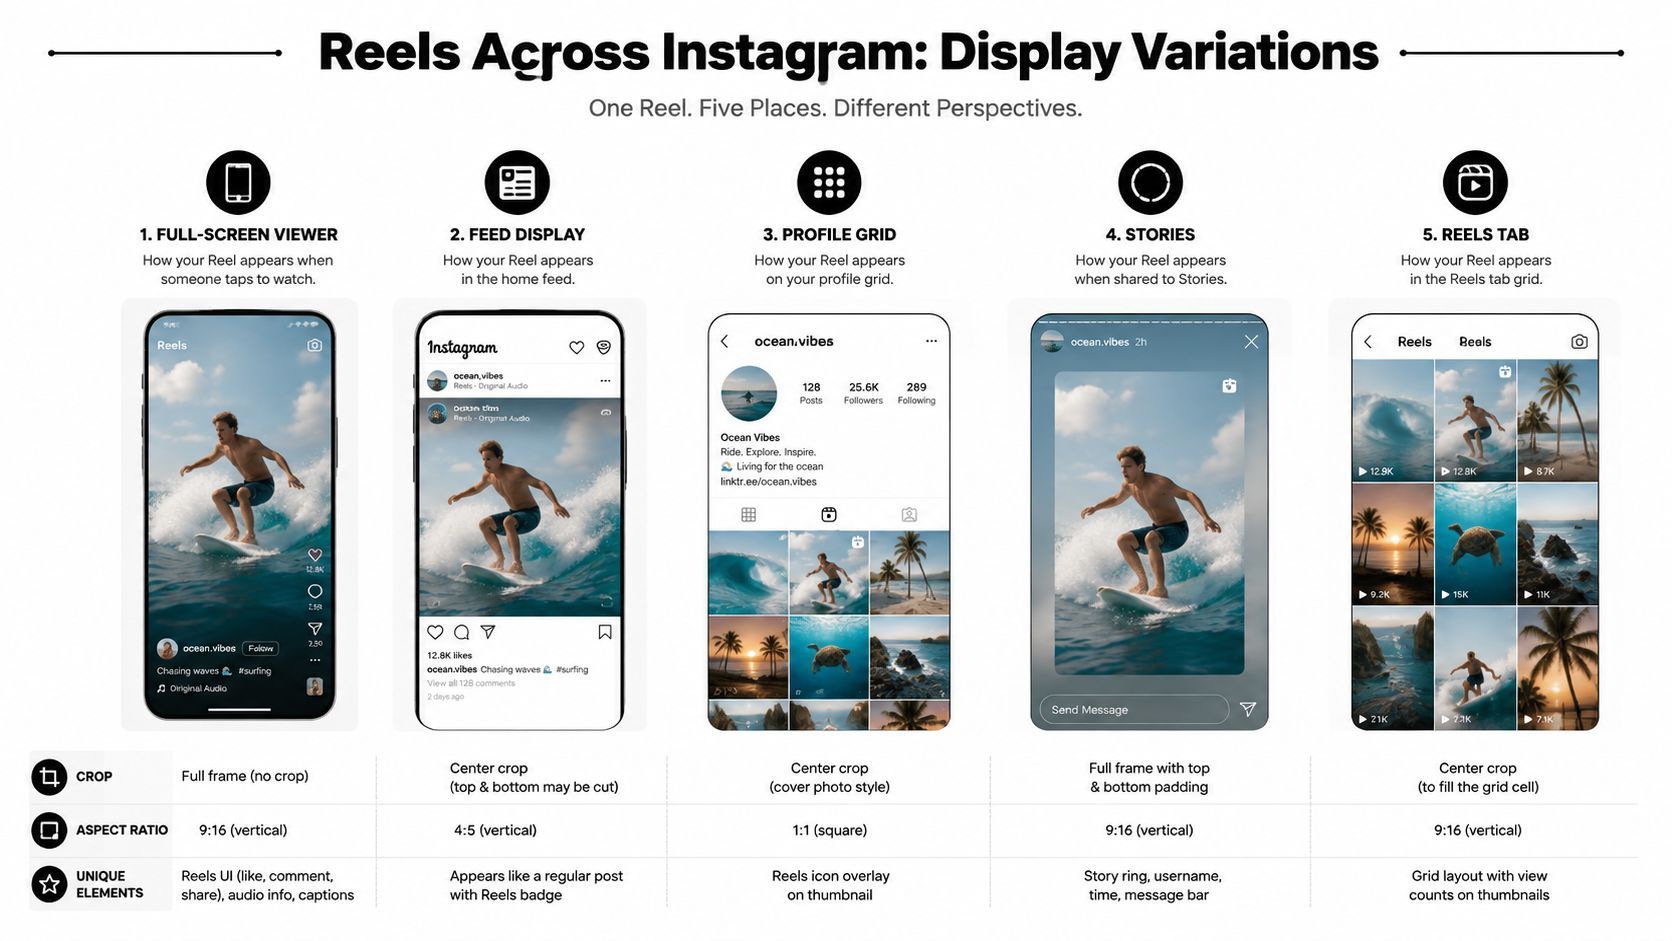
How one Reel shifts across placements
Here's the practical comparison:
| Placement | What changes | What to watch |
|---|---|---|
| Full-screen viewer | The Reel feels closest to your intended edit | Great for immersive framing, but overlays still matter |
| Main feed | The preview becomes more restrictive | Top and bottom composition matter less than center clarity |
| Profile grid | The crop gets more selective | Covers and title placement matter more |
| Stories share | Context and interface change | Keep the message readable without relying on tiny text |
| Reels tab | The content feels more native to vertical browsing | Strong opening frames matter a lot |
When one canvas is enough and when it isn't
If the Reel is simple, such as a talking head, product demo, or clean motion graphic, one well-framed vertical master is often enough. You just need disciplined placement of key elements.
If the piece uses dense text, side-by-side layouts, or edge-driven design, separate versions may be worth the extra step. Feed preview and profile presentation can't always carry the same composition equally well.
A few practical habits help:
- Choose a deliberate cover image instead of trusting a random frame.
- Check the profile grid crop before publishing if your page aesthetic matters.
- Build with a central message area so the Reel survives reduced display space.
- Avoid tiny labels and fine print that only work in full-screen playback.
Cross-posting inside Instagram is less about duplication and more about resilience. A good Reel keeps its meaning when the platform changes the frame around it.
Quick Resizing Workflow Using ShortGenius
Once you have a clean vertical master, the fastest way to repurpose it is to resize from that master, not from a previously exported crop. That preserves composition logic and reduces the chance of stacking compression or misaligned graphics.
For teams that need multiple versions quickly, ShortGenius can handle AI-assisted resizing, brand kit application, and export across formats from a single source file.
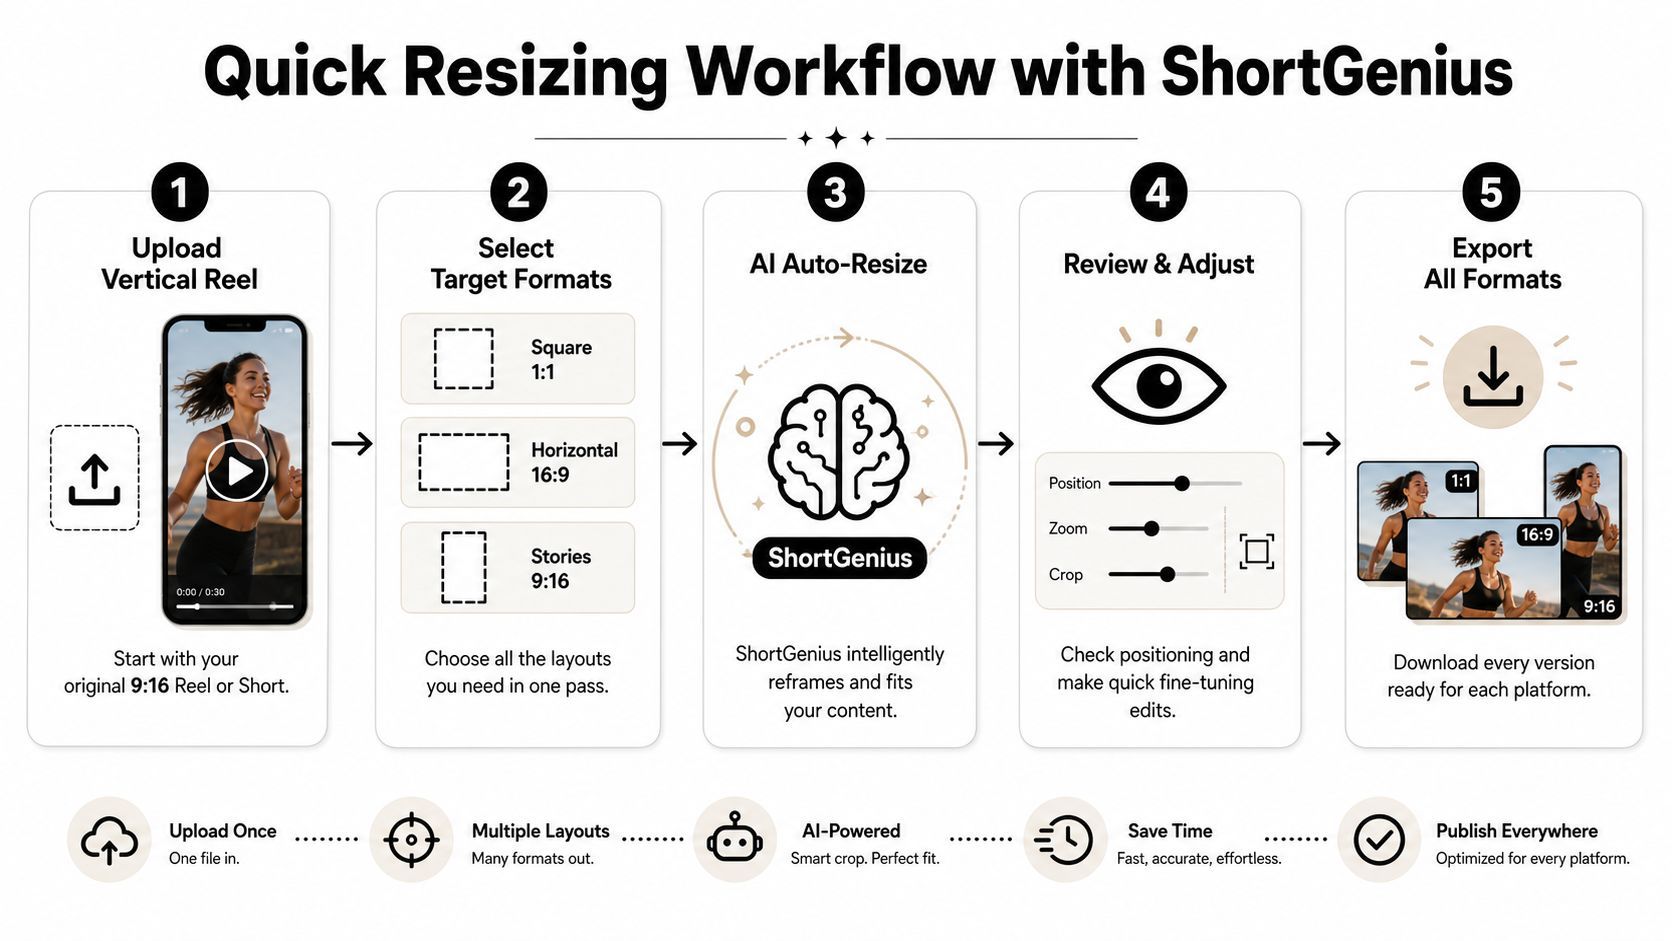
A practical resizing sequence
Start with your finished vertical master, not your raw clips. The master already contains your approved timing, captions, and visual rhythm.
-
Upload the approved Reel master
Bring in the final vertical file after you've checked crop safety and subtitle placement. -
Select target formats
Choose the placements you need, such as square for feed-heavy channels, horizontal for broader reuse, or another vertical output for Stories and short-form platforms. -
Run the AI resize pass
Let the tool reposition the frame and adapt the layout automatically as a first pass. These time savings become most apparent in a real production workflow, because manual reframing across multiple outputs is repetitive and easy to get wrong.
What still needs a human check
AI can handle the heavy lifting, but it shouldn't get final approval without review.
Check focal framing
If the subject moves a lot, confirm that the crop still prioritizes the right person or object. Auto-framing usually gets close, but “close” isn't enough when a face, product, or on-screen demo is the point.
Check overlays and captions
Even a good automated resize can push text into a weak position for a new aspect ratio. Review all title cards, lower-thirds, subtitles, and CTA screens with the same safe-zone mindset you used for the original Reel.
A resizing tool should shorten the mechanical work. It shouldn't replace judgment about framing and readability.
Export the full set together
The biggest workflow gain comes from approving all versions in one pass. Instead of rebuilding captions, logos, and scene crops manually in separate timelines, you adjust once, confirm, and export a package ready for publishing across channels.
That kind of system is especially useful for agencies, social managers, and solo creators publishing the same idea in several places without wanting each platform to become a fresh edit.
Quick Reference Cheat Sheet
When you're on deadline, you don't want to reread a long guide. You want a short list that keeps your export and framing decisions clean.
Here's the working cheat sheet I'd keep next to any Reel edit.
Instagram Reels Quick Reference
| Parameter | Recommended Value |
|---|---|
| Resolution | 1080 × 1920 |
| Aspect ratio | 9:16 vertical |
| Minimum accepted length | 3 seconds |
| Standard upload limit for most users | 90 seconds |
| Extended maximum for select creators | 15 minutes |
| Best-performing short range | 7 to 15 seconds |
| Strong reach and completion range | 7 to 30 seconds |
| Minimum resolution floor | 720 pixels |
| Frame rate | 30 FPS minimum |
| File format | MP4 |
| Video codec | H.264 |
| Audio codec | AAC |
| Recommended bitrate | ~3,500 kbps |
| File size cap | 4GB |
| Practical file-size target | Under 512MB |
| Feed preview appearance | 1080 × 1350 |
| Safe placement area for key content | Central 1:1 square |
| Lower UI caution area | Keep bottom 14% clear |
The most useful way to apply this sheet is simple. Build the edit on the right canvas, protect the center, clear the lower area, keep the runtime tight, and export for Instagram's actual delivery behavior instead of for your editor preview.
If you're turning one Reel into a repeatable content system, ShortGenius (AI Video / AI Ad Generator) can help you generate, resize, edit, and package platform-ready short-form videos from a single workflow, which is especially useful when you need Instagram-ready vertical outputs alongside versions for other channels.