Boost Your Video: reduce size of mov file Without Quality Loss
Discover how to reduce size of mov file in 2026 with codecs, bitrate tips, and simple tools to compress MOV without quality loss.
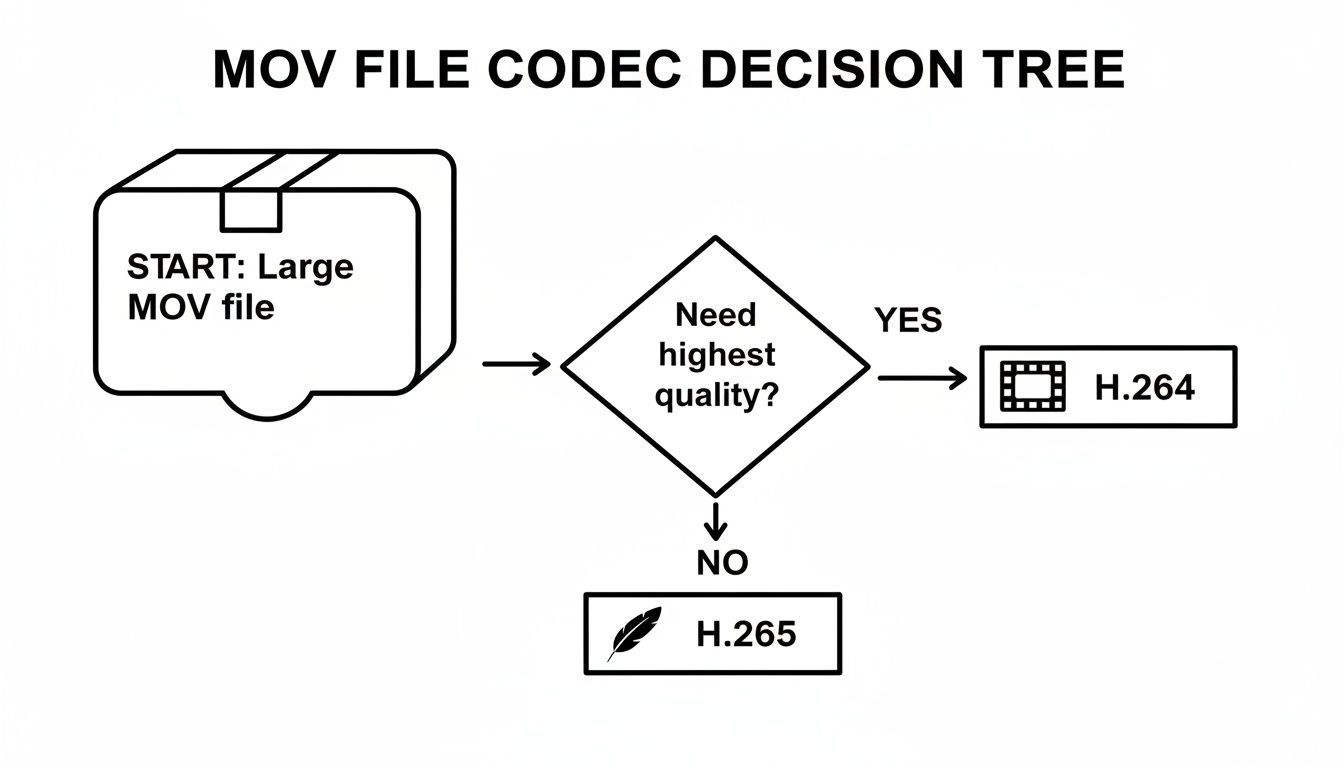
If you need to quickly reduce the size of a .mov file, your best bet is to re-encode it using a more efficient video codec, like H.265 (HEVC). By doing that and tweaking a few other settings, it’s entirely possible to shrink your file by over 50% without a noticeable drop in visual quality.
What Makes MOV Files So Big, and How Do You Shrink Them?
Ever finished a video project only to be hit with a shockingly large file size? You’re not alone. MOV files, the container format developed by Apple, are fantastic for the editing process because they’re built to preserve a massive amount of image data. This is exactly why they're the standard for iPhones and many professional cameras.
That high quality, however, comes with a trade-off: file size. The video and audio data packed inside a MOV file are often uncompressed or use codecs optimized for quality, not efficient storage or streaming. It's like a raw photo from a DSLR versus a JPEG—the raw file gives you maximum editing flexibility, but the JPEG is what you actually share online.
The Real Culprits Behind Large File Sizes
A handful of technical factors are responsible for bloating your MOV files. The biggest offenders are usually the video codec, bitrate, resolution, and frame rate. A professional camera shooting in a ProRes codec, for example, is perfect for post-production but creates files that are impractical for sharing.
The goal isn’t just about making the file smaller; it’s about finding the perfect balance between file size and visual quality. For most content destined for the web, you can dramatically reduce the size of a MOV file before anyone would notice a difference on a phone or laptop.
To get this right, you need to understand the four key levers you can pull:
-
Video Codec: Think of a codec as the language used to compress video. Simply switching from an older, common codec like H.264 to a modern one like H.265 (HEVC) can make a huge difference.
-
Bitrate: This is the amount of data allocated to each second of video. Lowering the bitrate directly shrinks the file, but if you go too low, you'll start seeing blocky, pixelated artifacts.
-
Resolution: A 4K video has four times as many pixels as a 1080p video. Downscaling is an easy win, especially if the video is meant for platforms like Instagram or TikTok where viewers won't see the full 4K detail anyway.
-
Trimming: Sometimes the most straightforward solution is the best one. Just shaving off a few unnecessary seconds from the beginning or end of your clips can add up to significant savings.
Quick Guide to Reducing MOV File Size
Before diving into specific tools, it helps to know which method to use for your situation. Here’s a quick breakdown of the most effective compression techniques and the trade-offs involved.
| Method | Potential Size Reduction | Impact on Quality | Best For |
|---|---|---|---|
| Switch to H.265 Codec | 40-50% | Minimal; nearly identical to H.264 at a much lower bitrate | Archiving footage, streaming 4K video, or maximizing storage space. |
| Lower the Bitrate | 30-70% | Moderate to high; aggressive reduction can cause artifacts | Creating multiple versions of a file for different bandwidths. |
| Downscale Resolution | 50-75% | Noticeable, but often acceptable for smaller screens | Sharing on social media or for viewing on mobile devices. |
| Trim/Remove Audio | 5-20% | None to video; audio is either cut or removed entirely | Removing dead air, creating silent clips, or making short GIFs. |
Each of these methods offers a path to a smaller file, but the best results often come from combining two or more of them. For instance, converting to H.265 and lowering the bitrate slightly can deliver huge savings with almost no perceptible loss in quality.
Mastering Codecs to Intelligently Compress Your MOV Files
If you're looking for the single most effective way to shrink a MOV file, this is it. Forget everything else for a moment and focus on the codec. A video codec—short for compressor-decompressor—is the algorithm that does the heavy lifting of shrinking your video data. Choosing the right one is the key to balancing file size and visual quality.
For years, the go-to codec has been H.264 (also known as AVC). It’s the old reliable standard; it works on just about any device you can think of and gets the job done. But technology moves on, and its successor, H.265 (or HEVC), is a much more efficient and powerful option for modern video.
Understanding H.264 vs. H.265
Think of it this way: H.264 packs your video into a standard-sized box. It fits, but there's wasted space. H.265, on the other hand, is like a custom-molded case that fits the exact shape of your content, offering the same protection in a much smaller package.
This isn't just a minor improvement—it's a huge deal in practice. Let's say you just finished a 10 GB 4K video for a client's social media campaign. Switching from H.264 to H.265 can easily cut that file down to around 5 GB. That’s not just a smaller file; it means faster uploads, lower cloud storage bills, and a smoother workflow for everyone involved.
The core advantage of H.265 is its ability to achieve the same visual quality as H.264 at a much lower bitrate. This means you can create a significantly smaller file that looks just as good to the human eye.
The numbers back this up. Most benchmarks show that H.265 delivers between 25% and 50% better data compression than H.264 for the same level of quality. I’ve seen it myself countless times: a huge 10 GB master file becomes a crisp 5 GB H.265 file with no perceivable loss in detail. You can dig into more compression benchmarks on Compresto's blog if you want to see the data.
How to Re-Encode a MOV File to H.265
So, how do you actually make the switch? One of the best tools for the job is HandBrake, a free, open-source video transcoder that gives you all the control you need.
Once you open your MOV file in HandBrake, you'll see a dashboard of options. Don't get overwhelmed. For a high-quality, small-file-size export, you only need to focus on a few key settings.
Here’s the simple recipe I use for great results:
- Video Encoder: The default is often H.264. Change this to H.265 (x265). You can ignore the 10-bit or 12-bit options unless you're specifically working with HDR video.
- Framerate: Always set this to "Same as source." Changing the frame rate can introduce stutter or weird motion artifacts, so it's best to leave it untouched.
- Quality Setting (RF): This is where you have the most control. Instead of guessing a bitrate, use the Constant Quality slider, which is measured as a "Rate Factor" or RF. For H.265, a good starting point for excellent web video is an RF value between 22 and 28. Remember, lower numbers mean higher quality (and bigger files).
After dialing in those settings, just hit start. The H.265 encoding process takes a bit more computational power, so it might be slower than an H.264 export, but the file size savings are almost always worth the extra few minutes. For anyone who deals with video regularly, getting comfortable with H.265 is one of the most practical skills you can learn.
Picking the right codec is a huge first step, but the real magic happens when you start tweaking your video's export settings. This is where you can get surgical, adjusting the bitrate, resolution, and frame rate to strike that perfect balance between a crisp-looking video and a file size that won't take all day to upload.
Think of these settings as your control panel for file size. A few small changes here can make a massive difference.
Dialing in the Perfect Bitrate
Let’s get one thing straight: bitrate is probably the biggest factor in your final file size. It's the amount of data used for every second of video, so a higher bitrate means more detail, but also a much, much larger file.
Instead of just guessing, your best bet is to use a Variable Bitrate (VBR) setting. This is a smart approach where the software uses more data for complex, fast-moving scenes and less for simple, static shots. It’s way more efficient than a constant bitrate.
So, what numbers should you use?
- For social media (Reels, Shorts, TikTok): You can be pretty aggressive here. Viewers are on small screens, so a target bitrate between 2,000 and 5,000 kbps for a 1080p video usually looks great.
- For high-quality projects (YouTube, client work): If quality is the top priority, you’ll want to aim higher. For 1080p, something in the 8,000 to 12,000 kbps range is a solid target.
My best tip? Create export presets. I have an "Instagram Reel" preset and a "YouTube 1080p" preset in my editor. I don't have to remember the numbers every time, and it makes my workflow so much faster. I just pick the destination, and I know the settings are already dialed in.
And don't forget to check the platform's own recommendations. You can find guides on the optimal export settings for Instagram and other sites that will save you from any nasty upload surprises.
Smartly Scaling Your Resolution
Here’s an easy win: downscale your resolution. Ask yourself, does this video really need to be in 4K? If it's headed for a phone screen, the answer is almost always no.
Knocking a 4K video (3840x2160) down to 1080p (1920x1080) is one of the most effective ways to shrink a file. It’s not a small change—you can easily see a size reduction of up to 75%. The video will still look perfectly sharp on phones, tablets, and most laptops.
This is a simple setting to change in any video editor or a tool like HandBrake. Just look for the resolution or dimensions in your export panel and choose 1080p. It's a lifesaver for anyone creating a lot of content on a tight schedule. And if you're looking for even more ways to streamline content creation, you can explore tools that help make videos from images with AI. https://shortgenius.com/models/image-to-video
Choosing an Appropriate Frame Rate
Finally, let's look at the frame rate, measured in frames per second (fps). Shooting at 60fps is great for silky-smooth slow-motion, but it doubles the data compared to 30fps. For most content, it's complete overkill.
Here's a quick breakdown:
- 60fps: Only use this for gaming, sports, or if you know you need to create slow-motion effects.
- 30fps: This is the standard for almost all online video. It looks smooth and natural to the human eye. Dropping from 60fps to 30fps will cut your file size in half.
- 24fps: This gives you that "cinematic" feel and will result in the smallest file size of the three.
For most of what you post online, changing from 60fps to 30fps is a no-brainer. Your audience won't know the difference, but your hard drive will thank you. When you start combining these techniques, the savings really add up. Just re-encoding a file might shrink it by 66%, but if you also trim dead space and adjust these settings, you can see total size reductions of over 89%.
Picking the Right Tool for the Job
Alright, you've got the theory down. Now it's time to get your hands dirty and pick the software that will actually shrink that MOV file. While there are tons of best video editing tools that can export smaller files, dedicated compression apps are often more efficient.
The right tool for you really boils down to three things: your technical comfort, the level of control you want, and how fast you need it done. Let's walk through my favorite options, each suited for a different kind of workflow.
HandBrake: The Power User's Free Choice
If you're the type of person who loves to dial in settings perfectly, look no further than HandBrake. It's a completely free, open-source video transcoder that gives you incredible control over every part of the compression process. We're talking codecs, bitrates, audio tracks, filters—you name it.
I'll be honest, the interface can look a bit overwhelming at first glance. But the beauty of HandBrake is its fantastic library of presets. You can easily start with something like "Fast 1080p30" and then just tweak a few key settings to get the result you want.
For a solid balance of quality and file size, my go-to recommendation is to select the H.265 (x265) encoder. Then, play with the Constant Quality slider (RF value), aiming for a number somewhere between 22 and 28. This range usually hits the sweet spot.
QuickTime Player: The Simple Mac Solution
Are you a Mac user who just needs to shrink a file without all the fuss? You’re in luck. You already have the perfect tool: QuickTime Player. It’s built right into macOS and has a surprisingly effective export feature.
It doesn’t have the deep-dive settings of HandBrake, but for a quick and easy size reduction, it's a lifesaver.
- Open your MOV file in QuickTime Player.
- Navigate to File > Export As.
- From the menu, choose a lower resolution like 1080p or 720p.
This one action tells QuickTime to re-encode your video using optimized settings, spitting out a much smaller MP4 file that’s perfect for sharing. I use this all the time for trimming down screen recordings or iPhone videos before I send them off.
Pro Tip: Exporting a 4K video as a 1080p file in QuickTime is one of the fastest ways to slash the file size by up to 75%. It's my secret weapon for getting videos ready for social media in a hurry without launching a full video editor.
Online Video Compressors: The Convenient Option
When you just need to compress a single file and don't want to install any software, online video compressors are your best friend. The process couldn't be simpler: you upload your MOV, pick a compression setting, and download the finished product.
But that convenience does come with a few catches. Most free online tools will have file size limits, might slap a watermark on your video, and present potential privacy concerns since your file is being uploaded to someone else's server. They’re best used for non-sensitive clips when you're in a pinch and speed is your number one priority.
While you're checking out different content tools, you might also find it interesting how AI can create videos from just text. You can learn more about text-to-video AI models on our site.
Trimming and Editing for a Smaller File Size
While we often focus on complex compression settings, one of the easiest ways to reduce the size of a .mov file is also the most obvious: just chop off the parts you don't need. It’s a simple, non-technical edit that pays huge dividends in file size.
Think about your raw footage. We all have those extra few seconds at the beginning while we're getting settled or at the end before we hit the stop button. Trimming that dead space directly shortens the video's duration, which in turn, makes the file smaller. No codecs, no bitrates, just a quick snip.
The Overlooked Impact of Audio
Video gets all the attention, but your audio tracks are a goldmine for saving space. Most cameras default to recording stereo audio, which is great for immersion but often complete overkill. If your video is just a person talking, converting that stereo track to mono can literally cut the audio data in half with no perceptible drop in quality.
For a standard 10-minute talking-head video, that's a quick and easy win. You can also get more aggressive and lower the audio bitrate. For voice-only content, a bitrate of 96 kbps or even 128 kbps is more than enough, a far cry from the high-quality defaults your camera probably uses.
Trimming isn't just some compression hack; it's just good, clean editing. A leaner clip is faster to process, easier to share, and cheaper to store, making it a foundational step in any efficient workflow.
When to Remove Audio Entirely
Sometimes, the best thing to do with your audio is to just delete it. This is far more common than you might think.
Consider these scenarios:
- Silent B-roll: If you’re just using a clip for some visual texture, the original ambient sound is usually more distracting than helpful.
- Social Media Clips: Creating a TikTok or an Instagram Reel? You’re probably going to lay a trending track or a new voiceover on top anyway. Ditching the original audio gives you a smaller, cleaner slate to work with.
- Making GIFs: Since GIFs are silent, the audio track is just dead weight. Removing it before you convert simplifies the whole process.
This mindset is crucial when you're repurposing content. Learning to efficiently trim clips and strip out unnecessary audio is a core skill for keeping your media library lean and organized. As you get comfortable with these edits, you can explore other ways to improve your workflow, such as using advanced image editing models to speed up other parts of your content creation.
Common Questions About Compressing MOV Files
Diving into file compression can feel a bit nerve-wracking. You've poured hours into your video, and the last thing you want is to ruin it just to make the file smaller. Let's walk through some of the most common questions and concerns that come up.
Will Compressing My MOV File Ruin the Quality?
That's the million-dollar question, isn't it? The short answer is: not if you're smart about it. Quality loss happens when you get too aggressive with your settings, especially the bitrate. If you set the bitrate too low for the resolution, your video will start to look blocky and smeared, losing all that crisp detail you worked so hard to capture.
A great starting point is simply switching to a more modern codec. Moving from an older format to something like H.265 (HEVC) can often slash your file size by up to 50% with almost no visible drop in quality. It's an incredibly efficient way to shrink a file without making obvious sacrifices.
Here's a pro tip: Always run a test export first. Take a short, action-packed clip from your video and apply your compression settings to it. This gives you a preview of the final result before you commit to a long render for the entire project.
What Is the Difference Between MOV and MP4?
It helps to think of MOV and MP4 as different types of shipping boxes, or "containers." Both can hold the exact same video and audio streams inside.
The MOV container, which Apple developed, is fantastic for editing, especially within Final Cut Pro and the broader Apple ecosystem. MP4 is the universal workhorse—it's designed for broad compatibility and will play on just about any device, platform, or browser you can think of.
Interestingly, you can often just switch the container from .mov to .mp4 without touching the video data inside. This process, known as "remuxing," is lightning-fast and doesn't change the quality or file size. To actually make the file smaller, you have to re-encode the video stream with more efficient settings.
Can I Reduce the Size of a MOV File on My iPhone?
You can, but your tools are much more limited than on a Mac or PC. The built-in Photos app on your iPhone doesn’t give you any control over the technical stuff like codecs or bitrates.
The simplest thing you can do right on your phone is to use the "Trim" tool to snip off unwanted footage from the start or end of the video.
If you need more control, you'll have to grab a third-party app from the App Store. Look for tools like 'Video Compress' or 'Compress Videos & Resize Video,' which let you choose a lower resolution or a general quality preset to shrink your files for sharing.
However, for any important project, the best workflow is still to move the file to a computer. Nothing beats the control and quality you get from dedicated desktop software like HandBrake or QuickTime Player.
Ready to stop wrestling with huge files and start creating content faster? ShortGenius unifies every step of video production, from AI-powered scriptwriting and scene generation to one-click resizing and compression. Produce high-quality, perfectly optimized videos for all your social channels in minutes, not hours. See how over 100,000 creators are scaling their content at https://shortgenius.com.