Instagram Story Longer Than 15 Seconds: A 2026 Guide
Learn how to post an Instagram Story longer than 15 seconds. This 2026 guide covers native 60-second uploads, splitting tools, and Reels workarounds.
You’ve got a video that runs longer than 15 seconds. Maybe it’s a product demo, a talking-head update, a tutorial, or a client testimonial. You open Instagram Stories expecting a smooth upload, then pause because you’re not sure what Instagram still does, what changed, and whether sharing a Reel is the same thing.
That confusion is normal. A lot of advice about the instagram story longer than 15 seconds problem is outdated, and some of it mixes together three different behaviors: native Story uploads, videos over 60 seconds, and Reel shares to Stories. Those are not the same workflow, and treating them the same usually creates clunky cuts, weak retention, or unnecessary extra steps.
The practical playbook in 2026 is simple once you separate those use cases. Native Story uploads now behave differently than they used to. Manual splitting still matters when you want cleaner transitions or when the video runs past Instagram’s cap. And if you’re relying on Reels as a shortcut, you need to know exactly where the platform still forces a 15-second preview.
Beyond the 15-Second Barrier
For years, Stories trained creators to think in 15-second chunks. That old limit shaped how people filmed, scripted, and edited. If your video ran long, you either accepted rough cuts or used a separate app to chop it up before posting.
That’s no longer the whole story. Instagram Stories evolved from the old 15-second limit to a 60-second cap, which changed how native uploads behave and gave creators a cleaner way to post longer clips according to Proom AI’s Instagram Story length guide. The platform is more forgiving now, but it still isn’t frictionless.
What still trips people up is that “longer than 15 seconds” can mean three different things:
- A native Story upload under 60 seconds gets handled inside Instagram.
- A video over 60 seconds still needs planning before upload.
- A Reel shared to Stories is a separate case and doesn’t behave like a native Story file.
That distinction matters because the wrong workflow creates avoidable problems. A spoken tutorial can get cut mid-sentence. A product walkthrough can lose momentum between frames. A Reel that looked perfect in the feed can become a weak teaser in Stories if you expected full playback.
Practical rule: Treat Stories as their own format, not just a dumping ground for whatever you already made.
The best-performing approach usually isn’t “make it as long as possible.” It’s making the sequence feel deliberate. If you need one smooth minute, use native Story upload correctly. If you need more than a minute, split with intention. If your real goal is feed traffic, then a Reel preview might be the smarter move.
That’s the shift. The question isn’t whether you can post longer than 15 seconds anymore. It’s which path creates the least friction for the viewer.
How Instagram's Native 60-Second Upload Works
A lot of teams still edit Stories as if the 15-second rule never changed. Then they waste time chopping a 42-second update into tiny clips that Instagram would have handled on its own.
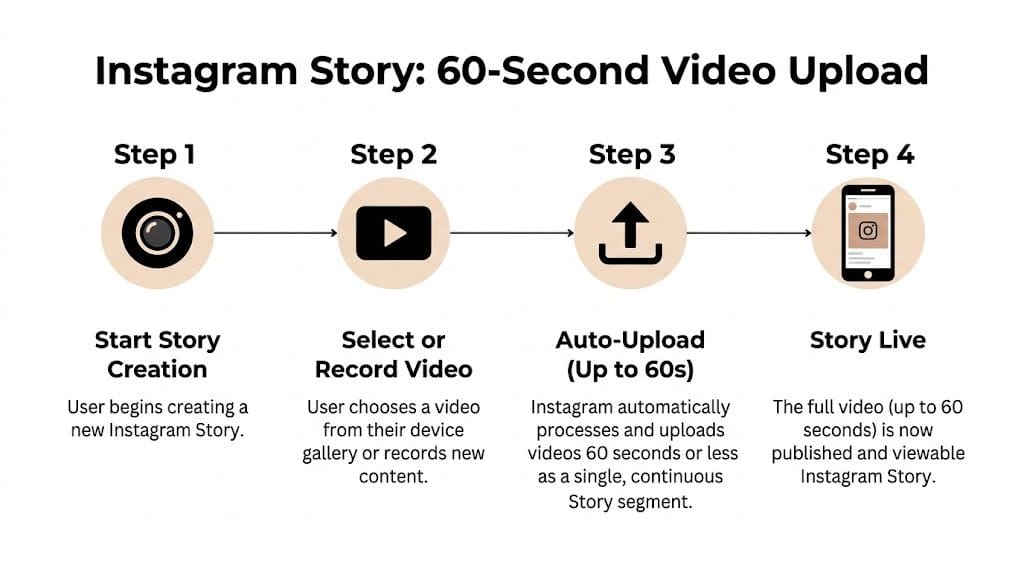
Here’s the practical version. If your video file is 60 seconds or less, Instagram lets you post it as a native Story upload. Viewers still experience it in 15-second Story cards, but the app handles that segmentation for you during playback.
That change saves time, especially for creator updates, event coverage, quick demos, and direct-to-camera clips. You can upload one file and keep the publishing flow inside Instagram instead of preparing four separate exports first.
What the app does well, and where it still breaks
Instagram is good at one thing here. It removes the old prep work for sub-60-second uploads.
Instagram is still bad at timing.
The split points are mechanical. They land at fixed intervals, not at the end of a sentence, a pause in motion, or the beat drop in your audio. If a key line hits right at the 15-second boundary, the viewer feels that cut even if the app technically plays the sequence in order.
I see this problem most often with talking-head Stories. A founder update feels fine in the camera roll, then the sentence turns awkward right as card one ends and card two starts. Product walkthroughs have a similar issue when a tap, zoom, or feature reveal gets divided across Story cards.
What to expect from native 60-second uploads
Native upload works best when the clip is simple, front-loaded, and easy to follow across automatic breaks.
Use it for:
- Face-to-camera updates
- One-point announcements
- Short explainers with clear captions
- Behind-the-scenes moments without tight edit timing
Be careful with:
- Dialogue that depends on rhythm
- Fast tutorials with multiple steps
- Before-and-after reveals near a split point
- Screen recordings where one action must stay intact
A good rule is simple. If the clip still makes sense when divided every 15 seconds, native upload is usually fine. If one bad cut weakens the message, edit first.
The fastest native workflow that still looks professional
Use this checklist before posting:
-
Keep the file at 60 seconds or less
Once you go over, you need a different workflow. -
Put the payoff in the opening seconds
Story viewers decide fast. Lead with the result, headline, or strongest visual. -
Check the 15, 30, and 45 second points
Those are the likely break areas. Move a sentence, trim a pause, or tighten a shot if a split lands in the wrong place. -
Add on-screen text from the first card
Captions help viewers follow the sequence, especially when a spoken line carries across a card change. -
Preview before publishing
I always watch for one thing. Does the first automatic cut feel intentional or clumsy? If it feels clumsy there, the rest usually does too.
When native upload is enough
| Use case | Native upload fit |
|---|---|
| Quick founder update | Strong |
| Short tutorial | Strong if pacing is tight |
| Product demo with many transitions | Risky without manual edits |
| Interview clip | Better if pre-cut first |
For a clean one-minute Story, Instagram’s native behavior is finally usable. It is not the same as having full editorial control, and that distinction matters. Native upload is the fast option for clips that can survive fixed split points. For anything timing-sensitive, manual editing still wins.
Manual Splitting for Videos Longer Than 60 Seconds
Once your video runs past a minute, manual control stops being optional. Instagram won’t preserve the flow for you, and trying to force a longer file through the app usually creates messy pauses, chopped dialogue, and a Story sequence that feels accidental.
The fix isn’t complicated. You just need to decide whether you want a simple phone-based workflow or a faster dedicated splitter.
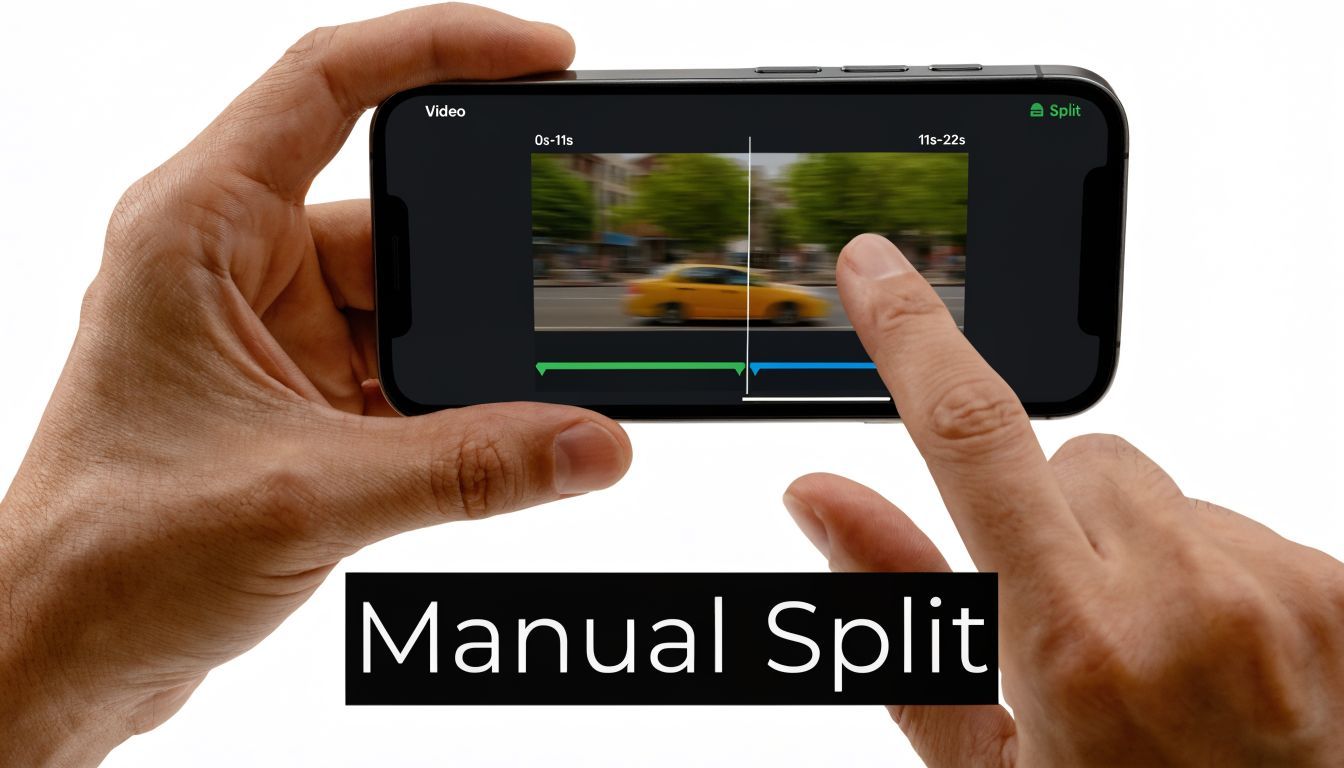
Method one with your phone editor
If you want maximum control without another app, your built-in editor works fine.
Start with the full video in your camera roll. Duplicate it so you’re not editing the original. Then create separate exports in 60-second or shorter chunks. The key is not just where you cut, but why you cut there.
Use these edit points:
- End of a sentence instead of the middle of a phrase
- Scene change instead of movement mid-frame
- Pause in action instead of the most important moment
- Music transition instead of a random timestamp
Name the files in order so upload stays clean. Simple naming like 1of3, 2of3, 3of3 prevents mistakes when you’re posting quickly.
A good split should feel like a breath, not a glitch.
Once exported, upload them in sequence to Stories. Watch the previews before posting. If one chunk starts too abruptly, go back and adjust that section. This takes longer than native upload, but the result usually looks more deliberate.
Method two with dedicated apps
If you do this often, use a tool built for the job. Creators still rely on apps like CutStory or StorySplitter because they speed up repetitive prep and make sequencing easier.
These apps are useful when:
- You have multiple clips to prep in one sitting
- You’re repurposing vertical content from another platform
- You need consistent segment lengths across a campaign
- You’re posting for clients and can’t afford upload confusion
Value isn’t just automation. It’s precision. You can preview the cut points, rework a rough transition, and avoid the amateur look that happens when every segment breaks at a bad moment.
How to decide which route to use
Here’s the practical split between the two workflows:
| Workflow | Best for | Trade-off |
|---|---|---|
| Phone editor | One-off Stories, simple edits, low volume | Slower when batching |
| CutStory or StorySplitter | Frequent posting, client work, repurposed content | Extra app in the stack |
If you’re posting a single event recap once a week, your phone is enough. If you’re a social media manager handling multiple brands, a dedicated splitter pays for itself in reduced friction.
What makes a long Story feel polished
Most bad multi-part Stories fail because the cuts weren’t planned around the viewer. The audience doesn’t care how hard the edit was. They only notice whether the sequence feels smooth.
A few habits help:
- Repeat visual cues across clips so the sequence feels connected
- Carry captions forward so a new segment doesn’t feel like a reset
- Use a continuation line such as “next step” or “watch this part” when a split is unavoidable
- Review the whole chain after upload, not just each individual clip
Manual splitting works best when the viewer never thinks about the split at all.
Using Reels as a Strategic Story Alternative
Sometimes the right answer isn’t to force a long video into Stories. It’s to post it as a Reel and use Stories as the entry point. That can work well, but only if you understand the trade-off before you publish.
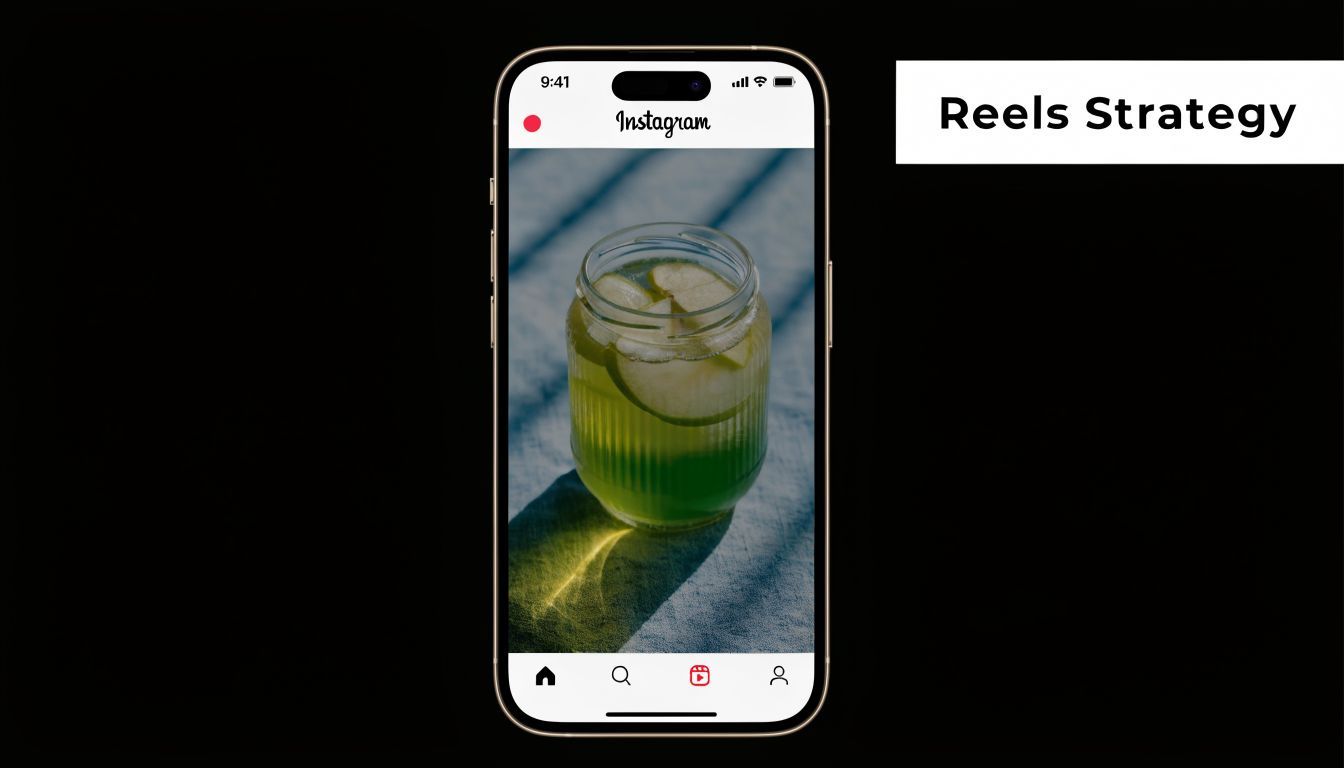
What Reels solve and what they don't
Reels are better when you want the content to live beyond the 24-hour Story window and keep working from your profile. They’re also useful when the video is stronger as a feed asset than as a temporary update.
But there’s a platform quirk that causes constant confusion. Sharing a Reel to your Story is capped at a 15-second preview, regardless of the Reel’s actual length as Kapwing’s guide notes. Even if the Reel is only 30 seconds, Story viewers still get a truncated preview and must tap through to watch the full version in the feed.
That means a Reel share is not a backdoor to full 60-second Story playback. It’s a teaser.
When this trade-off is worth it
Reels make sense in Stories when your goal is one of these:
- Drive viewers into the feed for the full video
- Give a quick teaser of a stronger permanent asset
- Support a campaign where Story acts as promotion, not the full experience
- Reuse a polished vertical video without rebuilding a Story sequence from scratch
This is especially useful when your content concept was designed for feed discovery first. If you need help brainstorming stronger feed-first hooks before repurposing, Sup’s list of 10 Actionable Ideas for Video is a good prompt bank for campaign planning.
Don’t ask Reels to do the job of native Stories. Use Reel shares when you want curiosity, not completion.
When native Stories are better
If the viewer needs to consume the whole message without tapping anywhere else, use native Story upload or a manually split Story series. That includes:
- step-by-step tutorials
- limited-time offers
- announcement sequences
- behind-the-scenes updates that need continuity
A Reel share inserts friction. Sometimes that friction is useful because it pushes traffic to the feed. Sometimes it kills the message because too many viewers won’t tap.
A quick example helps. If you’re promoting a launch video, the 15-second Story preview can work like a trailer. If you’re explaining order instructions or event logistics, it’s the wrong format because the audience needs the full message where they already are.
Here’s a walkthrough if you want to see the user experience in action:
A simple decision filter
Ask one question before you share a Reel to Stories:
Do I want uninterrupted viewing, or do I want a tap-through?
If you want uninterrupted viewing, don’t share the Reel. Export the video and upload it as a native Story sequence instead. If you want the Story to function as a trailer, a Reel share is perfectly valid.
That one choice removes most of the confusion around instagram story longer than 15 seconds in 2026.
The Ultimate Workflow With ShortGenius AI
A long Story usually breaks before it ever reaches Instagram. The script runs too long, captions cover the UI, exports come out in the wrong order, and scheduling turns into a last-minute manual job. That is the primary bottleneck.
A better setup keeps the whole Story build inside one workflow, then lets you decide at the end whether the piece should publish as native 60-second Story uploads, shorter retention-focused cuts, or a Reel preview. That flexibility matters in 2026 because Instagram supports longer native Story segments, but the Reel-to-Story share still behaves like a short preview and changes how people watch.
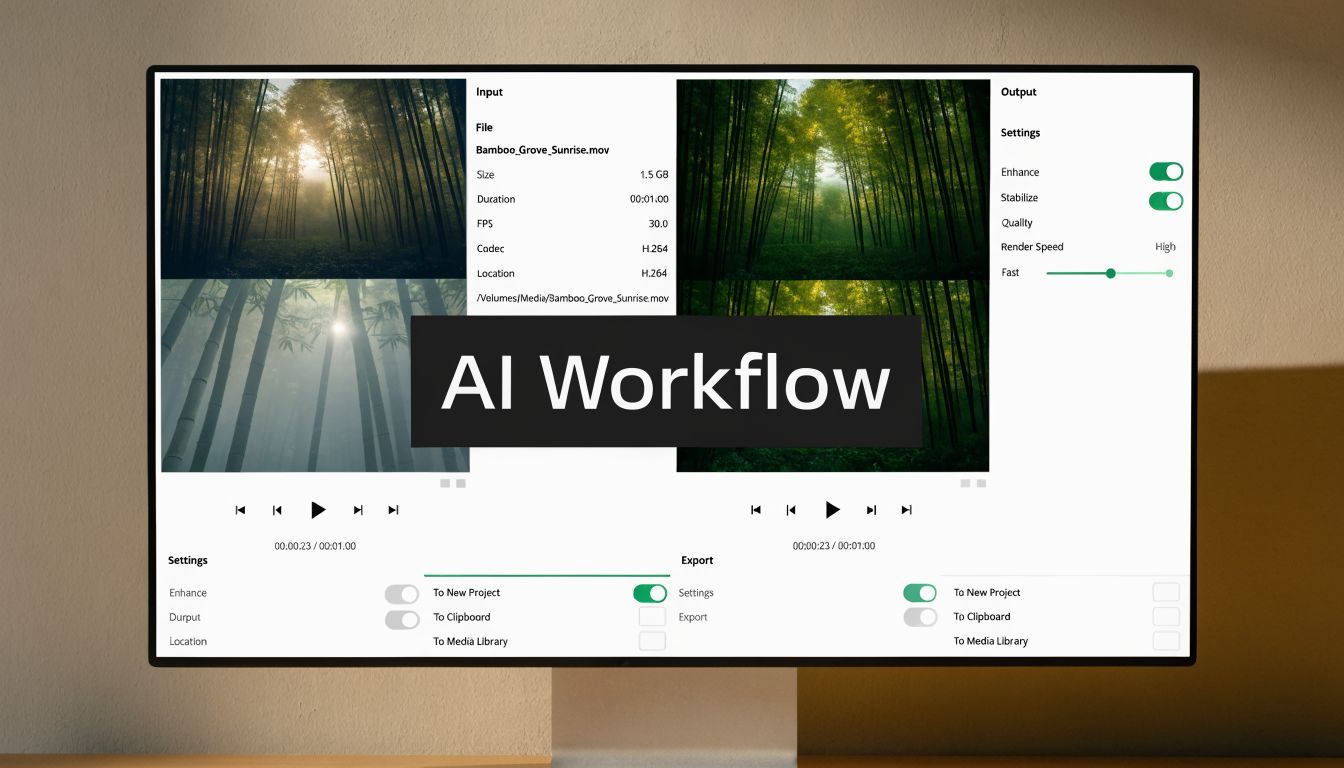
Why an AI workflow helps
A key benefit is consistency and speed under volume.
For Stories, teams are rarely making one polished asset. They are producing recurring promos, product updates, FAQ clips, tutorials, and repostable cuts every week. AI helps by shortening the repetitive parts: drafting hooks, building vertical scenes, generating voiceover, timing captions, and keeping visual formatting consistent across a sequence.
It also gives you cleaner control over pacing. Even though Instagram now accepts longer native Story uploads, shorter beats still tend to hold attention better for many formats, especially promos, announcements, and direct-response content. The point is not to force every Story into one length. The point is to build once, then cut to the right format without rebuilding the entire asset.
A practical end-to-end setup
Here is the workflow I use inside ShortGenius AI for vertical video creation and scheduling:
-
Start with the publishing goal
Decide whether the Story needs full in-Story viewing, a multi-part explanation, or a trailer that pushes people to a Reel. That one choice affects script length, scene count, and CTA placement. -
Write for Story frames, not for a general video
Build the script in blocks that can survive being viewed one frame at a time. Each section should carry one point, one visual idea, and one action. If a sentence only works when the viewer has seen the previous 30 seconds, tighten it. -
Design vertically from frame one
Create in 9:16 at the start. Do not edit for feed, then crop for Stories later. That shortcut usually creates bad headroom, captions over buttons, and weak focal points. -
Generate voiceover and captions together
Timing matters more than style here. Captions should enter where the spoken line starts, stay clear of interface zones, and remain readable across cuts. Building audio and text in the same pass saves revision time. -
Create two output versions
Export one version as native 60-second Story-ready segments for direct Story upload. Export another as shorter cuts for campaigns where faster pacing performs better. This is also the point where you can create a Reel version if you want the Story to act as a preview instead of the full message. -
Schedule the sequence in order
Multi-part Stories fail when part three goes live before part two, or when a time-sensitive promo posts after the audience peak. If timing matters, check your posting window against guides on the best time to post on Instagram before scheduling the full run.
Where the time savings show up
The gain is not only in generation. It shows up in revision control and publishing.
Teams waste hours on the same avoidable problems:
- Reframing horizontal footage after the edit
- Fixing captions that sit behind Story UI
- Exporting separate files and losing the clip order
- Recutting the same video for native Story upload and Reel preview use
- Manual posting that breaks the sequence
That rework disappears when the project stays editable in one place and every variation comes from the same source file. One master build can become a native 60-second Story sequence, a shorter Story run, and a Reel promo without starting over each time.
What works best in practice
The strongest teams treat Story production like modular assembly, not one-off editing.
They build scenes that can stand alone. They place the hook in the first frame, because Story viewers decide fast. They script transitions that survive cuts between segments. They also decide early whether continuity matters more than curiosity. That is the difference between a native long Story series and a Reel share used as a teaser.
AI speeds up production, but judgment still sits with the operator. You still have to choose whether the viewer should watch the whole message inside Stories, tap through to a Reel, or move through a sequence of shorter clips without friction. That decision is what turns a longer Instagram Story from a workaround into a repeatable system.
Pro Tips for Seamless and Engaging Long Stories
A long Story only works when it feels like one experience. If each frame looks edited by a different person, viewers feel the seams immediately. The strongest sequences keep visual style, pacing, and message continuity tight from the first tap to the last.
Continuity cues people actually notice
Use repeated design signals so the sequence feels connected:
- Keep one text style throughout instead of switching fonts every frame.
- Use one color treatment so the Story doesn’t visually reset between clips.
- Carry music or ambient audio across segments if the tone should stay consistent.
- Place captions in the same area so the viewer’s eye doesn’t have to hunt.
These details sound small, but they do a lot of work. A Story series feels more professional when every segment looks like part of the same edit.
End each segment with forward motion
The biggest retention mistake in multi-part Stories is ending a clip like it’s the end of the message. If the next frame matters, signal that.
Try moves like these:
- Open loops such as “here’s the part often overlooked”
- Bridge text like “step 2” or “next”
- Visual continuation where the action starts before the cut and resolves after it
- A final-frame cue that points to the next Story instead of closing the topic
Viewers keep going when the current frame creates momentum, not when it wraps everything up too neatly.
Use interaction at the end, not in the middle
Polls, quizzes, questions, and sliders work best when they support the sequence instead of interrupting it. If you place them too early, they can break the flow of a longer Story chain.
A cleaner pattern is:
| Story stage | Best element |
|---|---|
| Opening clip | Hook and context |
| Middle clips | Proof, demo, explanation |
| Final clip | Poll, question, CTA, link sticker |
That structure keeps the narrative intact and gives the final frame a job.
Timing still matters
Even a well-edited Story can underperform if it goes live when your audience is least likely to engage. If you want a practical timing reference for planning your schedule, this guide on the best time to post on Instagram is useful for narrowing posting windows and building a repeatable cadence.
One last note. Don’t judge your Story quality by whether it’s longer than 15 seconds. Judge it by whether the longer format helped the message land better. Sometimes that means one clean minute. Sometimes it means four sharp clips. Sometimes it means the Reel teaser was enough.
If you want to create, edit, segment, and schedule Story-ready videos without juggling multiple tools, ShortGenius (AI Video / AI Ad Generator) is built for that workflow. It helps creators and teams turn ideas into polished vertical content fast, then publish consistently across channels with less manual prep.