How to Remove the Music from a Video - Keep Vocals in 2026
Learn how to remove the music from a video while preserving dialogue using AI tools, desktop software, and mobile apps in 2026.
You’ve filmed a fantastic video, but the audio is a mess. Maybe it’s a copyrighted song that will get you flagged, or perhaps the music just doesn't fit the vibe you're going for anymore. Knowing how to remove the music from a video is a crucial skill for any creator. You can go for a quick fix by muting the entire audio track, but the real magic happens when you can separate the music from the vocals, keeping your original dialogue perfectly intact.
Why You Need to Separate Audio in Your Videos
Have you ever shot a great clip, only to realize the background music renders it totally unusable? I've been there more times than I can count. It’s a classic creator headache, especially when a copyrighted track leads to takedown notices or muted videos on YouTube and Instagram. Being able to cleanly separate audio from video isn’t just a nice-to-have; it’s a total game-changer.
Think about it. You’ve got a viral-worthy TikTok featuring a trending—and heavily copyrighted—song. The video itself is gold and would be perfect for a branded ad, but using that music is a legal non-starter. Instead of trashing the whole thing, you can just pull the music out while keeping the person’s original dialogue. What was once a liability is now a valuable asset for your marketing campaign.
Repurpose Content with Confidence
This skill is absolutely essential if you want to get more mileage out of your existing footage. For instance, you can take one video and spin it into several different pieces of content.
- Tweak Your Interviews: Got an interview with some distracting coffee shop music in the background? Strip it out. Now you have a clean slate to add a professional voiceover or your own branded soundtrack.
- Create a Podcast from a Webinar: It’s one thing to mute a video, but being skilled at extracting and cleaning up audio from videos allows you to turn video content into high-quality podcast episodes.
- Adapt for Different Social Platforms: The audio that works on TikTok might not fly on LinkedIn. Removing the original music gives you the freedom to tailor the sound for each specific audience.
For years, the biggest hurdle was always trying to save the dialogue. Muting a video is easy, but it often means sacrificing every spoken word. To cleanly separate vocals from music, you used to need an audio engineer and a budget for expensive software.
The real goal isn't just muting a clip. It's about surgically removing unwanted music so you can keep the valuable dialogue, unlocking a ton of new possibilities for your content.
Thankfully, modern AI tools have completely changed the game, making this process accessible to everyone. These platforms can analyze an audio track and intelligently isolate the different layers—vocals, music, even sound effects—into separate files. This tech gives creators the power to rescue and repurpose footage that would have been unusable just a few years ago. Whether you're a social media manager crafting AI UGC ads or a vlogger cleaning up footage, audio separation is a skill you'll want in your toolkit.
Sometimes, you don't need a full-blown editing suite to fix your video's audio. Let's be honest, most of the time you just need a quick and dirty solution to get your content out the door. Knowing how to quickly mute or replace audio is an essential skill, especially when you're creating content on the fly for social media.
The fastest fix is often the simplest: just mute the entire clip. It’s an all-or-nothing approach, for sure, but it's perfect for those times when the original audio is a total lost cause. Think of a clip ruined by overwhelming wind noise, or a video from an event where copyrighted music is blaring in the background. Muting gives you a clean slate, ready for a trending sound, a fresh music track, or your own voiceover.
Not sure whether to salvage the audio or just scrap it? This little decision tree can point you in the right direction.
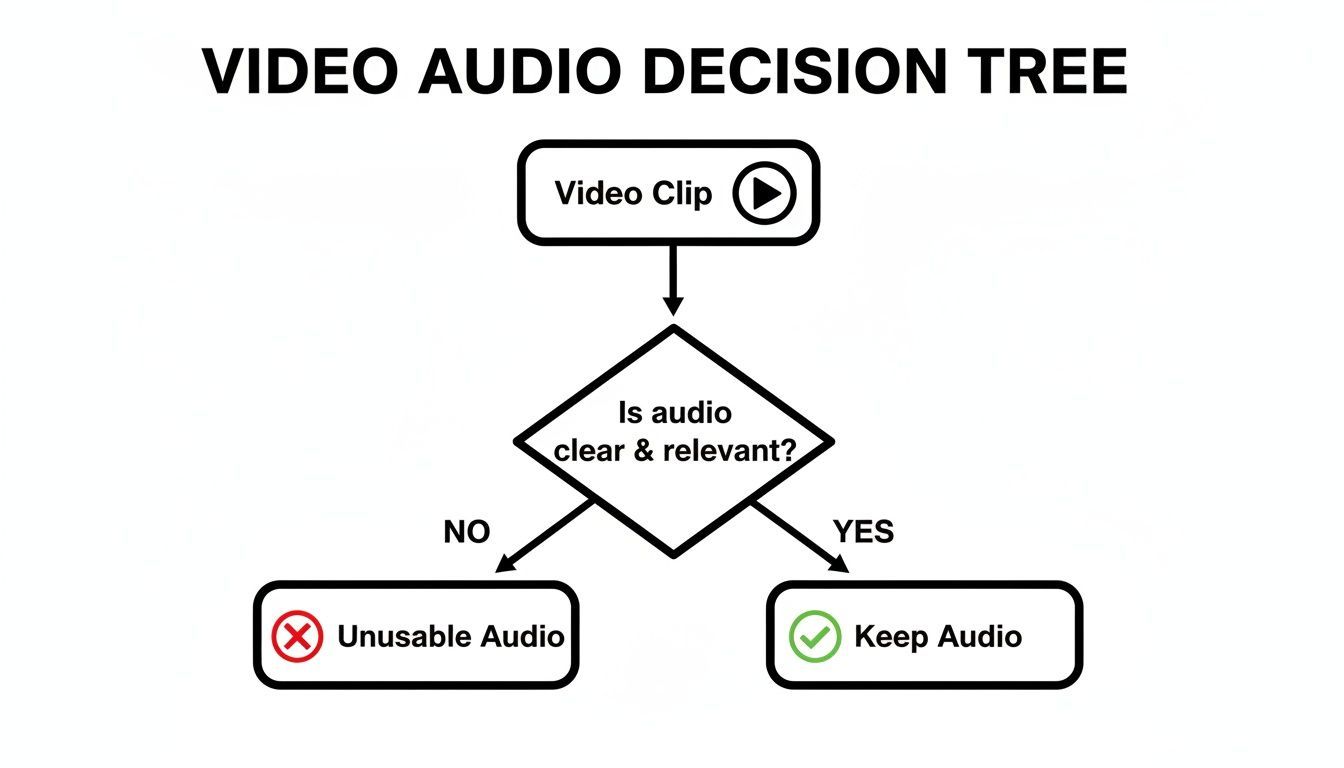
Ultimately, it comes down to a simple question: does the audio add value? If the answer is no, or if it actively causes a problem (like a copyright strike), your best bet is to remove it.
For these quick fixes, you probably already have everything you need. Here's a look at the fastest ways to get the job done.
Fastest Ways to Mute or Replace Video Audio
Choose the best method to mute or replace audio based on your device and desired outcome.
| Tool | Best For | Pros | Cons |
|---|---|---|---|
| Phone's Native Editor (iOS/Android) | Creating a silent clip quickly for use in other apps or for a clean B-roll. | - Completely free and built-in - Extremely fast; takes seconds - Saves a new, separate silent file | - Mutes all audio; no separation - No option to add new audio directly |
| Social Media App (TikTok, Instagram) | Muting original audio and immediately replacing it with a trending sound or music. | - Seamless workflow; no need to leave the app - Access to the platform's licensed music library - Easy-to-use sliders for audio levels | - Edits are tied to that specific platform - Less control than a dedicated editor - Interface can change with app updates |
These tools are your first line of defense for audio issues. Let's walk through how to use them.
Use Your Phone's Built-In Editor
Don't underestimate the power of the device in your pocket. Both iPhones and Androids have simple editing features baked right into their photo apps that can mute a video in just a couple of taps.
If you're on an iPhone or iPad, just open your video in the Photos app and tap Edit. In the top-left corner, you'll see a small yellow speaker icon. Tap it. It’ll turn gray, indicating the audio is now muted. Hit Done, and you’ll have a brand new, silent version of your clip.
The process is nearly identical on Android. Open your video in your Gallery or Google Photos app and find the Edit option. Look for the speaker or sound icon, tap it to mute, and then save your work. The exact location can vary a bit depending on whether you have a Samsung, Pixel, or another device, but the icon is almost always there.
I use this trick constantly when I just need a silent B-roll clip to drop into a larger project without worrying about clashing background noise.
Mute Directly in Social Media Apps
If your video's final destination is a social platform, why not edit it there? Apps like TikTok, Instagram, and YouTube Shorts have their own editors designed for exactly these kinds of quick adjustments.
For example, when you're creating an Instagram Reel, you can tap the music note icon to open the audio controls. You'll see a slider for "Camera audio"—just drag it all the way to 0. This completely mutes your original clip, freeing you up to add a track from Instagram’s music library or record a voiceover without any sound bleeding through.
My Two Cents: Muting directly in the app is incredibly efficient, but always preview your post before you hit "Share." I’ve seen app updates move things around or introduce bugs. A quick final check can save you the embarrassment of posting a video with jumbled audio.
These basic muting techniques are fundamental skills for any creator. While they don’t offer the precision of more advanced tools, they solve a huge number of everyday audio headaches. For creators also running paid ads, getting fast with these edits is key to producing assets quickly. If you're looking for more ways to streamline your content creation, check out our guide on using an AI ad generator to turn simple ideas into polished video ads.
Separate Music from Vocals with AI Audio Tools
Muting the audio is the quick and dirty solution, but what happens when you need to keep the dialogue? This is where things get really interesting. We're talking about AI audio separation, a process you might also hear called stem splitting.
This tech is a lifesaver. It dives into your video's audio, figures out what’s speech versus what’s music, and pulls them apart into separate, editable tracks.
Just a few years back, this was something only professional audio engineers with super expensive software could pull off. Now, powerful and accessible AI tools let anyone surgically remove background music while keeping the vocals perfectly clear.
Let’s say a customer sends you an amazing testimonial video. The content is gold, but they recorded it with a popular, copyrighted song blaring in the background. You can’t touch that for a social media ad without risking a copyright strike. Instead of asking for a do-over, you can use an AI tool to strip out the music, leaving you with a clean vocal track you can actually use.
How AI Stem Splitting Works
So, how does it do it? These tools are trained on huge libraries of audio, learning to tell the difference between the frequencies of a human voice and, say, a guitar riff or a drum beat. When you upload your video, the AI "listens" to the whole mix and spits out separate audio files for each part it identifies.
You'll almost always get at least two tracks back:
- Vocals: This is just the spoken dialogue from your video.
- Instrumental: This track holds everything else—the background music, ambient noise, and any sound effects.
From there, you can just toss the instrumental track. You're left with clean dialogue, ready for you to layer in some royalty-free music or record a fresh voiceover in your video editor.
Using an Online AI Audio Separator
There are tons of online tools for this now, and they all work in a pretty similar way. The basic workflow is simple: upload your video, let the AI work its magic, and then download your separated audio stems.
Most interfaces make it really clear what you're getting. You can see exactly how the AI has split the original sound into different tracks.
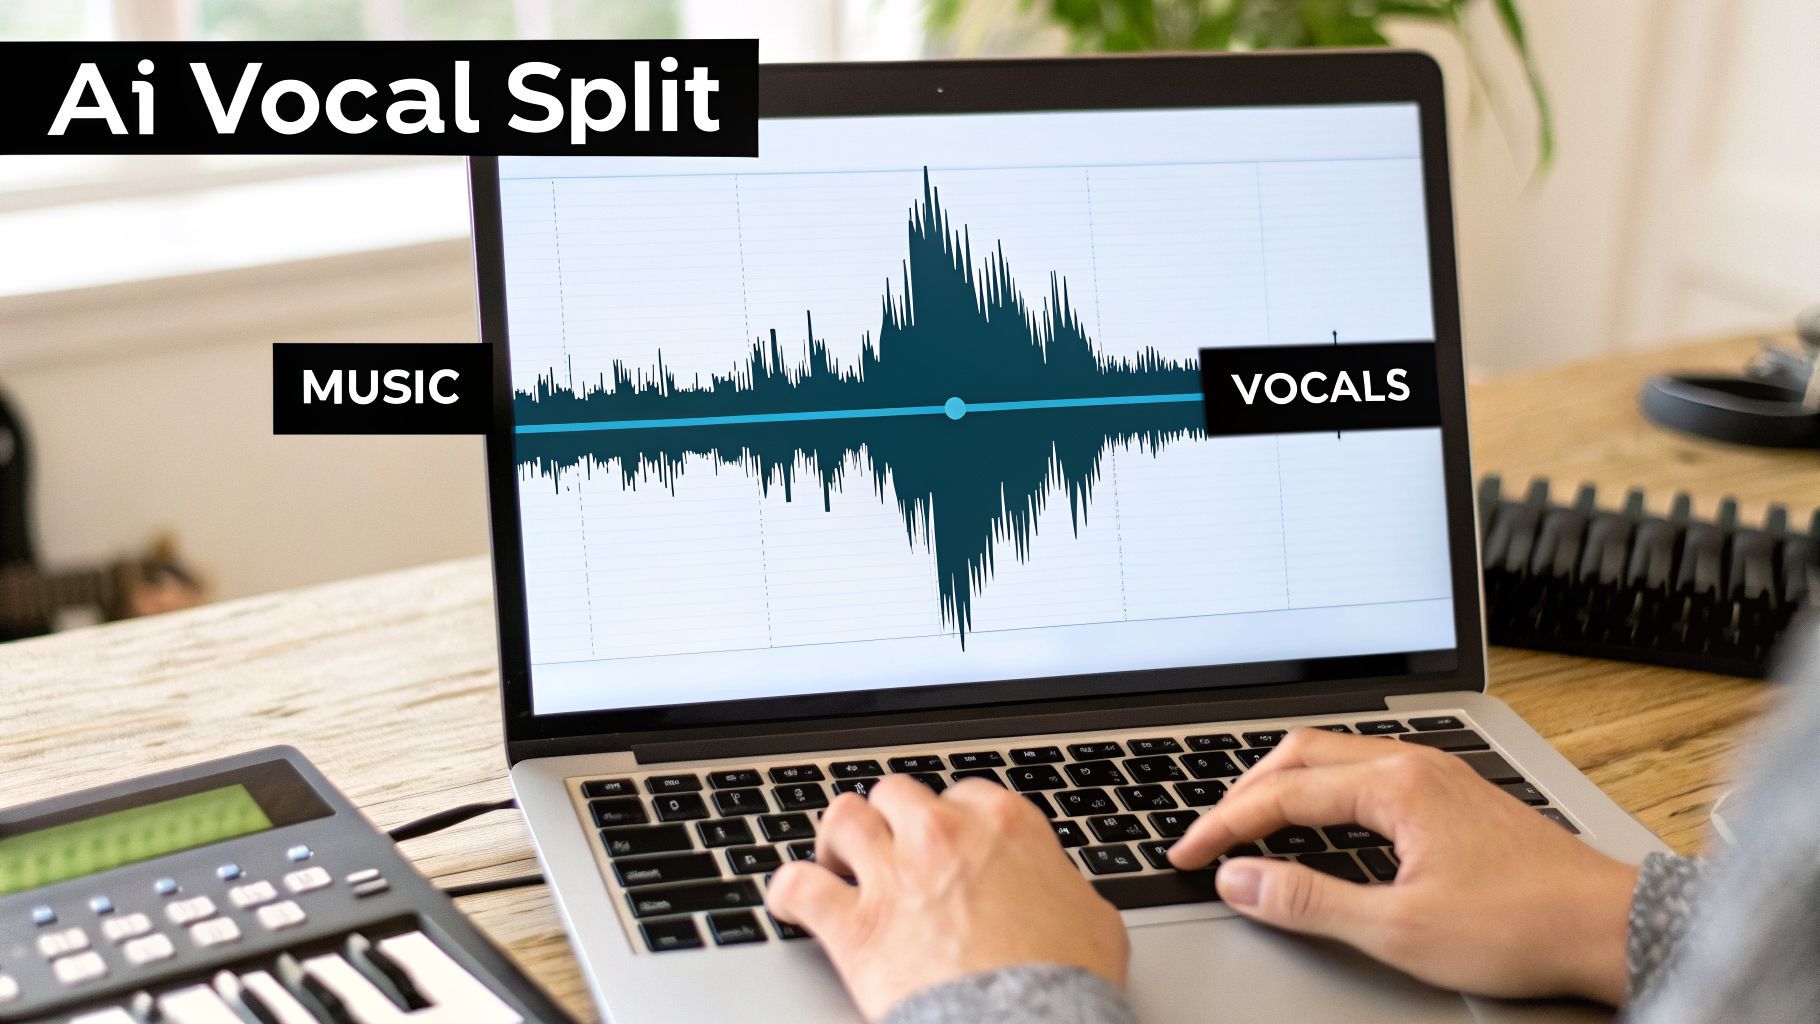
The image above shows a perfect example. The original audio has been broken down into a "Music" track and a "Vocals" track, each with its own controls. This is the kind of granular control that makes these tools so powerful for creators.
When you're picking a tool, it pays to shop around. Many modern video editing suites are building this feature right in, so check out different platforms and their alternatives like Veed.io to see what fits your workflow best.
A Quick Reality Check: The final quality really depends on your source audio. If the music is deafeningly loud and the speaker is mumbling, the AI might leave behind some little sound fragments or "artifacts." For most social media content, though, the results are more than good enough.
Tips for Getting the Best Results
While the AI does most of the heavy lifting, a little prep work goes a long way. Always start with the highest-quality video file you have. If you're working with a clip that's been downloaded and re-uploaded a dozen times, the compressed audio will give the AI a much harder time.
Here are a few tips I've picked up from experience:
- Start with Great Audio: The better your source file, the cleaner the separation will be. Avoid heavily compressed or low-quality audio whenever you can.
- Listen with Headphones: After the AI is done, put on some headphones and listen closely to the vocal-only track. Can you still hear bits of the song? Is the dialogue muffled or clear?
- Try a Different Tool: Not all AI models are the same. If one tool doesn't quite nail it, don't be afraid to try another one. Some are better at handling really messy or complex audio mixes.
Honestly, learning how to remove the music from a video this way is a game-changer. It lets you rescue valuable footage, sidestep copyright headaches, and take full creative control of your project's sound.
For Ultimate Control, Go Desktop
Look, those one-click AI tools are fantastic when you’re in a hurry. But when you need absolute precision, it's time to fire up your desktop video editing software. For professional creators, this is where the real magic happens. Getting granular control over your audio is non-negotiable, and powerhouse programs like Adobe Premiere Pro and DaVinci Resolve are built for this.
Think about a real-world scenario. You're editing a crucial client testimonial for a marketing campaign. The speaker's message is gold, but a faint, repetitive jingle from a nearby office is bleeding into the audio. A quick online tool might either miss it or create weird artifacts trying to remove it. This is where a desktop editor earns its keep, letting you surgically target and reduce those specific musical frequencies without mangling the dialogue.
This is exactly why production houses and serious YouTubers practically live in these applications. It’s the difference between a video that sounds "fine" and one that sounds truly professional.
Built-in Tools are Your First Stop
The good news is that modern video editors (often called non-linear editors, or NLEs) are now packed with their own powerful AI features. You don't always have to go hunting for a third-party plugin.
In Adobe Premiere Pro, for instance, you can find the Vocal Enhancer tool inside the Essential Sound panel. It's designed to boost dialogue, but by tweaking its settings, you can often push background music far enough into the background that it’s no longer a distraction.
Over in DaVinci Resolve, the "Voice Isolation" effect is a game-changer. It’s a one-click wonder that uses an AI model to analyze the sound and cleanly separate speech from everything else. It works surprisingly well right out of the box, but its true power is as a starting point for more detailed work.
Getting Surgical with DaVinci Resolve’s Fairlight Page
DaVinci Resolve is a particular favorite for this kind of work because its professional-grade audio suite, known as the Fairlight page, is included in the completely free version. We're not talking about a lite or limited tool; this is a full-blown Digital Audio Workstation (DAW) integrated directly into your editor.
Let's walk through a common problem: you have a great interview clip, but a bass-heavy music track is making the speaker sound muddy.
First, with your clip on the timeline, just click the Fairlight tab (it looks like a little music note) at the bottom of the screen. Select your audio clip, and in the Inspector panel on the right, you'll see an "Audio" tab. Find the "Voice Isolation" effect, switch it on, and play with the dial. You'll likely be shocked at how much cleaner the audio becomes instantly.
But don't stop there. For the fine-tuning, head to the "Mixer" panel and find the audio track you're working on. Double-click the "EQ" section, which will pop open the Equalizer window.
The Equalizer (or EQ) is your secret weapon. It gives you the power to boost or cut very specific audio frequencies. Since human voices and background music often live in different frequency ranges, you can use the EQ to carve out space for the dialogue to shine.
For example, the core of most human speech falls between 85 Hz and 255 Hz. If that pesky background music has a thumping bassline, you can use the EQ to dramatically cut all the frequencies below 80 Hz. This will kill the bass without ever touching the speaker's voice. You can then listen for other dominant musical frequencies and gently lower them, too.
This manual approach takes some practice—and you'll definitely want a good pair of headphones—but it gives you a level of control that automated tools just can't replicate. Once you get comfortable with these tools, you can rescue audio you thought was unusable and ensure every video you produce has that polished, professional sound.
Finalize Your Video with New Audio
So you've successfully stripped the old music out. That's a huge win, but the job isn't quite done. You’re now left with a clean vocal track, which is the perfect blank canvas for building a professional soundscape from the ground up.
The most obvious next move is to layer in some new background music. But you can't just drop in the latest pop hit—that’s a surefire way to get a copyright strike. To stay in the clear, you need to use royalty-free music. These are tracks specifically licensed for use in content like yours, either through a one-off purchase or a subscription.
Source the Right Soundtrack
Choosing the right track is about more than just finding something you like. The music needs to fit the video’s mood and, just as importantly, your brand's identity. It should support your message, not distract from it. Are you launching a high-energy fitness product? You’ll want something upbeat. Are you explaining a complex topic? A subtle, atmospheric track is probably a better fit.
Here are my go-to spots for finding high-quality, legally safe music:
- Subscription Services: For anyone creating content regularly, platforms like Epidemic Sound or Artlist are lifesavers. A monthly fee gets you unlimited access to massive libraries, which makes the whole licensing process a breeze.
- Pay-Per-Track Marketplaces: If you only need music for a single, high-stakes project, a marketplace like PremiumBeat is a fantastic option. You can buy a license for one specific track that’s perfect for your needs.
- Free (But Good) Archives: Don't sleep on the YouTube Audio Library. It has a surprisingly solid collection of music and sound effects that are completely free to use. It can take some digging to find a gem, but it's a great starting point if you're on a tight budget.
Mix Your Audio for a Professional Sound
Once you’ve found the perfect track, it's time to mix it with your original dialogue. This is where a lot of creators stumble. The single biggest amateur mistake is mixing the music too loud, forcing your audience to struggle to hear what’s being said.
As a rule of thumb, background music for dialogue-heavy videos should be mixed at around -18 dB to -24 dB relative to the dialogue levels. This keeps it present enough to set the mood but quiet enough to stay in the background where it belongs.
The process is straightforward. Just import your clean vocal track and your new music file into your video editor and place them on separate audio tracks. Now, hit play and listen closely. Nudge the music’s volume fader down until it sits comfortably underneath the speech without ever competing with it.
For an even cleaner mix, look for a feature called audio ducking. Most modern editors have it, and it's a game-changer. It automatically lowers the music volume whenever someone starts talking and brings it back up during pauses.
Of course, some tools can handle this entire workflow in one go, from removing the original music to adding a new soundtrack and even generating a fresh voiceover. If you're looking to streamline your process even further, you can explore how to create video from text and add polished audio elements all in one place. Mastering these final audio touches is what separates a good video from a great one.
Common Questions About Removing Music from Videos
Even after you've learned the ropes of audio separation, a few questions tend to pop up. Let's tackle some of the most common ones we hear from creators so you can edit your content with total confidence.
Diving into audio editing is a game-changer, but it's smart to be clear on the technical and legal details. We'll clear up any confusion right here.
Is It Legal to Remove Music and Repost a Video?
This is a big one, and the answer really depends on who owns the video. If you're removing copyrighted music from a video you filmed yourself—say, to get rid of a background track that triggered a copyright strike on YouTube or Instagram—you're in the clear. It's your visual content, and you have every right to change the audio.
The trouble starts when you take someone else’s video, strip out their audio, and use the visuals for your own content. Even with the original sound gone, you could still be infringing on their copyright for the video footage itself.
The golden rule is to only edit video you've shot yourself or footage you've properly licensed. It's the only way to be 100% certain you’re not violating copyright.
How Good Is AI at Removing Music?
Modern AI tools are shockingly effective, but they aren't magic. The quality of the final result really hinges on the original audio mix. If the vocals and music are tangled up in the same frequency range, or if the track is drenched in reverb, you might hear some slight imperfections, often called "artifacts," in the separated audio.
For most creators making content for social media or online platforms, the results are more than good enough. My best advice? Always listen to the isolated audio with a good pair of headphones before you hit publish. It’s a quick check that can save you a lot of headaches.
What’s the Difference Between Muting and Separating Audio?
Getting this distinction is crucial for picking the right tool for the job.
-
Muting is exactly what it sounds like. It’s a blunt instrument that removes the entire audio track, leaving your video completely silent.
-
Audio Separation, sometimes called stem splitting, is a much more sophisticated process. It uses AI to intelligently identify different elements—like vocals, music, and sound effects—and lets you remove just the music while keeping the dialogue intact.
Think of it this way: muting gives you a silent clip. Separation gives you a clean vocal track that you can actually use.
Ready to spend less time worrying about audio and more time creating? ShortGenius pulls together AI-powered scriptwriting, video creation, voiceovers, and scheduling into one intuitive platform. Take back control of your workflow and see how you can produce professional-quality videos in minutes by visiting https://shortgenius.com.