How to Compress a MP4 Video Without Losing Quality

Learn how to compress a MP4 video with our step-by-step guide. Discover the best tools, codecs, and settings to reduce file size for web and social media.
You exported a video, tried to upload it, and got blocked by a file size limit. Or the upload worked, but the platform crushed the quality and your captions suddenly look fuzzy. That's usually when people start searching for how to compress a MP4 video and end up buried in sliders, acronyms, and bad advice.
The problem isn't just getting a smaller file. It's getting a smaller file that still looks professional on social feeds, messaging apps, ad platforms, and mobile screens. That matters even more for AI-generated content, explainers, motion graphics, and short-form ads, where clean text, sharp edges, and flat backgrounds make compression mistakes painfully obvious.
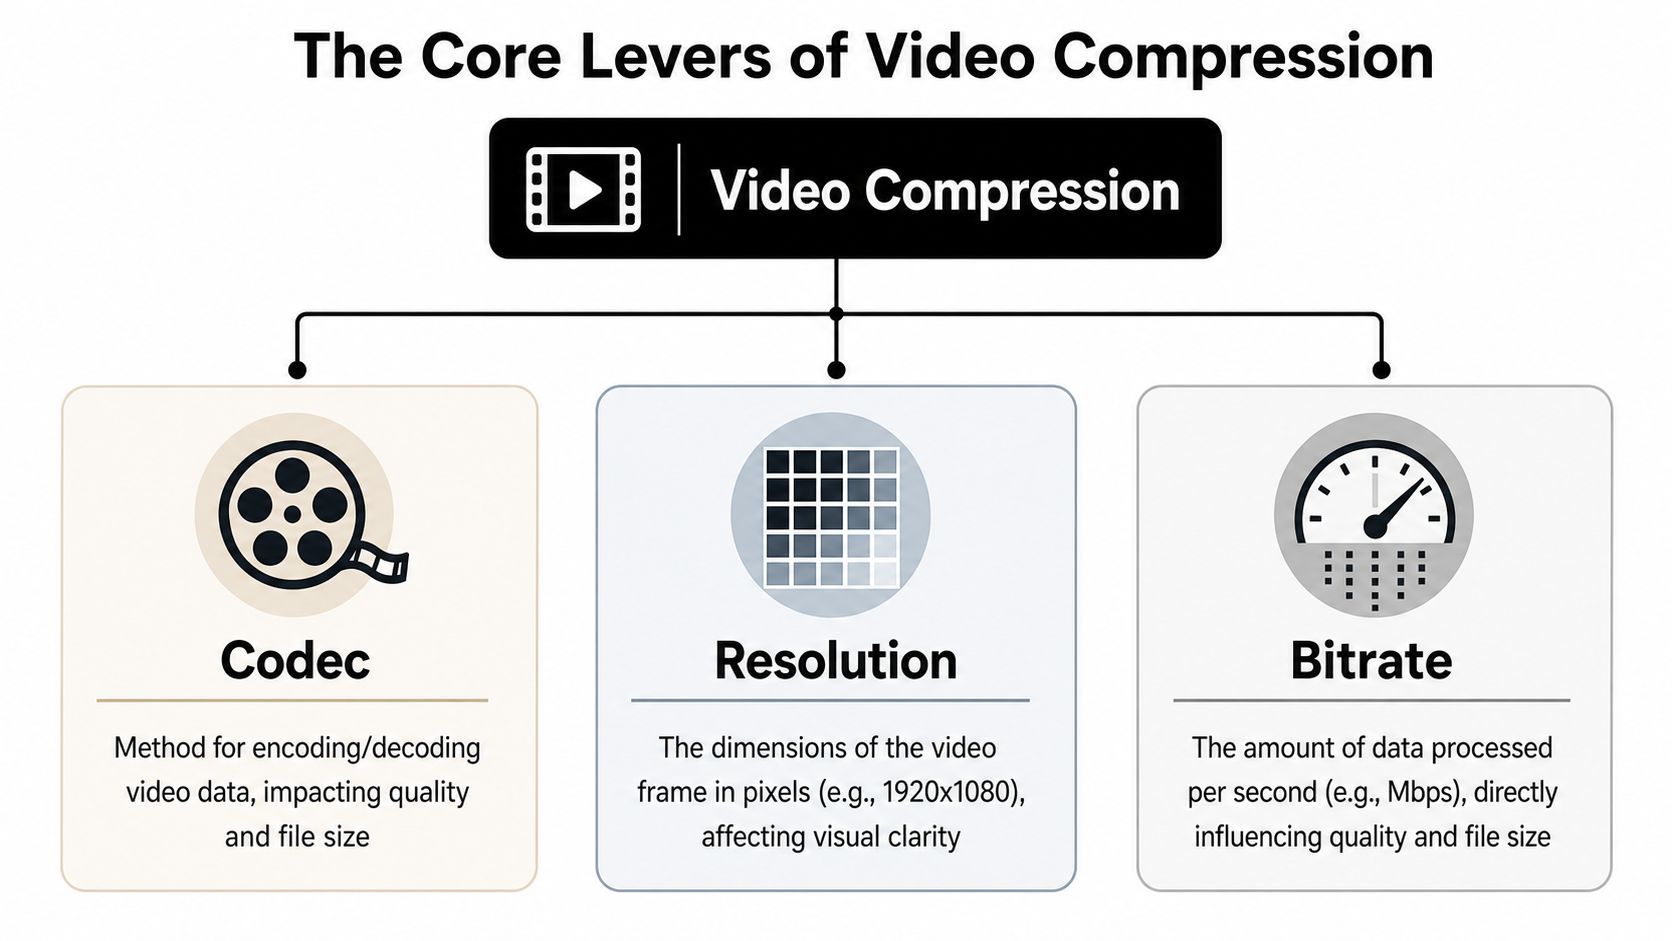
The Core Levers of Video Compression
Most compression decisions come down to three controls: codec, resolution, and bitrate. If you understand those, the software stops feeling random.
Codec decides how efficiently the video is packed
An MP4 file is a container. The codec is the compression method inside it. That's the part handling the compression.
Think of codec choice like packing a suitcase. One person folds clothes. Another rolls them neatly and uses every corner. Both use the same suitcase, but one fits far more into it. H.265 does that better than H.264.
Re-encoding with H.264 at CRF 22 to 23 typically cuts file size by 40% to 90% while keeping quality indistinguishable to most viewers, and H.265 shifts the sweet spot to CRF 24 to 28 while producing roughly 40% to 50% smaller files at the same quality according to PlayPause's MP4 compression guidance.
Practical rule: If your audience is on modern platforms and devices, H.265 is usually the better compression choice. If compatibility matters more than efficiency, H.264 is still the safer default.
Resolution cuts size faster than most people expect
Resolution is the frame size, like 1920 x 1080 or 1280 x 720. More pixels mean more data to encode.
Creators often try to save a bloated file by lowering bitrate while keeping full resolution. That works to a point, but there's a limit. If the frame is too large for the amount of data you allow, the encoder starts making ugly compromises.
For social media, especially mobile-first content, downscaling is often the cleanest move. If you work in property marketing, local brand content, or neighborhood reels, this is also part of essential video optimization for realtors, where faster loading and legibility matter more than preserving a giant master export.
Bitrate controls how much data the video gets per second
Bitrate is your data budget. More budget usually means more detail. Less budget means a smaller file, but also more visible compression if you push too far.
Two common ways to control it:
- CRF mode gives the encoder a quality target. It uses more data for demanding scenes and less for simple ones.
- Target bitrate mode gives the encoder a size budget. It tries to hit a more predictable output size.
CRF is like telling an editor, “Keep this looking good, use whatever space you need.” Target bitrate is like saying, “You have one page. Make it fit.”
For most creators, CRF is the easiest way to get a strong quality-to-size balance. Use target bitrate when you have a hard upload cap and the final size matters more than absolute quality consistency.
Quick mental model
| Lever | What it changes most | Best use |
|---|---|---|
| Codec | Compression efficiency | Shrink files without changing dimensions |
| Resolution | Pixel count | Biggest size cuts for mobile/social use |
| Bitrate | Data per second | Fine-tune quality or hit file limits |
If you only remember one thing, remember this: codec improves efficiency, resolution removes workload, and bitrate sets the budget.
Choosing the Right Tool for the Job
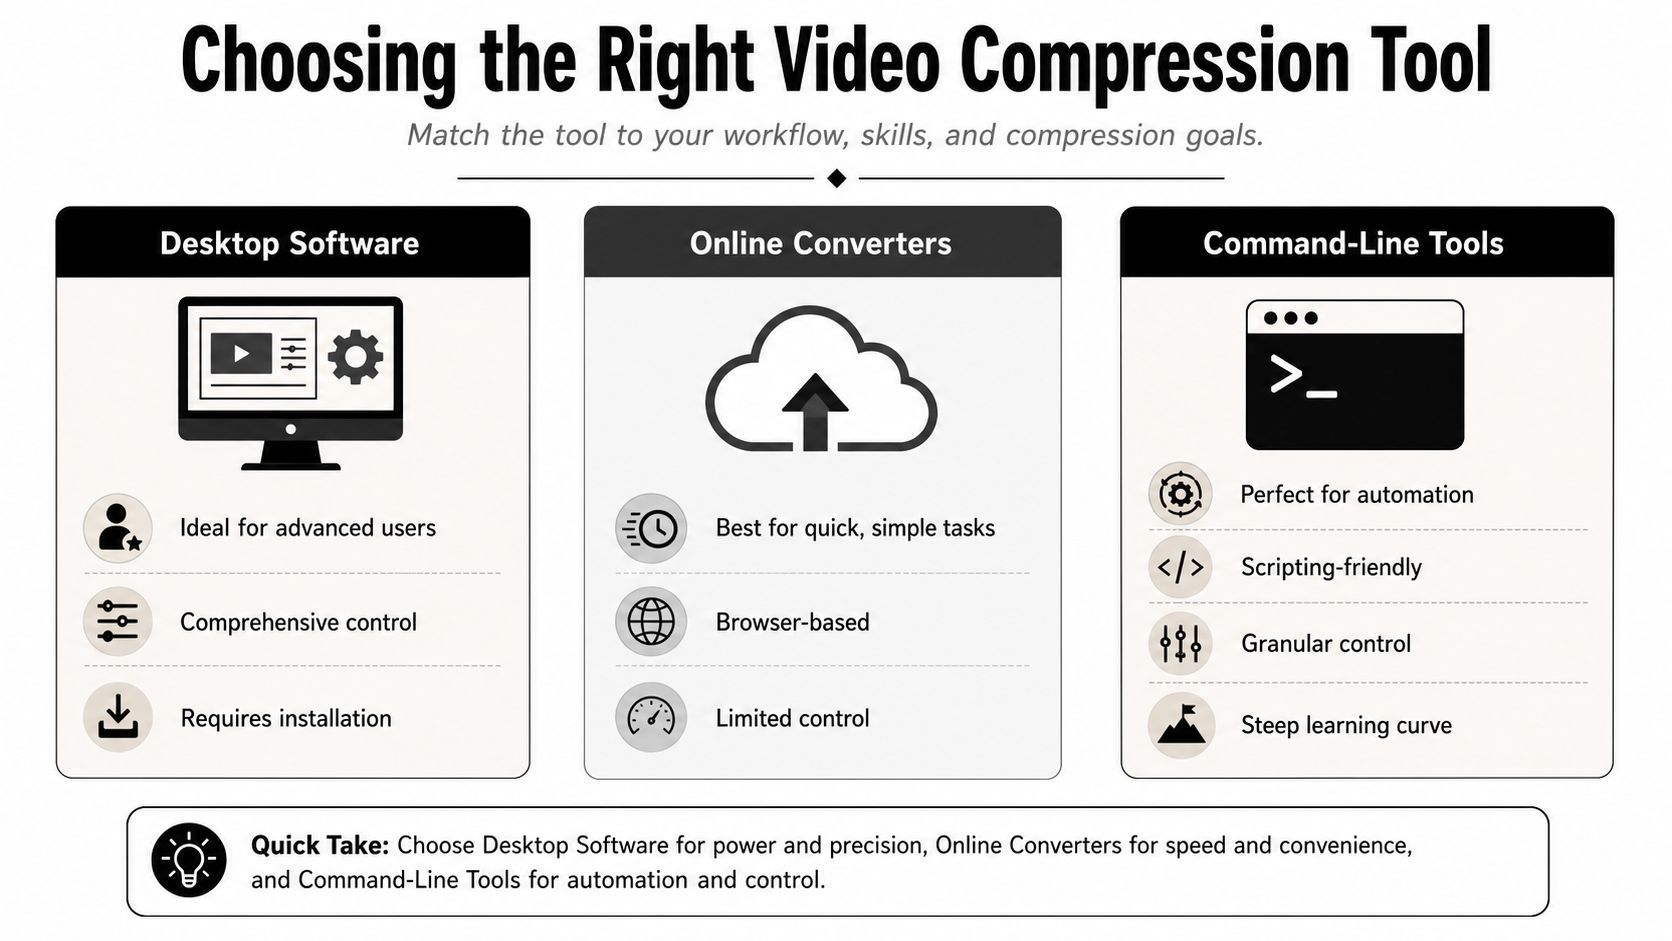
The best compressor depends less on brand loyalty and more on how you work. Some creators want a visual interface. Some want automation. Some just need to shrink one file and move on.
Desktop apps for control without command lines
If you care about settings and repeatability, desktop software is the sweet spot.
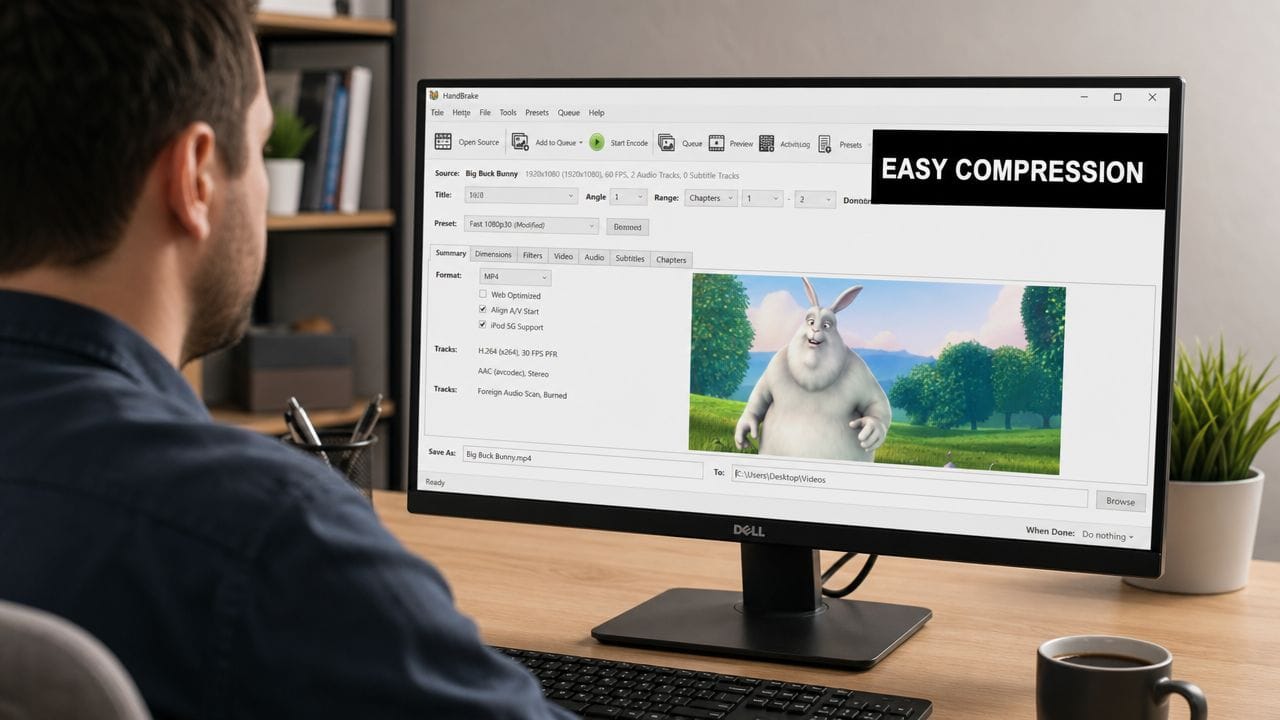
HandBrake is the first tool I'd hand to most creators. It exposes the settings that matter, hides the ones that don't, and makes it easy to test exports without getting lost.
VLC can also handle basic conversions. It's useful when you already have it installed and need a quick pass. The downside is that it doesn't make quality tuning as clear as HandBrake does.
This category fits:
- Detail-oriented creators who want to choose codec, resolution, and audio settings
- Editors working with masters who need one clean compression pass
- Teams reviewing results visually instead of writing scripts
Command-line tools for bulk workflows
FFmpeg is the serious option. It looks intimidating at first, but once you understand a few flags, it becomes the fastest way to process lots of files.
If you produce variations, archive exports, or social cutdowns in batches, FFmpeg saves time because you can automate the same settings across folders. That's why it stays in so many pro workflows, even for people who also use GUI tools.
Compress from the best source you have, once. Re-compressing an already compressed MP4 keeps stacking damage.
That point matters. A lossy encode degrades every time you run it again, and repeated passes can create macroblocking and color banding. Tools using H.265 can also deliver 50% better compression efficiency than H.264 according to Compresto's compression guide.
Online compressors for quick one-off jobs
Browser-based compressors are convenient when speed matters more than control. Drag, drop, wait, download.
They're useful for:
- One-off client requests
- Small test clips
- Creators on borrowed machines
- People in a hurry
But they come with trade-offs. You usually get less control over codec and quality settings, and uploading source footage to a third-party service may not fit your privacy or client requirements.
If your workflow already starts with AI-assisted production and fast iteration, it's worth looking at broader stacks of top AI video editing software to decide where compression should happen in the chain. Some creators also prefer building and organizing content inside platforms like ShortGenius before handling final exports and delivery.
A simple way to choose
- Use HandBrake when you want a strong visual tool with real control.
- Use FFmpeg when you process lots of videos or need automation.
- Use VLC when the job is simple and you already have it open.
- Use an online compressor when convenience beats precision.
A Practical Walkthrough Using HandBrake
A common social creator problem looks like this. The edit is finished, the MP4 is too large for upload, and the first quick compression pass makes captions look soft or turns clean motion graphics into mush. HandBrake is a good fix because it gives real control without forcing you into command line work.
Start with the cleanest source you have. Use the master export, not a file already downloaded from Drive, pulled from Instagram, or exported twice from another editor. Every extra lossy pass throws away information, and AI-generated footage tends to show that damage faster. Flat gradients, sharp text, and synthetic edges make compression mistakes easier to spot.
Start with a preset, then tune only what matters
Load the file and choose Fast 1080p30 first. That preset is a practical baseline for short-form video because it gets you close without inviting pointless tweaking.
Then adjust only the settings that change outcome in a meaningful way:
-
Format
Keep MP4 if the file is headed to social platforms, ad managers, or mixed-device playback. -
Video codec
Choose H.265 if smaller size matters more than maximum compatibility. Choose H.264 if you need the safest playback across older tools and ad platforms. -
Quality mode
Set Constant Quality. It is the easiest way to keep quality predictable when you are not trying to hit an exact file size. -
Audio
Use AAC. Drop the bitrate for voice-heavy videos. Keep it higher for music-led edits.
Settings that hold up for social content
For talking-head clips, product explainers, paid social ads, and AI-assisted shorts, this is a reliable starting point:
- Preset base: Fast 1080p30
- Video codec: H.265
- Quality: Constant Quality
- CRF: 26 to 28
- Audio codec: AAC
- Audio bitrate: 128 kbps, or 96 kbps for voice-first content
That range matters more than a single magic number. CRF works like a compression budget. Lower numbers spend more bits to protect detail. Higher numbers save space by allowing more damage. For clean AI-generated visuals from tools like ShortGenius, I usually stay a little more conservative than generic tutorials suggest because text, UI elements, and hard graphic edges break earlier than natural camera footage.
If your video includes subtitles burned into frame, mock app screens, lower-thirds, or product labels, start at CRF 26 or 27. If it is a simple talking head with a blurred background, 28 may look fine.
The practical rule is simple. Save space where viewers will not notice it. Protect the details they read.
Resize only when the frame size is the real problem
HandBrake's Dimensions tab is where many creators make or save the project.
If the source is 4K and the destination is TikTok, Reels, Shorts, or paid social viewed mostly on phones, downscaling to 1080p often cuts file size more effectively than pushing compression harder at 4K. That usually gives a better result because the encoder has fewer pixels to preserve.
Still, there is a ceiling here for AI-generated content. Downscaling can hurt small text fast. A frame that looked crisp at 4K may become hard to read at 1080p if the original design packed in too much copy, tiny UI chrome, or thin line art. In those cases, keep the resolution higher or redesign the frame before export. Compression cannot rescue text that was marginal to begin with.
Use resizing when:
- The source resolution is far above the delivery need
- The video is mainly viewed on phones
- Upload speed and review speed matter
- The frame does not rely on tiny text or fine interface detail
Test the hard part, not the easy part
Do a short test encode before you commit the whole file. Pick the section most likely to fail.
Good test sections include:
- Fast motion
- Animated captions
- Gradients
- Drop shadows
- Dense on-screen text
- Screenshots or UI mockups
A static intro card tells you almost nothing. The trouble usually shows up in motion, edges, and readable text.
Here's a walkthrough video if you want to see the interface in motion before trying it yourself.
A fast HandBrake checklist
| Setting | Good default for social video |
|---|---|
| Preset | Fast 1080p30 |
| Codec | H.265 or H.264 for wider compatibility |
| Quality mode | Constant Quality |
| CRF | 26 to 28, then adjust after review |
| Audio | AAC |
| Audio bitrate | 128 kbps, or 96 kbps for non-music |
HandBrake works best when you keep the job boring. Start from a solid preset, change four or five settings that matter, test the ugliest part of the clip, and export once from the clean source. That approach is faster than chasing tiny gains across repeated re-encodes, and it protects the details social viewers notice.
Automating Compression with FFmpeg
If you handle lots of files, GUI workflows get slow fast. FFmpeg is the tool for creators who want repeatable compression, bulk processing, and exact control.

A simple CRF command
This is the clean starting point for quality-first compression:
ffmpeg -i input.mp4 -c:v libx265 -crf 28 -c:a aac -b:a 128k output.mp4
What the key parts mean:
-i input.mp4tells FFmpeg which file to open-c:v libx265sets the video codec to H.265-crf 28uses constant quality mode-c:a aac -b:a 128ksets AAC audio at 128 kbps
A command that also downscales
If the source is larger than it needs to be, scale it during encode:
ffmpeg -i input.mp4 -vf scale=1280:720 -c:v libx264 -crf 23 -c:a aac -b:a 128k output-720p.mp4
That's useful when delivery matters more than preserving the original frame size.
FFmpeg rewards precision. One clean command beats five rounds of exporting and recompressing.
When you have to hit a hard file size target
For strict upload caps, CRF alone isn't ideal because output size can vary by scene complexity. In that case, use two-pass bitrate encoding.
The standard formula is video_bitrate_kbps = ((target_size_MB × 8192) / duration_seconds) − audio_bitrate_kbps, and Mux's guide to video compression with FFmpeg notes that this approach gives predictable output sizes, unlike single-pass VBR which can overshoot.
A common workflow looks like this:
- Set your target size and note the video duration.
- Calculate video bitrate with the formula.
- Run two-pass encoding using that bitrate target.
- Set max bitrate higher than target to give the encoder room in harder scenes.
- Review a motion-heavy segment before final delivery.
Batch processing a folder
If you regularly compress a stack of clips, FFmpeg shines because the command can be repeated through a script or shell loop. The exact syntax depends on your operating system, but the idea is the same: point FFmpeg at each file in a folder, apply the same settings, save to a new location, and let it run unattended.
That's where FFmpeg stops being “a command line tool” and becomes infrastructure for your content workflow.
Platform-Specific Settings for Social Media
The smartest export isn't the largest file you can upload. It's the smallest file that still survives platform playback and re-compression cleanly.
For most short-form social work, 1080p is already enough. Going higher often increases upload time and gives the platform more data to crush. For strict sharing limits and chat apps, 720p is often the better choice.
Recommended MP4 Compression Settings for Social Media
| Platform | Resolution | Codec | Quality/Bitrate Target | Audio Bitrate |
|---|---|---|---|---|
| YouTube | 1080p | H.264 or H.265 | Use CRF-based export for quality-first uploads | 128 kbps |
| Instagram Reels | 1080p | H.264 | Keep export optimized before upload to reduce ugly platform re-compression | 128 kbps |
| TikTok | 1080p | H.264 or H.265 | Favor clean, efficient files over oversized masters | 128 kbps |
| Discord or WhatsApp | 720p | H.264 | VBR in the 1–2 Mbps range for small, legible web files | 128 kbps or 96 kbps for non-music |
That last row is the one many creators ignore. According to PlayPause's guide to compressing MP4 for web delivery, downscaling from 4K or 1080p to 720p is often more effective than bitrate tweaks alone, and 720p with VBR in the 1–2 Mbps range can produce files small enough for platforms like Discord while remaining highly legible.
What changes by platform
Different platforms punish different mistakes.
- YouTube handles larger uploads better, so the main goal is preserving a clean source before its own transcode.
- Instagram Reels tends to expose softness and mosquito noise around text, especially in graphics-heavy edits.
- TikTok is forgiving of some texture loss, but not of muddy captions or weak contrast.
- Discord and WhatsApp force harder file size decisions, so 720p usually wins.
If Instagram is a major channel, this breakdown of mastering Instagram video for creators is useful for matching compression choices to actual feed behavior and format constraints.
A better rule than platform chasing
Don't build one giant master and upload it everywhere. Export by destination.
That usually means:
- Keep a high-quality master
- Make a platform-ready 1080p version for public social
- Make a lighter 720p version for chat apps, approvals, and fast sharing
The right settings aren't universal. They're tied to where the video will be watched.
Troubleshooting and Retaining Perceived Quality
Compression guides often assume video quality declines smoothly as file size drops. In practice, it doesn't work that way. There's usually a threshold where the image holds together, then suddenly falls apart.
That's especially true for AI-generated content, motion graphics, and text-heavy ads. Clean edges make flaws easier to see. A soft handheld clip can hide compression damage. A crisp caption card can't.
Why AI-style visuals break sooner
Most generic tutorials were written around camera footage. They don't account for flat colors, sharp fonts, simple backgrounds, and hard contrast lines. Those visuals hit a compression ceiling fast.
As noted in XConvert's discussion of MP4 compression limits, aggressive recompression on clean, high-contrast visuals often creates blocky artifacts that are disproportionately visible, and text legibility can be destroyed even when the file size target is technically met.
If your video contains text people must read, judge the encode by text edges first, not by faces or backgrounds.
Common fixes that actually help
When a compressed export looks wrong, these are usually the causes:
- Text looks crunchy because bitrate was pushed too low for the frame size.
- Motion looks smeared because the compression setting was too aggressive for scene complexity.
- Everything feels muddy because the file was re-encoded from an already compressed version.
- Colors feel off because of export mismatches between apps, not compression alone.
What to change first
Don't start changing five settings at once. Make one correction, test, then reassess.
- Use the original source file if you still have it.
- Try H.265 first when playback compatibility allows it.
- Lower the CRF slightly if text or edges break apart.
- Reduce resolution only if the design still reads clearly at that size.
The best compressed video is not the one with the smallest file. It's the one that still feels sharp, readable, and intentional after the platform does its own damage.
If you're producing short-form videos, ads, and channel content at a pace where manual exporting starts to slow you down, ShortGenius (AI Video / AI Ad Generator) is built for that kind of workflow. It helps creators and teams generate, edit, organize, and publish video faster, with scripting, voiceovers, resizing, captions, series management, and multi-platform scheduling in one place.