How to Add Voiceover to Video: A Complete Guide (2026)
Learn how to add voiceover to video using AI, a pro mic, or your phone. Our guide covers recording, syncing, editing, and audio optimization for social media.
You’ve probably done this already. The visuals are clean, the cuts are sharp, the captions look right, and the video still feels flat the second you play it back. Usually the problem isn’t the footage. It’s the voiceover.
On short-form platforms, viewers will forgive a lot before they forgive weak audio. A muffled read, harsh room echo, bad pacing, or a robotic AI voice can make a polished edit feel cheap. A clear, intentional voiceover does the opposite. It gives the video structure, tone, and momentum.
The good news is that learning how to add voiceover to video doesn’t require a full studio. What matters more is choosing the right recording method, syncing it cleanly, and doing the post-production work that most tutorials skip.
Why Your Video Needs a Great Voiceover
A lot of creators treat voiceover like the final checkbox. Record something quick, drag it onto the timeline, lower the music, export. That workflow is exactly why so many videos look better than they sound.
A strong voiceover fixes three common problems at once. It explains what the viewer is seeing, sets the emotional tone, and carries the pace when the visuals alone aren’t enough. That matters in tutorials, product demos, ads, faceless content, talking-head explainers, and almost every short-form format where the first few seconds decide whether someone stays or scrolls.

The business side tells the same story. The global voice-over market was valued at $4.2 billion in 2024 and is projected to reach $8.6 billion by 2034, according to voice-over industry market data. That kind of growth reflects how important narrated content has become across marketing, education, ads, and social video.
What bad voiceover actually does
Bad voiceover doesn’t just sound unpolished. It creates friction.
- It slows comprehension when the delivery is vague or too fast.
- It weakens trust when room echo, clipping, or robotic phrasing makes the audio feel low effort.
- It hurts retention because viewers have to work harder to follow the message.
- It breaks the brand feel when every video sounds different.
A good voiceover should feel invisible. The viewer shouldn’t think about the audio. They should simply keep watching.
You have more than one path
There isn’t one correct workflow. There are three practical ones.
Some creators use a phone when speed matters more than polish. Some record with a dedicated mic because their own voice is part of the brand. Others use AI because they need consistency, faster iteration, or multilingual output. All three can work. The difference is whether you clean up the audio and fit the method to the job.
Choosing Your Voiceover Recording Method
The wrong method creates extra work before you even edit. I’ve seen creators spend more time fixing a rushed recording than they would have spent making a better one from the start.
Choose based on the role the voiceover plays in your content. If your audience follows you for your personality, your own recorded voice matters more. If you run a content machine for ads, explainers, or product videos, scale and consistency may matter more than vocal performance.
Voiceover Method Comparison
| Method | Cost | Audio Quality | Speed & Convenience | Best For |
|---|---|---|---|---|
| Smartphone | Low | Acceptable in a quiet room, limited control | Fastest to capture | Stories, quick updates, rough drafts |
| Pro Mic | Moderate to high | Best control and most natural result | Slower because recording and cleanup take time | Personal brands, YouTube, premium ads, education |
| AI voice generator | Varies by tool | Can sound strong with the right settings, weaker if left generic | Very fast for production and revisions | Faceless channels, agencies, multilingual content, version testing |
Smartphone recording works when speed is the whole point
A phone is fine for temporary content, casual clips, or moments when authenticity matters more than polish. If you’re making a quick reaction, behind-the-scenes update, or a same-day trend post, convenience can win.
But phones expose every untreated-room problem. Hard walls create reflections. Distance kills presence. Built-in mics don’t give you much room to shape the sound later.
Use a phone if:
- You need to publish fast
- You’re recording in a quiet, soft room
- The content is intentionally casual
Skip it if the voiceover is carrying sales copy, teaching, or brand positioning.
A dedicated microphone gives you control
If your voice is part of the product, a proper mic setup is worth it. You get better tone, less room noise, and much more predictable results in editing. This is the best route for creators building a recognizable voice and for anyone who wants the sound to hold up across YouTube, Instagram, TikTok, and paid social.
The trade-off is time. Manual recording requires setup, retakes, editing, and some basic audio treatment. That work pays off when consistency matters.
Working rule: If you want the same voice to become familiar across months of content, use a real mic and build a repeatable recording setup.
AI voice generators win on speed and scale
AI is the practical choice when you need volume. It’s also useful when you want to test several hooks, swap narrator styles, localize a script, or keep one consistent sound across a team.
The downside is obvious. Generic output sounds generic. If you don’t adjust pacing, emphasis, and script phrasing, the result can feel lifeless. AI works best when you treat it like a narrator that still needs direction.
A simple decision filter helps:
- Use your phone for quick, disposable, or highly casual content.
- Use a pro mic when voice quality is part of your reputation.
- Use AI when turnaround, consistency, or multilingual production matters most.
How to Record a Professional Voiceover Manually
If you’re recording your own voice, most of the quality comes from setup before you ever hit record. A mediocre read in a controlled space usually beats a great read in a bad room.

Professional practice is straightforward. Use a dynamic microphone, then apply a high-pass filter at 80-100Hz and compression at a 4:1 ratio to keep the voice consistent at -12 to -6dB LUFS, as outlined in Lightworks voiceover best practices.
Start with the room, not the mic
A great microphone in a reflective room still sounds bad. Before you think about plugins or presets, reduce the room problems.
Good makeshift options:
- A closet with clothes because soft materials absorb reflections
- A corner with curtains, rugs, and soft furniture
- A desk setup with blankets or acoustic panels nearby
Avoid kitchens, empty offices, and rooms with bare walls. Those spaces exaggerate harsh reflections and make the voice feel distant.
Mic technique matters more than most beginners think
Distance and angle shape the recording immediately. Stay roughly 6 to 12 inches from the mic, and speak slightly off-axis instead of directly into it. That helps reduce plosives and mouth blasts on words with hard consonants.
A few habits improve results fast:
- Use a pop filter: It catches bursts of air before they hit the capsule.
- Keep your posture open: A collapsed posture makes reads sound small.
- Mark your position: If you move around, the tone changes between takes.
- Record room tone: A few seconds of silence helps if you need cleanup later.
Record one short test, then listen on headphones before the full take. Fixing a noisy setup after ten minutes of narration is a painful way to learn.
Record like an editor will touch the file later
Don’t try to nail the whole script in one heroic take. Record in sections. Leave a beat between lines. If you make a mistake, pause, repeat the sentence cleanly, and keep going. That gives you obvious edit points.
A simple workflow:
- Write for speech, not for reading. Shorter lines sound more natural.
- Warm up your voice. A cold first take usually sounds tight.
- Set gain conservatively. Clipping ruins good takes.
- Record in WAV if possible. It gives you more flexibility later.
- Do two versions of key lines. One neutral, one with more energy.
The first cleanup pass
Once recorded, do the basic treatment before you sync it to video.
- Apply the high-pass filter at 80-100Hz
- Add light EQ for clarity
- Use 4:1 compression
- Normalize the voice into the target range
- Remove obvious clicks, breaths, or background distractions
That’s the difference between a raw recording and a voiceover that sits well in a social video mix.
How to Generate Flawless AI Voiceovers with ShortGenius
You finish a short-form edit, drop in an AI voice, and the result still feels cheap. The words are right. The pacing is wrong. The tone misses the hook. On TikTok and Instagram, that gap shows up fast in retention.
AI voiceover works best as a production system, not a magic button. It gives you fast revisions, consistent delivery across batches, and far less rerecording when a script changes. The trade-off is direction. If you don’t shape the script, pacing, and post-processing, the output sounds flat even with a good voice model.
Some analyses of AI voice workflows report major time savings from automated cleanup and stronger listener response to well-trained cloned voices than to generic text-to-speech. That matches what creators see in practice. The main gain is not speed alone. It is the ability to test multiple hooks, tones, and line reads before you commit to the final cut.
Write for AI delivery
AI interprets copy verbatim. Dense sentences, stacked clauses, and vague emphasis points produce the familiar synthetic rhythm that kills watch time.
Scripts built for AI usually have:
- one idea per sentence
- clear stress words near the end of the line
- short transitions between scenes
- deliberate pause points
- phrasing that sounds spoken, not published
I also shorten opening lines harder for social than for YouTube. If the first sentence can’t land cleanly in under three seconds, I rewrite it before I touch voice settings.
If you need multilingual versions, fix the script before generation, not after. Direct translation often preserves meaning but loses cadence. For teams localizing ads, tutorials, or creator-style clips, this guide on how to translate voice and audio files accurately is useful because phrasing and delivery usually need adaptation before the final render.
The workflow inside ShortGenius
A good AI workflow keeps writing, voice selection, and revisions close together. That is why many creators use ShortGenius for AI voiceover and short-form video production instead of splitting the job across separate script, TTS, subtitle, and editing tools.
A practical workflow looks like this:
-
Draft by scene Write the narration to match visual beats, not the full concept doc.
-
Choose a voice that fits the format UGC-style promos need a different read from faceless explainers or product demos.
-
Set pacing on purpose Slightly slower often sounds more confident. Slightly faster can work for urgency, but only if the script is sparse.
-
Render a short sample first Test the hook and one mid-video section before generating the full script.
-
Fix bad lines at the script level If emphasis sounds off, rewrite the sentence. Settings can only do so much.
-
Generate alternates Create two or three versions of the opening line. That is one of the easiest ways to improve retention without rebuilding the whole edit.
Here’s a walkthrough if you want to see the flow in action.
What separates usable AI from polished AI
Poor AI voiceovers usually fail in predictable ways. The script is overstuffed. The default cadence is left untouched. The voice does not match the footage. The render goes straight into the timeline with no audio finishing.
The creators getting strong results on social do more than generate and export. They treat AI narration like raw material. That means adjusting pronunciation, splitting long lines into cleaner phrases, and running light post work so the voice cuts through phone speakers without sounding harsh.
AI narration sounds natural when the script is directed well and the exported file is finished like real voiceover audio.
That extra polish is what makes AI usable for high-volume social production. It also closes the quality gap between fast synthetic narration and the tighter, more deliberate sound people associate with professional voice work.
Syncing and Editing Your Voiceover to Perfection
Once the file exists, the hard part isn’t adding it to the timeline. It’s making it feel native to the video instead of layered on top of it.
If your source clip already has distracting camera audio, fan noise, or accidental speech, clean that out first. A simple utility to remove existing audio from your video can save time before you start syncing the final narration.
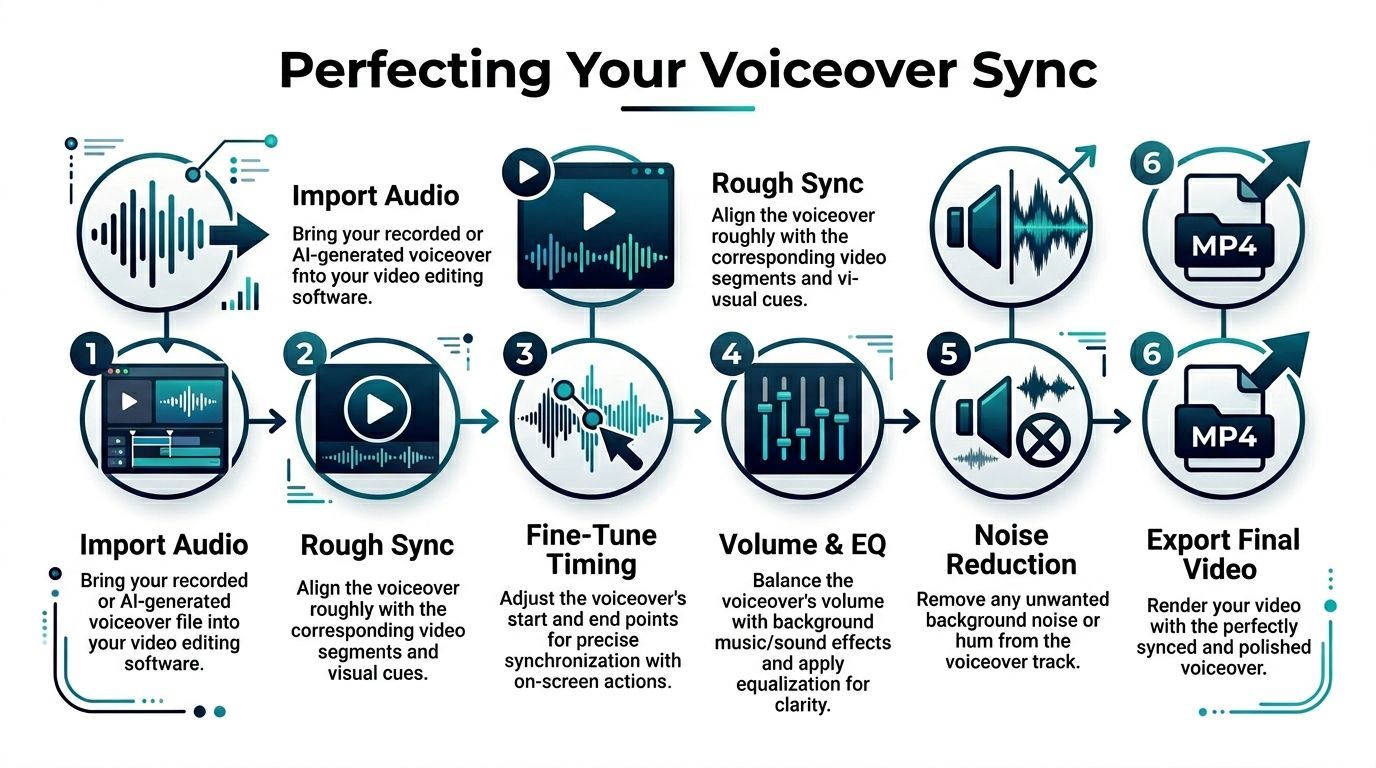
Start with rough sync
Import your audio into Premiere Pro, DaVinci Resolve, CapCut, Final Cut, VEED, or whatever editor you use. Drop the voiceover on its own track under the video and line it up by meaning first, not by frame perfection.
For a rough sync, focus on:
- where the first spoken phrase should begin
- where visual actions need verbal support
- where silence should be left alone
If the voiceover was recorded to a script that matches the edit, this part goes quickly. If the script changed after the cut, expect to trim lines or move clips.
Fine-tune with waveforms and visual cues
Zoom into the timeline and listen sentence by sentence. Tight sync matters most when the narration references a visible action, text on screen, hand movement, or product reveal.
Use:
- waveform peaks for obvious speech starts
- markers for key visual beats
- small trims instead of large shifts once you’re close
Use overlap edits to smooth the flow
A beginner cut often sounds abrupt because every voice line starts exactly when the new shot appears. That’s not always the best move.
Two simple editing patterns help:
- J-cut: The next voice line begins before the visual changes.
- L-cut: The current voice line continues after the visual changes.
These edits make the video feel more intentional and let the voice guide the viewer through transitions.
If a cut feels jumpy, don’t always fix the picture first. Often the smoother fix is moving the audio by a fraction.
Balance voice, music, and effects
After timing is locked, mix the track. The voice should always win. Background music should support the energy without competing for attention.
A practical finishing pass:
- lower music under dialogue
- remove distracting breaths only when they pull focus
- fade line starts and ends cleanly
- check transitions on speakers and headphones
- watch once without touching the timeline
That final real-time watch catches more problems than endless micro-adjustments.
Advanced Tips to Polish Your Voiceover Audio
Raw voiceover is almost never finished voiceover. This is the step most creators rush, and it’s the step that often separates content that feels credible from content that feels homemade.
The reason is simple. Viewers react to sound faster than they consciously analyze it. If the voice is muddy, noisy, thin, harsh, or inconsistent, they feel resistance before they decide why.
A strong reason not to skip the polish is audience behavior. A Wistia study found that audio quality issues cause 42% of viewers to abandon short-form videos within the first 5 seconds, and research on the voice numerosity effect found that using multiple voices can increase persuasiveness and funding on Kickstarter by over 30%, as summarized in SMU’s write-up on voiceovers in video marketing.
Clean the noise before you enhance the voice
A lot of people jump into EQ first. That’s backwards if the track has hiss, hum, room tone, or low-end rumble.
Start by removing what shouldn’t be there:
- Use noise reduction lightly so the voice doesn’t get watery
- Gate carefully if the room noise sits between phrases
- Cut rumble before boosting clarity
- Trim bad breaths and mouth clicks only when they distract
Heavy cleanup can make a voice sound worse than the original. The goal isn’t sterile audio. It’s controlled audio.
EQ for clarity, not for impressiveness
Good EQ usually sounds boring in solo mode and excellent in the full mix. You’re trying to create intelligibility, not radio drama.
Useful moves include:
- High-pass filtering to clear low rumble
- Cutting muddy low-mids if the voice feels boxed in
- Adding a touch of presence so consonants read clearly
- Reducing harshness or sibilance if the top end bites
If you hear a dramatic transformation after one aggressive EQ move, it’s often too much.
Compression is your consistency tool
Compression is what keeps a voice sitting in front of the viewer instead of bouncing around in volume. It helps quiet lines stay understandable and keeps louder lines from jumping out.
What works:
- moderate compression
- gain reduction that sounds controlled, not squashed
- matching output level after compression
What doesn’t:
- crushing the life out of the read
- over-brightening after compression
- trying to fix bad mic technique with plugins
Practical rule: If you can hear the compressor working, back it off.
Pacing, silence, and multiple voices
Audio polish isn’t only technical. It’s editorial.
Sometimes the smartest move is leaving a half-second of silence before the key line lands. Sometimes it’s cutting a phrase that repeats what the visual already shows. And in some formats, adding a second voice creates contrast that keeps attention high.
Multiple voices are especially useful for:
- dialogue-style ads
- skits and UGC-style promos
- before-and-after comparisons
- tutorials with host and customer lines
The important part is restraint. Two distinct voices can feel dynamic. Too many voices can make a short video feel messy.
Exporting and Publishing Your Video for Social Media
By the time you export, the creative decisions should already be finished. Export is where you protect the work, not where you hope the platform fixes it.
Keep the final file simple and platform-friendly. Export with clean audio, then watch the rendered file before uploading anywhere. Problems often show up only after export, especially abrupt cuts, missing fades, and music that came out louder than expected.
Final checklist before publish
- Watch the full export once: Don’t scrub. Play it through.
- Check the first seconds closely: The opening line needs to be clear right away.
- Verify captions: Captions should support the voiceover, not fight it.
- Listen on phone speakers: That’s where a lot of short-form content gets judged.
- Check music balance again: A mix that felt fine on headphones can get muddy on mobile.
- Make sure the ending resolves cleanly: No clipped final word, music tail, or awkward silence.
Captions are part of the audio strategy
A good voiceover and good captions work together. Captions help silent viewers, improve accessibility, and reinforce key lines when the feed environment is noisy or distracting.
For TikTok, Instagram Reels, YouTube Shorts, and Facebook video, the best result is usually a clear spoken track paired with clean on-screen text. If the voice explains and the captions echo the message cleanly, the video becomes easier to follow in more viewing conditions.
Publishing strong narrated video comes down to one habit. Don’t treat audio like a layer. Treat it like the spine of the video.
If you want a faster way to script, generate natural voiceovers, assemble scenes, add captions, swap variants, and publish across channels from one workflow, try ShortGenius (AI Video / AI Ad Generator). It’s built for creators and teams who need to turn ideas into polished social video without stitching together a stack of separate tools.