Create Datamosh Video Online: AI Glitch Art Guide 2026
Learn to create datamosh video online. Our 2026 guide offers free tools, codec tricks, and a fast AI workflow for stunning glitch art, audio intact.
You've probably seen the effect already. A face drags into the next shot, a doorway liquefies into a skyline, or a dancer's movement keeps flowing after the scene has changed. It looks broken, but in a very deliberate way.
That effect is datamoshing. And if you're searching for a way to make a datamosh video online, you probably want one of two things. Either you want the fastest path to a cool glitch without touching codec internals, or you want enough control to make the melt happen where you want it, not where the software randomly decides.
Both are possible. The catch is that browser workflows are usually easier than desktop tools, but also more fragile. The best results come from understanding what to prep, what settings matter, and where online tools tend to fall apart, especially when you need a usable export with audio still in sync.
What Is Datamoshing Anyway
Datamoshing is the kind of effect people often discover backwards. They don't start with the term. They see a video that seems to smear one scene into another and then ask how to recreate it.
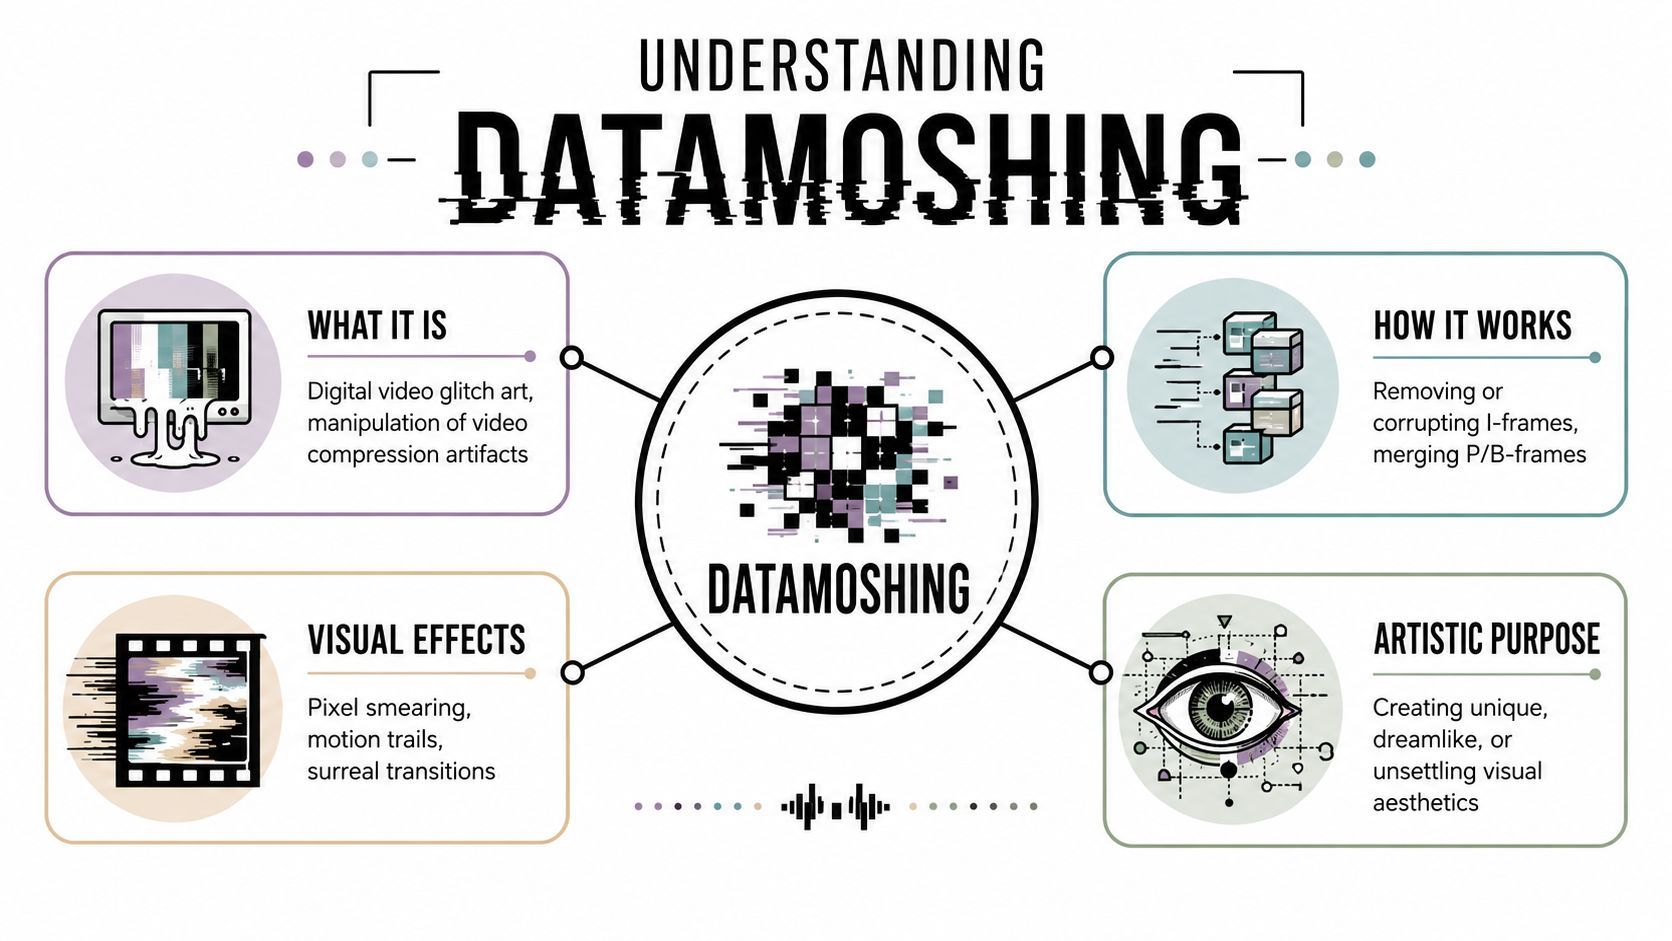
Datamoshing is a digital-glitch art technique that works by tricking video compression into reusing old motion data across new frames. Adobe describes it as a process that relies on altering the maximum I-frame interval, often by setting the GOP size high, such as 500, and reducing B frames to zero to break compression and create the melting effect, as explained in Adobe's datamosh overview.
The simple way to think about it
A compressed video doesn't store every frame as a totally new picture. Some frames act like anchors. Others mostly store changes and motion.
A useful mental model is this:
- I-frames are full snapshots.
- P-frames carry forward motion and change from earlier frames.
- Datamoshing happens when you stop the video from refreshing cleanly, so old motion data spills into the next image.
That's why the signature look feels like a memory leak. The second shot isn't fully replacing the first one. It's inheriting movement from it.
Practical rule: If you want a good datamosh, think less like an editor and more like someone sabotaging the refresh logic of the file on purpose.
What the effect actually looks like
When it works, the video can:
- Smear movement across cuts so scene A bleeds into scene B
- Warp faces and edges into abstract shapes
- Pull color and motion trails forward even when the background changes
- Create a melt effect instead of a clean transition
The art side matters as much as the technical side. Datamoshing isn't just corruption for its own sake. It's useful when you want a surreal transition, a dream-state visual, or a rough digital texture that feels more alive than a standard glitch overlay.
Prepping Your Clips for Maximum Glitch
Most failed datamoshes don't fail in the codec editor. They fail before the file ever gets there.
The raw material matters. If your two clips don't have the right relationship to each other, the glitch won't read as intentional. It'll just look like a damaged export.

Pick clips with a clear handoff
The strongest results usually come from contrast.
One clip should have obvious motion. The next clip should give that motion somewhere weird to land. A hand moving across frame into a portrait shot works. Fast body movement into a still hallway works. Camera pans into a static object can work too, though they're harder to control.
Use this selection test before you start:
- Clip A needs motion: A person turning, walking, swinging an arm, or moving across frame gives the codec something to drag forward.
- Clip B needs readable shapes: A face, object, or simple background gives the smear somewhere visible to attach.
- The cut should be hard: Datamoshing likes abrupt scene changes more than soft fades.
Trim tighter than you think
If you leave too much footage before or after the target cut, you make the process harder. For online workflows, shorter source clips are easier to preview, easier to corrupt, and easier to salvage if something breaks.
I usually isolate the transition moment first. That means the end of clip A and the beginning of clip B should be the only parts I really care about. Everything outside that moment is just overhead.
Keep the datamosh target narrow. The more dead space around the transition, the more chances the file has to refresh or drift away from the effect you want.
Keep the footage structurally simple
A few things tend to work against good online results:
| Choice | Usually works | Usually causes trouble |
|---|---|---|
| Motion | One dominant movement | Busy scenes with many moving objects |
| Composition | Clear subject separation | Crowded, noisy backgrounds |
| Edit point | Hard cut | Dissolves or motion blur-heavy transitions |
| Goal | One strong glitch moment | Trying to datamosh an entire long sequence |
If you want a stylish, shareable result, don't try to mosh everything. Build one memorable break in the video. That reads better on social platforms and gives you more control over the final output.
The Manual Online Datamosh Workflow
A good online datamosh usually starts with a frustrating preview. The cut is right, the source clips are right, and the browser tool still spits out a fake RGB glitch or a broken file with dead audio. The manual workflow fixes that by targeting the codec behavior that creates the smear in the first place.
The underlying move is I-frame removal. As explained in SpotlightFX's breakdown of datamoshing, you keep the first I-frame, stretch the GOP as far as the tool allows, often up to 500, and set B-frames to 0 so the encoder keeps reusing motion from earlier frames. If a clean reset frame survives at the cut, the melt stops.
What you're trying to force
Datamoshing works when clip B arrives before the codec gets permission to redraw the image cleanly.
That is the whole job.
Clip A supplies motion. Clip B supplies new shapes. Remove the reset at the cut, and the old motion vectors drag themselves across the new shot. Done well, it looks intentional. Done badly, it looks like compression damage.
A browser-first process that actually works
Online tools hide a lot, so the fastest path is to simplify the task before you upload anything. Use one exported file with a single hard cut, then do the glitch pass on that file only. Fewer moving parts means fewer mystery failures.
A practical sequence looks like this:
-
Export one combined source clip
Put clip A and clip B in one timeline, hard cut them together, and export a clean intermediate file. Do not send separate files into the datamosh tool unless the app specifically requires it. -
Pick a tool that exposes codec settings
If the site only offers a one-click “glitch” style, expect a simulated effect, not a true mosh. For a real smear, the tool needs some control over keyframes, GOP length, or frame structure. -
Push the GOP length as high as the tool allows
Long GOP settings give the codec more room to keep predicting instead of refreshing. If 500 is available, use it. If the browser app caps it lower, use the maximum and test anyway. Online tools are often limited, but a partial mosh can still look good in a short social clip. -
Set B-frames to 0
This removes a common source of messy, inconsistent motion prediction. In browser tools, this setting is often buried under advanced export or codec options. -
Protect the first I-frame
The file needs one stable reference frame at the beginning. Remove that anchor and playback often collapses into black frames, decoder errors, or motion sludge that is impossible to use. -
Remove the reset frame at the cut into clip B
This is the frame that matters. If the second shot gets a clean I-frame, the codec resets and your smear dies immediately. -
Preview only the transition zone
Do not judge the full clip yet. Check the few seconds around the cut, confirm the bleed is happening, then decide whether the result is worth exporting with audio intact.
Where online workflows hold up
Browser-based datamoshing is best for one clear transition that needs to be shareable fast. That is the trade-off. You give up some frame-level precision, but you skip the slower desktop chain and you can keep the result ready for posting.
These conditions usually produce the cleanest online result:
- One strong motion pattern in clip A
- A simple, readable shot in clip B
- A single hard cut
- Short source duration
- Minimal re-encoding before the glitch pass
These conditions usually cause trouble:
- Multiple scene changes in one file
- Busy footage with lots of competing motion
- Tools with no access to keyframe behavior
- Source files that have already been exported several times
- Long sequences where audio sync matters across many edits
The shortest useful settings checklist
For manual browser work, these are the settings worth hunting down:
- Long GOP, ideally 500
- B-frames set to 0
- Keep the first I-frame
- Remove the next reset point at the target cut
- Test the cut, then re-export if needed
That list is short. The annoying part is that many online editors hide at least one of those controls behind presets or automatic encoding.
That is why manual online datamoshing feels inconsistent. You are often trying to force codec behavior through an interface designed to hide it.
What I use this method for
I use the manual route when I want one real codec smear, not a generic glitch overlay, and I need the result to stay usable in a browser workflow. It is good for short reels, music edits, title transitions, and quick experiments where keeping the original audio matters.
If the tool gives enough control, the manual process still produces the better-looking mosh. If it does not, I stop fighting the browser and use an AI preset workflow instead. That shortcut skips the most error-prone setup, gets to a polished result faster, and is usually the better choice when the deadline matters.
Troubleshooting Common Glitch Failures
A lot of people assume datamoshing fails because they “didn't corrupt it enough.” Usually the opposite is true. They corrupted the wrong part.
Manual online workflows fail in repeatable ways. Once you recognize the pattern, the fix gets much faster.
The video goes black
This often means the file lost the wrong reference frame. If you remove the opening I-frame, the clip may have nothing stable to build from.
The fix is straightforward. Keep the first anchor frame intact and target the reset point at the transition instead.
The effect starts, then stops
This usually means a stray keyframe survived in the middle of the section you wanted to smear. One intermediate refresh can kill the melt instantly.
Check the cut area and any later refresh points. If the clip “snaps back to normal,” the codec probably found a clean image again.
The glitch looks noisy instead of fluid
That often comes from bad source pairing, not just bad settings. Too many moving objects, too much detail, or a weak transition between shots can make the smear look messy rather than intentional.
Try changing the footage before changing the tool. A better clip pair beats endless export retries.
The best troubleshooting move isn't always technical. Sometimes you just picked two clips that don't want to blend.
The audio drifts or breaks
This is the problem most tutorials ignore. Visual corruption gets all the attention, but a shareable video also needs to stay watchable.
A significant gap in datamoshing tutorials is preserving audio sync and narrative structure. Forum data shows 68% of users are looking for tools that maintain audio fidelity, according to the source cited in this discussion of audio-preserving datamosh workflows.
If your audio matters, use a safer structure:
- Separate audio from picture early: Keep a clean copy of the audio track before you start corrupting the video.
- Glitch only the transition segment: Don't mosh the entire timeline if you only need one effect moment.
- Reassemble in a normal editor afterward: Drop the corrupted visual back under the original sound when possible.
Online experimentation often meets a common challenge. You can get a cool broken file fast. Getting a cool broken file that still plays cleanly is a different job.
The AI Shortcut to Perfect Datamosh Effects
If you like the datamosh look but don't enjoy wrestling with keyframes, AI presets are the practical shortcut. They don't replace the underlying art logic. They replace the fussy part where one bad encode can waste an hour.
The value isn't just speed. It's consistency. When you need a datamosh video online that still feels deliberate, preset-based workflows are often better than trying to force a pure manual mosh inside a limited browser tool.
Why presets solve the annoying part
Most creators don't need forensic codec control. They need a visual result that looks like motion leakage, pixel melt, frame drag, or digital smear. They also need the export to survive upload to TikTok, Reels, or Shorts.
That's where AI glitch presets help. Instead of deleting I-frames by hand, you choose an effect such as a pixel melt or data glitch look, then adjust how aggressive it feels. The output stays easier to edit, caption, resize, and publish.
This also lines up with what many creators want. The source above notes that 68% of forum users seeking datamosh help are specifically looking for tools that preserve audio fidelity and narrative structure. That's a strong argument for modern preset workflows when the end goal is a usable piece of content, not a technical exercise.
A better workflow for social content
Use AI presets when any of these are true:
- Your audio matters: Spoken content, music timing, or dialogue usually shouldn't be risked in a destructive manual pass.
- You need repeatability: Brand content and client work need predictable exports.
- You want creative control without codec surgery: Visual style should be adjustable without file corruption roulette.
A useful mindset comes from Tokify's guide to AI creative control. The point isn't to let automation make every choice. It's to keep control over timing, structure, and the final look while skipping the mechanical parts that don't add creative value.
Here's a quick look at the workflow in action:
What to adjust in an AI datamosh preset
Don't just click the effect and export. Tune it.
Look for controls that shape the final style:
- Transition intensity for subtle bleed versus full melt
- Edge distortion for whether subjects warp softly or break apart
- Temporal drag for how long motion trails persist
- Color instability for cleaner or dirtier glitch aesthetics
If the preset keeps audio locked and the story readable, that's not cheating. It's a better production decision.
Exporting and Sharing Your Glitch Art
You finish a datamosh clip, it plays perfectly in preview, then the upload flattens the motion smear, shifts the audio, or crushes the opening frame. That last export step decides whether the piece feels intentional or broken in the wrong way.
Online delivery rewards restraint. Keep the glitch in the image, not in the final handoff. Export a clean delivery file after the effect is approved, especially if you built the look through a destructive manual pass. That gives you a shareable version with the audio intact and cuts down on surprises once a platform recompresses it.
Final export checklist
- Use a common delivery format: MP4 is still the safest option for short-form posting and cross-app uploads.
- Check the first second: Social feeds autoplay fast. Start on a frame that already has shape and motion, not dead air before the smear kicks in.
- Watch the exported file outside the editor: Timeline playback can hide stutters, reset frames, and small audio sync problems.
- Size for the platform on purpose: Vertical usually wins for TikTok, Reels, and Shorts. Square or widescreen can work, but only if the composition was built for it.
- Keep one master and one post-ready export: Save the high-quality version, then make platform-specific files from that instead of re-exporting re-exports.
Sharing matters as much as export settings. A good datamosh loop usually reads best when the caption tells viewers what to notice: the melt, the motion carryover, the frame drag, or the way one subject bleeds into the next. If you used an AI preset to build the effect, that is often the fastest route to a polished post because it skips the fragile codec work and keeps speech, music, and timing usable.
For visual direction, study artists and editors who treat glitch as part of the composition instead of a random corruption stunt. If you want to push the style toward vaporwave, retro web decay, or haunted-screen color palettes, Internet's favorite ghost is a useful reference for mood, texture, and palette decisions. For more inspiration from people still posting experimental moshes, the datamoshing community on Reddit is worth browsing.
A shareable datamosh is not the most broken file. It is the one that survives upload, keeps its audio, and still hits on the first watch.
If you want the fast version of this workflow, ShortGenius (AI Video / AI Ad Generator) gives you a practical way to build stylized glitch videos, keep the audio usable, edit the result, and publish across platforms without juggling separate tools.