How to Convert MPEG to MP3: Fast Methods That Work

Learn how to convert MPEG to MP3 with FFmpeg, VLC, desktop apps, and online tools. Includes settings, batch tips, and fixes for common errors.
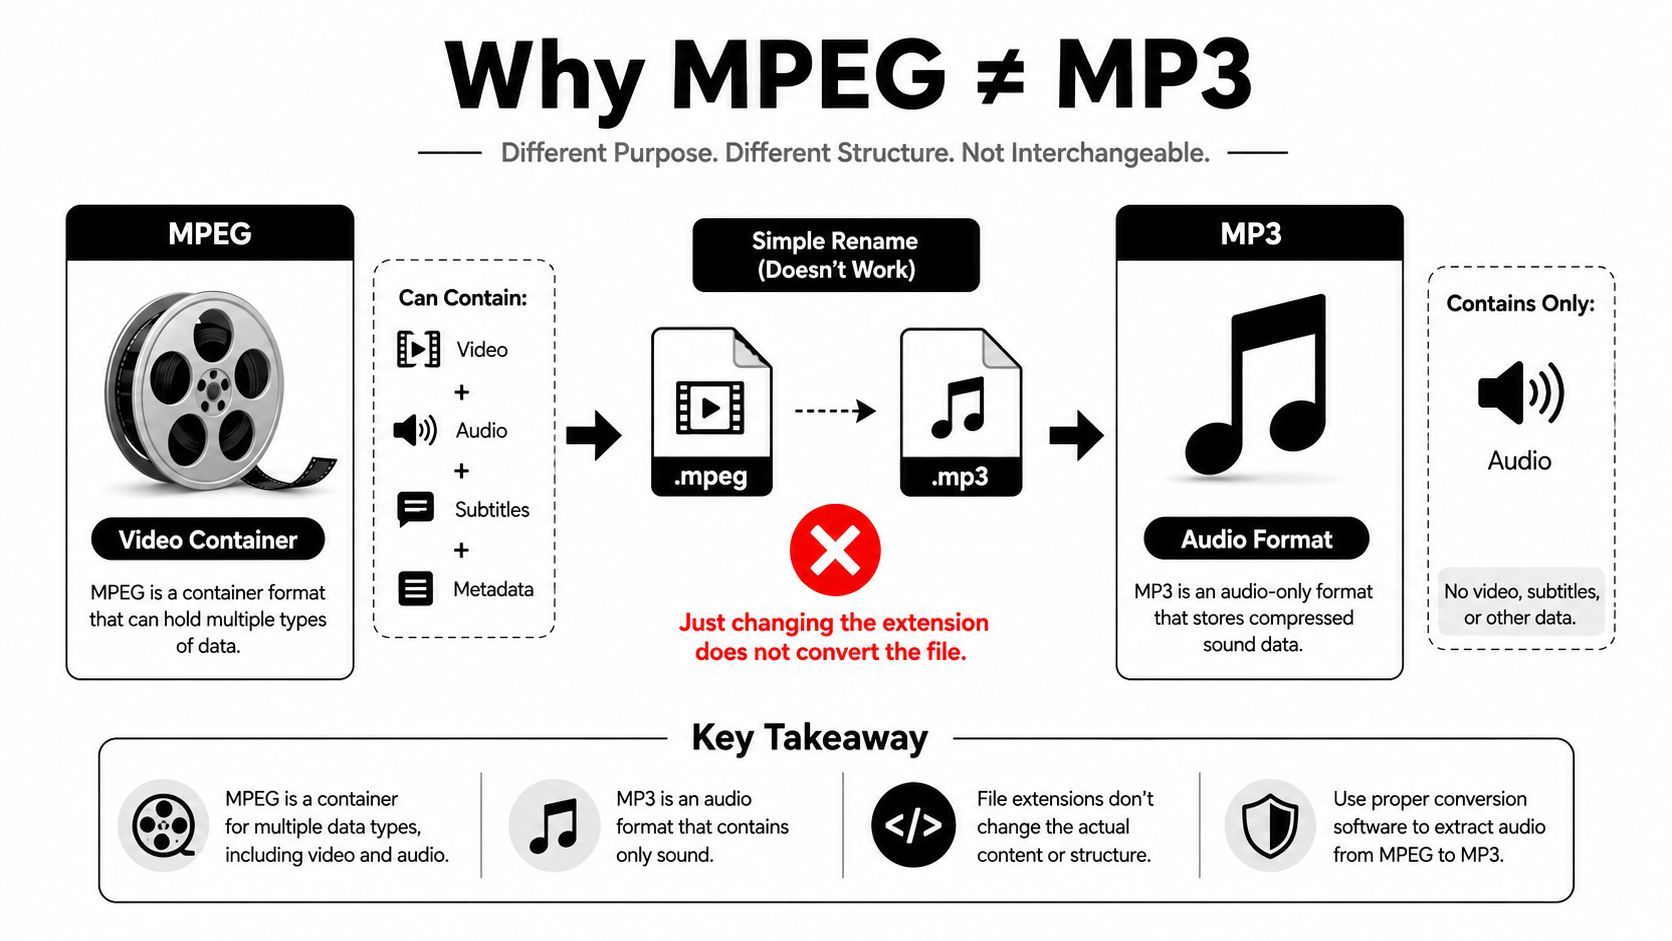
You've got an MPEG clip open on your desk, the edit is almost done, and all you really need is the audio. Maybe it's a webinar clip you want for a podcast intro, maybe it's b-roll with a clean voice track, or maybe a client sent an old .mpeg file and asked for MP3 “so it'll play everywhere.” The trap is thinking the file can just be renamed and dropped into a player. It can't, because MPEG and MP3 are different formats with different jobs, and converting one into the other means extracting the audio and re-encoding it, not changing the extension.
Why Converting MPEG to MP3 Is Not a Simple Rename
A file that opens as video in one app and comes up empty in another usually means the format details are being confused. MPEG is often a video container or a multimedia file that carries both audio and video, while MP3 is audio-only. Renaming file.mpeg to file.mp3 does not change what is inside the file, so the player still reads the original structure and the result can be silence or a broken file.
What happens during conversion
The workflow is usually demux, then re-encode. The tool first pulls the audio track out of the MPEG file, then compresses that audio into MP3, and that is where the file size and fidelity tradeoff shows up.
For video producers, the question is not whether the file can be renamed, it is whether the audio needs to be preserved cleanly for a reel, a podcast intro, or an archived interview. A source that came from a camera clip can tolerate different settings than a spoken-word recording meant for reuse, so the encoder choice matters. In a practical FFmpeg conversion discussion, the workflow was treated as an extraction and encoding task, with average bitrate targets around 165 kbps for default output and about 190 kbps with -q:a 2 for better quality. Those numbers matter because they show the tradeoff clearly, a smaller MP3 with more compression, or a larger one that keeps more detail (FFmpeg conversion discussion).
Practical rule: if the source has video, treat it like audio extraction plus encoding. If the source is already audio in an older MPEG-family file, the job still involves decoding and re-encoding, not renaming.
Two common source types
Creators usually run into two cases. The first is ripping audio from MPEG video clips, like interviews, b-roll, webinars, or screen recordings. The second is dealing with older .mpg or .mpeg files where the goal is to get the audio into a more portable MP3 shape.
That split matters because each workflow calls for a different level of control. A creator pulling voice from b-roll may only need a quick export, while a podcaster archiving interviews often wants bitrate control and predictable output. Agency teams processing deliverables usually care about consistency across files, so they need tools that behave the same way every time instead of guessing through a one-click converter.
Using FFmpeg to Convert MPEG to MP3
A creator pulling clean dialogue from a b-roll clip, a podcaster saving an interview, and an agency team processing a stack of deliverables all need the same thing at the end, an MP3 that matches the source without extra guesswork. FFmpeg is the tool I reach for when control and repeatability matter more than a friendly interface. It keeps the audio path visible, which matters when you have to trust the same command across many MPEG files instead of clicking through a GUI guessing.
The command that works
A solid starting command looks like this:
ffmpeg -i input.mpeg -vn -ar 44100 -ac 2 -b:a 192k output.mp3
Each part has a job. -i input.mpeg points FFmpeg at the source. -vn strips video. -ar 44100 sets the sample rate to 44.1 kHz. -ac 2 keeps stereo channels. -b:a 192k asks for a 192 kbps audio bitrate.
That command works well for normal interview clips and b-roll with usable sound. If I want a smaller file and the playback target is not some ancient device, I switch to variable bitrate with -q:a 2, which is the higher-quality FFmpeg and LAME operating point noted in a practical conversion discussion. That tradeoff is the one that matters, fixed bitrate for predictable size, or VBR for better efficiency and often better sound at the same file weight.
Install it once, then reuse it
FFmpeg runs on Windows, macOS, and Linux. On Windows, many editors install it through a package manager or a prebuilt binary. On macOS and Linux, it usually comes from the system package tools. Once it is installed, the same command line behaves the same way every time, which is why production teams keep it around for repeated MPEG-to-MP3 work.
Why I trust it for batch work: FFmpeg does not hide the audio path. If the source track is wrong, the command is wrong in a visible way, which is better than a GUI guessing.
Batch processing without hand work
For a folder of clips, FFmpeg is where the time savings show up. On Windows, a FOR loop can feed each MPEG file through the same command. On macOS or Linux, find plus xargs does the same job for an entire interview folder. The exact syntax depends on your shell, but the pattern stays the same, loop the files, apply one known-good command, and let the machine do the repetitive part.
Use FFmpeg when you are handling lots of deliverables, need consistent output, or want to set audio parameters directly instead of hoping a converter picks the right defaults. If the job is a one-off on a locked-down laptop, the GUI route can still be quicker for the person doing the export.
Converting with VLC When You Prefer a GUI
Some people don't want a terminal open at all, and that's fair. VLC is the common compromise when you need a straightforward desktop workflow and you'd rather click through menus than remember flags.
The menu path that matters
Open VLC, go to Media, then choose Convert / Save. Add the MPEG file, click Convert / Save again, and pick an MP3 profile as the destination. Before you start the conversion, check the profile's audio codec settings so you can set the bitrate and channels to something sensible for the source.
If the file has multiple audio tracks, don't assume VLC picked the right one. Enable or select the specific track before converting, or you can end up with a silent export or the wrong language stream. That's the most common reason a “successful” GUI conversion still disappoints.
Where VLC fits and where it doesn't
VLC is friendlier than FFmpeg for a teammate who only needs one file today. It's also a better fit on a work laptop where installing extra command-line tools isn't allowed. The cost is control. VLC is less scriptable, slower for large batches, and less transparent about encoder behavior than FFmpeg.
A practical desktop guide I'd point a teammate to alongside VLC is see Budget Loadout's review, especially if they're comparing lightweight media tools and want to understand what tends to be useful versus just convenient.
The conversion path is simple enough, though. Load file, choose the MP3 profile, confirm the audio track, set the destination, and start. For one-off archival pulls or a quick podcast cleanup on a constrained machine, that's often all you need.
Comparing Desktop Apps, Online Converters, and Built-In Tools
The right method depends on who's doing the work, not just on the file extension. A solo creator ripping a few b-roll clips doesn't need the same setup as an agency processing client deliverables, and a social media manager under deadline probably doesn't care whether the converter is elegant, only whether it's reliable.
Choosing by workflow, not by hype
Online converters are built for the fastest possible path, upload the MPEG, choose MP3, adjust quality if the site exposes it, and download the result. One major converter documents support for more than 200 output formats and cloud imports from Computer, Google Drive, Dropbox, and URL, which shows how normalized browser conversion has become for everyday tasks (Convertio MPEG to MP3). But the same convenience comes with less control and weaker transparency about how the audio gets handled.
Local desktop tools behave differently. They're better for repeated jobs, folder processing, and anything that shouldn't leave the machine. Built-in OS tools sit in the middle, useful when you already live inside Apple or Windows media workflows, but usually not the first pick for demanding batch work.
| Method | Best For | Batch Support | Privacy | Typical Limit |
|---|---|---|---|---|
| FFmpeg | Editors, podcasters, teams with repeat jobs | Strong | High, local processing | None in normal use |
| VLC | One-off desktop conversions | Limited | High, local processing | None in normal use |
| Online converters | Quick casual jobs | Weak to moderate | Lower, files leave the device | Some services note a 1 GB upload ceiling (Audio.com MPEG to MP3) |
| Built-in OS tools | Light consumer use | Limited | Moderate | Depends on the app |
The default choice for each persona
A solo creator usually does fine with VLC if the job is occasional, or FFmpeg if the clips pile up. A social media manager doing client cuts should favor FFmpeg or a vetted desktop suite because repeatability matters more than novelty. An agency team handling sensitive brand assets should stay local by default and treat browser converters as a last resort.
If you want another perspective on lightweight recording and media workflows, the privacy and reliability questions in tool reviews matter as much as feature lists. The point is to pick the route that matches the volume and sensitivity of the material, not the one with the flashiest landing page.
Settings That Actually Change Your Output
Most failed conversions come from people leaving the defaults untouched and hoping for the best. The settings that matter are the ones that change audible quality, file size, and compatibility, and you only need a few of them to get predictable results.
Bitrate, sample rate, and channels
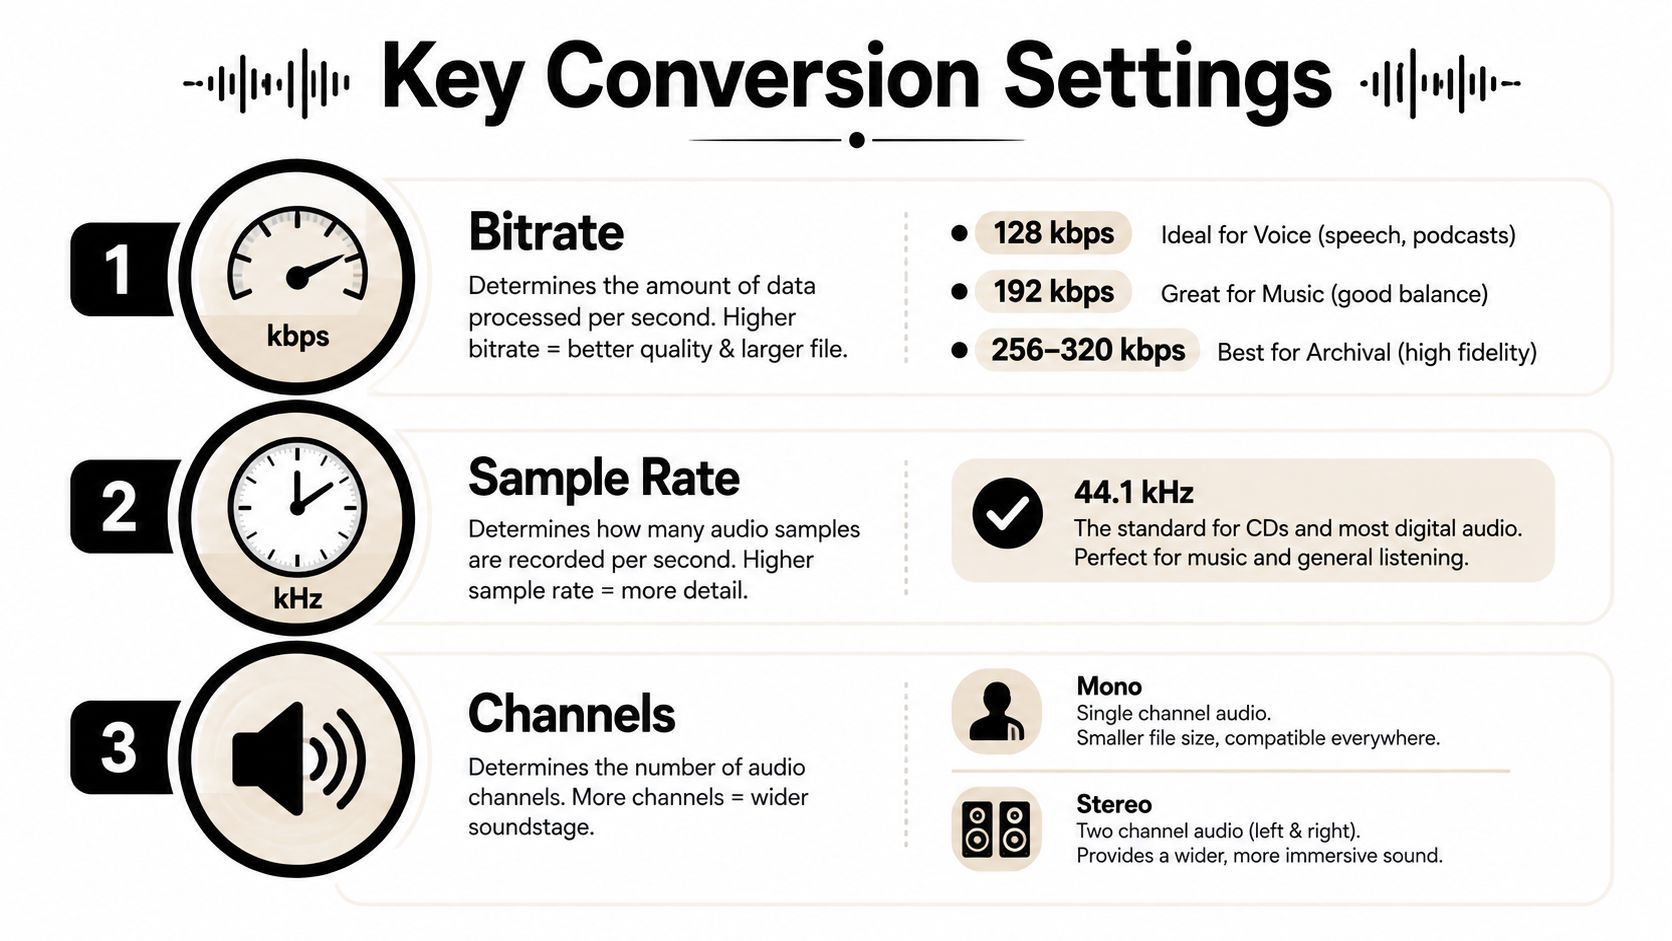
Bitrate is the knob most listeners adjust first. For voice-heavy material, 128 kbps is a common practical target. For music clips, 192 kbps is a safer everyday choice. For archival or client assets where quality matters more than file size, 256 to 320 kbps makes more sense.
Sample rate is the next one. 44.1 kHz is the safe default and matches the CD-era standard, while 48 kHz fits better when the source comes from video production. If the MPEG came from a camera, webinar, or edit timeline, keeping that 48 kHz source behavior in mind can help avoid unnecessary resampling.
Channels matter more than people expect. Mono is fine for podcasts, interviews, and spoken-word archives. Stereo is the better choice for music, ambience, and reels where the original mix has real left-right movement.
If the source is a clean talking head interview, don't force a music-style export. If the source is a music cue, don't collapse it to mono unless you mean to.
CBR, VBR, and metadata
CBR means constant bitrate. It's predictable and familiar, which helps with compatibility. VBR means variable bitrate, and it usually gives better quality per file size, but older players can be fussier about it.
Metadata is worth keeping too. FFmpeg can preserve or set tags with -metadata flags, VLC offers metadata fields in its save profile, and many online converters provide an edit step before export. For a client interview, keeping artist, album, and title fields intact saves cleanup later. For a reel, the tags help when you're sorting clips across devices.
A simple settings checklist
- Voice interview: 128 kbps, 44.1 kHz or 48 kHz depending on source, mono if the content is spoken only.
- Podcast archive: 192 kbps, 44.1 kHz, mono or stereo based on the original recording.
- Music clip for a reel: 192 kbps or higher, stereo, keep the source sample rate if it's already clean.
- Client deliverable: choose the highest practical setting your workflow allows, then verify metadata before exporting.
The YouTube embed below is a useful visual companion if you're checking how these choices affect output behavior in practice.
Privacy, File Size, and When Local Tools Win
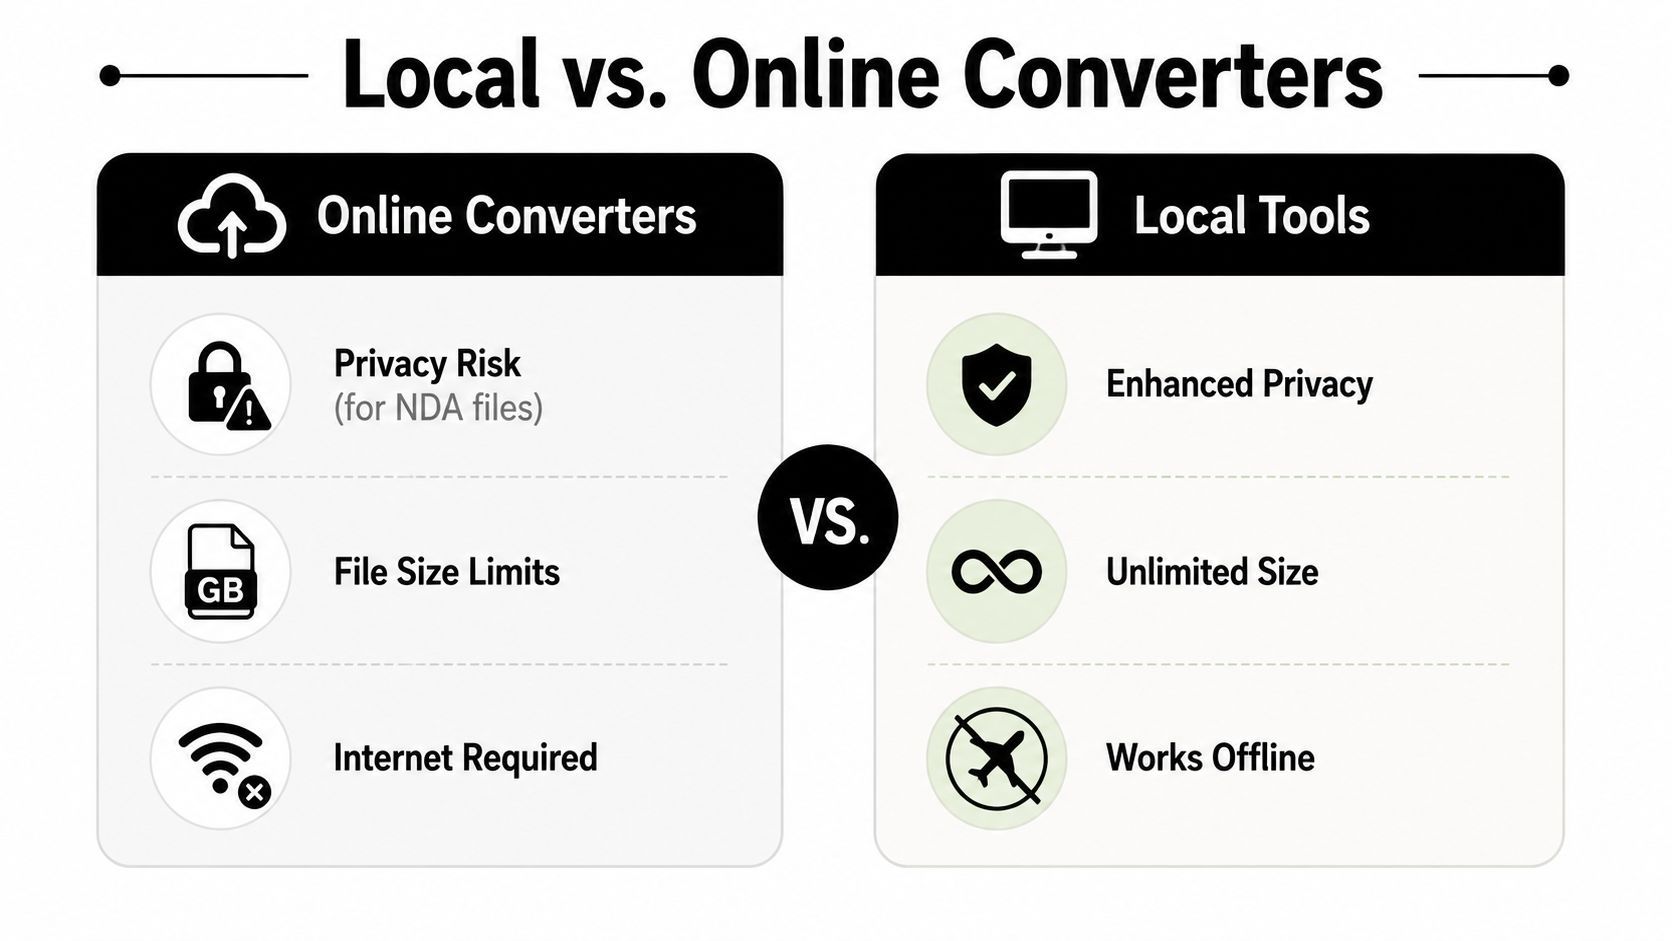
The easiest answer is often “use a free online converter.” That advice falls apart fast when the file is a client cut, an unreleased campaign, or an interview with names and faces that shouldn't leave a controlled environment. The browser route is fine for casual public clips, but it's the wrong default for branded work.
The cases that should stay local
If the file is under NDA, keep it local. If it's an unreleased campaign version, keep it local. If it contains proprietary audio or work-in-progress edits, keep it local. That rule is simple because the risk isn't just quality, it's control over where the media goes and how long it sits on someone else's server.
A practical privacy page worth reading alongside any media workflow is browse the privacy page, because tool choice should match the sensitivity of the material, not just the speed of the conversion.
Online converter pages often lean on convenience, but their own workflows are built around uploads, cloud imports, and browser handling of files. That's useful when the clip is harmless and small enough to move easily. It's a liability when the job involves a locked brand asset or a large interview that shouldn't be copied around casually.
The rule that keeps teams out of trouble
Use online conversion for public, low-risk, one-off material. Use local tools for anything that is sensitive, repetitive, or large enough to become a nuisance during upload. That includes agencies processing deliverables, brands reworking campaign assets, and editors moving through a stack of interviews.
Bottom line: if you'd hesitate to send the file in a public chat, don't upload it to a random converter.
Local tools also win on simple logistics. They don't ask for a stable connection, they don't depend on a cloud queue, and they don't introduce extra handoffs when you're already under deadline. For production teams, that stability usually matters more than saving one click in a browser.
Troubleshooting Common MPEG to MP3 Errors
When a conversion fails, the fix is usually obvious once you know what failed. Most problems fall into a small set of patterns, and each one has a quick correction.
Silent MP3 output
If the MP3 plays but nothing is audible, the wrong audio track was probably selected in a multi-track MPEG. In FFmpeg, map the first audio stream explicitly with -map 0:a:0 so the encoder doesn't guess. If you're in VLC, go back and select the correct audio track before converting again.
Invalid data found
If FFmpeg says “Invalid data found”, the file may not be a real MPEG at all. Some files are just renamed incorrectly, or they're damaged. Check the actual codec and container with ffprobe before trying again, because the extension can lie even when the filename looks right.
Audio out of sync or odd file size
If audio drifts against the video, you may be re-encoding when you should be remuxing or keeping the original video intact. If the output is tiny, the bitrate is probably too low. If it's unexpectedly huge, the converter may have locked you into a constant bitrate profile instead of a variable one.
- Wrong stream selected: use
-map 0:a:0in FFmpeg. - Corrupted or mislabeled file: verify the format with
ffprobe. - Sync drift: preserve the source structure when possible instead of forcing a new encode.
- Tiny or huge output: raise the bitrate or switch to a more appropriate VBR setting like
-q:a 2.
The fastest fix is usually the simplest one, correct the stream, confirm the source, and stop assuming the file extension tells the truth.
If you're turning MPEG clips into MP3s as part of a bigger content workflow, ShortGenius (AI Video / AI Ad Generator) can help you move from raw footage to finished output faster. It's built for creators and teams who need scripts, captions, voice, resizing, and publishing in one place, so if you want a smoother path from conversion to final cut, visit ShortGenius (AI Video / AI Ad Generator).