How to Make an AI Generated Music Video That Actually Works

Learn how to make an AI generated music video from concept to publish. Practical prompts, scene workflow, sync tips, and export settings that actually perform.
You can tell a music video is in trouble before it's finished. The timeline looks polished, the renders are sharp, and the chorus still lands on the wrong visual because the clip was built from prompts instead of the song's structure. That's the trap with an AI generated music video, the generator usually isn't the problem, the missing audio plan is.
The fix is boring in the best possible way. Split the track, map the beats, assign intent to each section, then generate shots that belong to the music. When that backbone is in place, the visuals stop drifting off into unrelated beauty shots and start feeling like they were cut to the track on purpose.
Why Most AI Generated Music Videos Fall Flat
A lot of creators start with the fun part, a gorgeous prompt, a dramatic camera move, maybe a cinematic character walking through neon rain. The first render looks sharp, then the chorus hits and nothing in the frame changes with it. The video feels detached because the visual energy is not tied to the song's internal shifts.
That failure mode shows up in a few predictable ways. A verse gets the same visual treatment as a drop. A bridge gets overloaded with motion. A performance moment gets buried under abstract scenery because the prompt sounded cooler than the music. The result is usually not a bad clip, it is a clip that does not know where it sits in the song.
The practical shift is simple. Treat the audio as the primary script. Recent workflow research describes an audio-segmentation-first pipeline where the song is split into segments, each segment is analyzed for style, mood, and emotion, then those features are turned into a time-ordered scene script before any video is rendered (arXiv pipeline on audio-segmentation-first generation). That missing layer is why so many rushed builds feel random.
Practical rule: if the scene order does not exist before generation, the final cut usually feels improvised instead of musical.
The gap is bigger than taste, too. A 2026 generative AI media market statistics report estimates the global AI video generation market at $788.5 million in 2025 and $946.4 million in 2026, while the AI music generator market is estimated at $1.98 billion in 2025 and projected to reach $18.04 billion by 2035 (2026 generative AI media market statistics report). The tools are growing fast, but growth does not fix a weak workflow.
The best sign you are on the right path is simple. The chorus, the drop, and the visual switch all happen for a reason you can point to on the timeline. If that relationship is hard to explain, the prompt is probably not the problem, the plan is.
Planning the Concept and Picking the Right Song
Start with a creative brief, not with a generator. The song, the mood, the visual language, and the distribution target should all be decided before you touch prompts. A track with clear sections, repeatable motifs, and obvious transitions is much easier to turn into a coherent AI generated music video than a song that stays flat from start to finish.
Build the brief around the music, not around the tool
Pick a track that gives you handles. A strong choice has an intro that can establish a world, a verse that can carry character or environment, and a chorus or drop that can justify a visual shift. If the song keeps changing texture in a way you can point to on a waveform, that's useful. If every part feels the same, the video will have to invent momentum that isn't there.
A workable 90-second brief looks like this:
- Track: 90 seconds, clear intro, two distinct choruses, short bridge.
- Visual mood: glossy cyber-pop with warm skin tones and hard rim light.
- Core subject: one performer, one recurring symbol, one location.
- Delivery target: vertical short-form first, then a cutdown for YouTube Shorts.
- Rights check: confirm the track is original, licensed, or otherwise cleared for the platform you want to use.
Original AI music and licensed tracks each have trade-offs. Original AI music gives you more control over structure and remixing, but it still needs quality control and rights clarity before release. Licensed tracks can carry stronger recognition and emotional familiarity, but they can also narrow what you can publish and where. If monetization matters, check the usage terms early, not after the edit is done.
For planning, a simple prompt starter can double as a brief:
Song brief prompt: “Create a visual concept for a 90-second vertical music video with clear intro, verse, chorus, and bridge transitions. Keep the visual world consistent, define one subject, one color palette, and one recurring symbol. Match scene intensity to the song's energy shifts, and note where each scene should cut.”
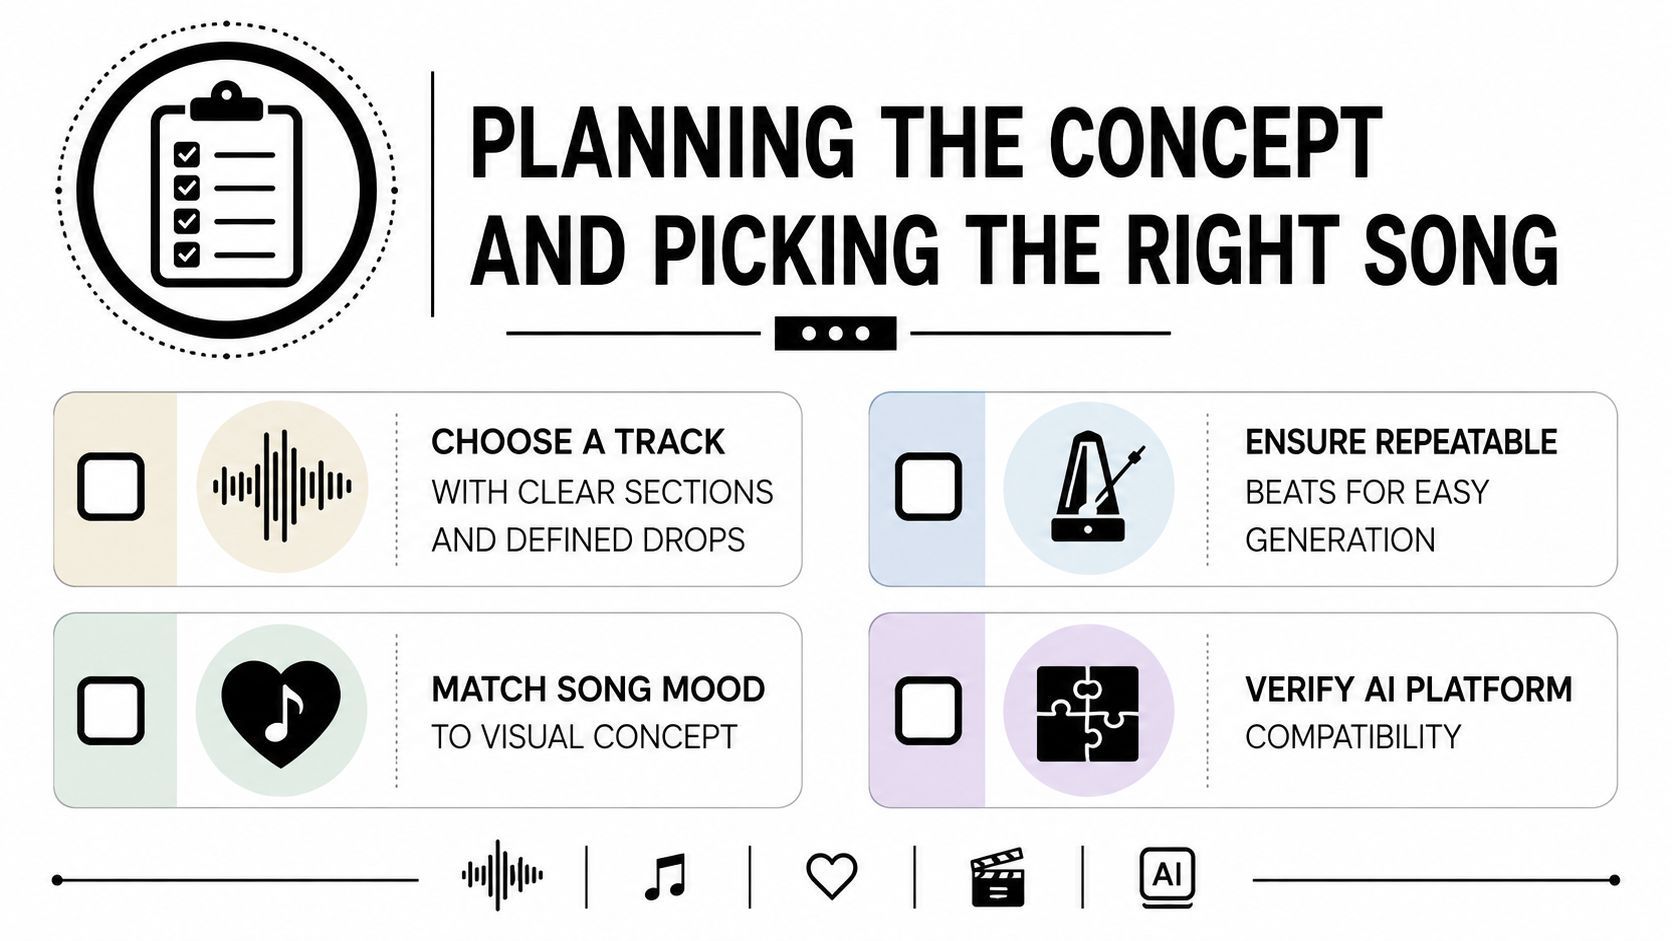
The goal here isn't to overproduce the plan. It's to remove avoidable decisions so the generation stage can stay focused on timing, consistency, and motion instead of trying to solve the whole creative problem at once.
Mapping the Song Before You Generate Anything
The cleanest workflow I use starts the same way every time. Break the audio into sections first, mark the emotional job of each part, then build a scene script that follows the song instead of fighting it. That is the difference between a clip that looks good and a video that feels deliberately composed.
Split, tag, and timestamp
Start by dividing the track into manageable parts, then label what each part is doing. The point is to make the timing visible before any generation work begins, because weak alignment usually comes from vague structure, not from the model itself. When a song is mapped this way, it becomes much easier to keep scene changes, motion, and performance beats in sync.
A simple structure works well. Use the section labels, the emotional tag, the visual job, the main subject, the camera behavior, and the transition note. I keep the segments short enough that one visual idea can hold them, because once a section gets too long, the model starts to drift in mood and continuity.
A copyable scene-mapping template looks like this:
Scene mapping template
Time range, section label, emotional tag, visual intent, primary subject, camera behavior, transition note.
Worked example for an 80-second track:
- 0:00 to 0:14, intro. Calm, expectant. Wide cityscape, slow push-in, no lyric performance yet.
- 0:14 to 0:34, verse. Tighter, intimate. Performer in a moving room, medium shots, restrained motion.
- 0:34 to 0:58, chorus. Expansive, high energy. Harder light, faster cuts, stronger camera movement, repeated symbol appears.
- 0:58 to 1:20, outro. Release and resolution. Pull back, soften the palette, let the final image breathe.
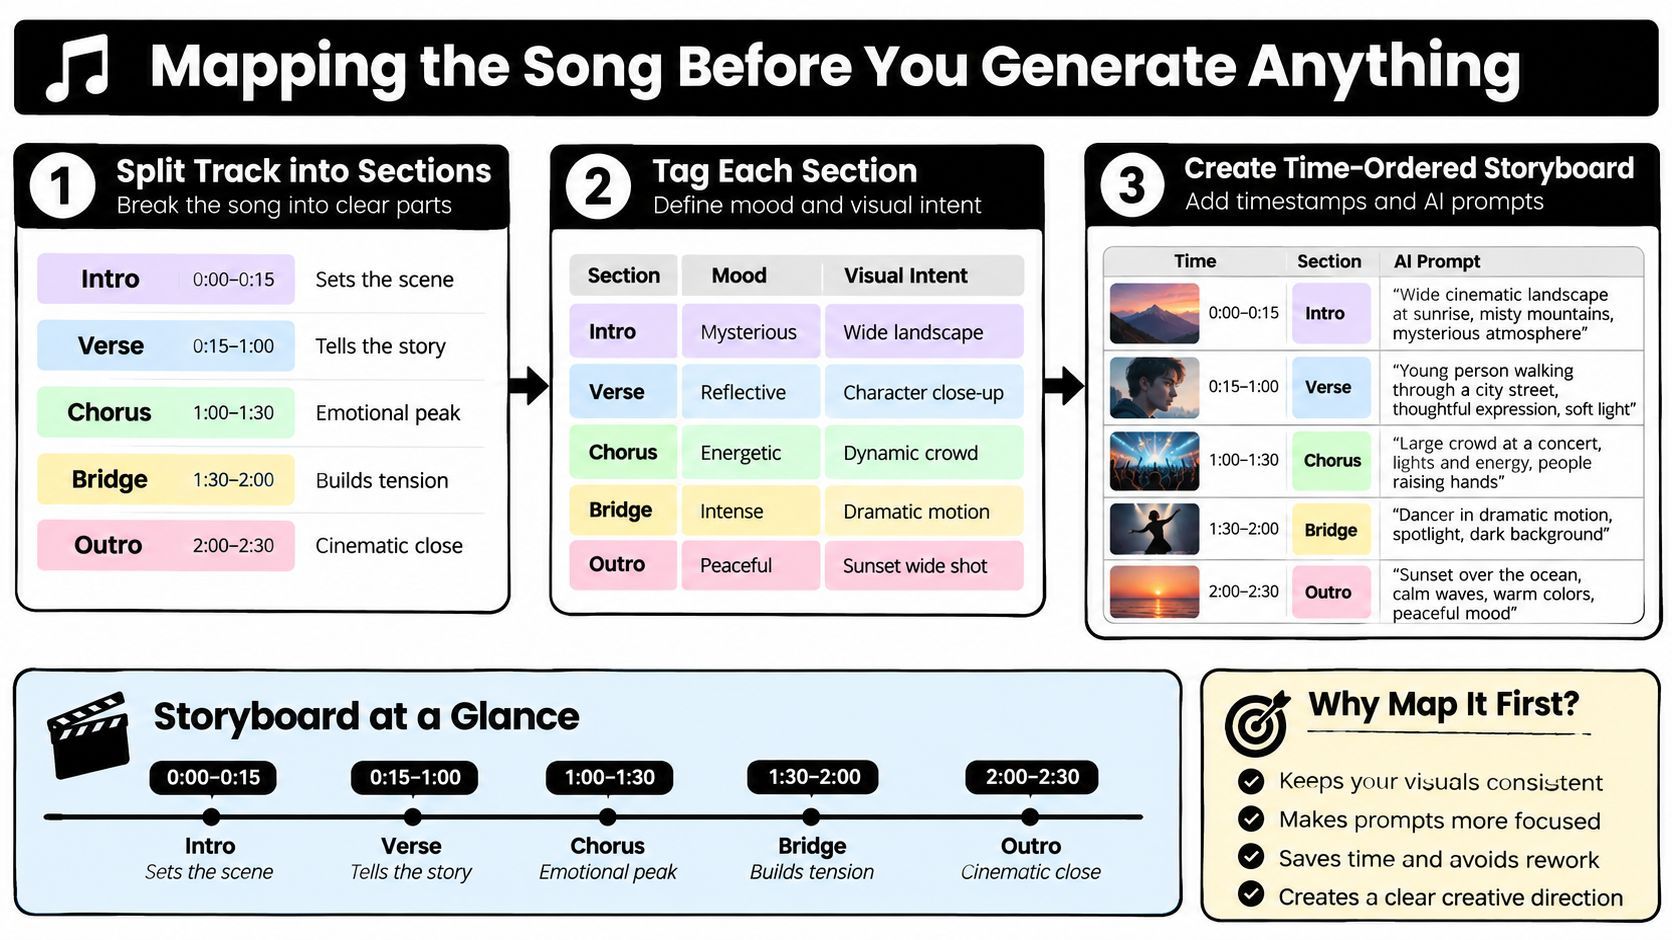
The practical habit here is simple. Think like an editor before you think like a prompt writer. Once the song is broken into usable units, every generation step gets easier, because the model only has to solve one scene at a time instead of carrying the whole track at once.
Choosing How to Generate Each Scene
Not every shot should come from the same model. Some scenes need movement, some need a character locked in place, and some only work if the lips are synced tightly enough to sell the performance. Choosing the wrong generation path for a shot is one of the fastest ways to make the whole video feel inconsistent.
Match the shot type to the generator
Text-to-video works best for motion-heavy sequences, especially environment shots, transitions, and stylized action where you want the model to invent movement. Image-to-video is better when you already know the frame composition and want the shot to evolve from a controlled still. Lip-sync models are the obvious choice for performance moments, but they're also the most sensitive to bad audio prep and long, messy uploads.
The decision should follow the scene script, not the other way around. If the verse is about intimacy, a locked image-to-video shot can hold mood better than a wildly inventive text prompt. If the chorus needs impact, text-to-video can give you the motion burst you want without forcing the whole section into one rigid still.
| Shot intent | Best generator class | Main risk | Workaround |
|---|---|---|---|
| Wide establishing shot | Text-to-video | The scene drifts away from the song's mood | Lock the palette and camera direction in the prompt |
| Character close-up | Image-to-video | Subject changes shape across frames | Use a stronger reference image and limit motion |
| Singing or rapping performance | Lip-sync model | Mouth timing slips or the upload gets rejected | Keep the audio clean and split the song into manageable parts |
| Chorus lift or drop | Text-to-video | Motion becomes chaotic | Anchor the scene to one visual motif and one camera move |
| Repeated visual symbol | Image-to-video | The image loses detail during motion | Keep the motion subtle and make the symbol large in frame |
If you're comparing tools, a utility like Image Studio music video can be useful as a reference point for how different scene types get assembled into one project. The bigger lesson is that generator choice is a shot-level decision, not a branding decision.
A separate technical framework makes the same point from another angle. Recent multi-agent systems use a Director to plan shot boundaries, a Renderer to pick the right model per shot, and a Verifier to score alignment and feasibility before regeneration (multi-agent control stack). That structure exists for a reason, the workflow has to manage different scene types differently if you want the end result to feel coherent.
Prompts That Actually Hold Up to a Beat Drop
Generic prompts make generic clips, and generic clips fall apart the moment the track gets interesting. If you want a beat drop to feel earned, the prompt has to carry motion, camera behavior, lighting, and subject continuity at the same time. Write prompts like shot directions, not like mood boards.
Anchor the prompt to motion and subject
The strongest prompts include a subject, a movement verb, a camera cue, and a lighting cue. Leave out those four pieces, and the model gets too much freedom, which usually turns into drift. I also like to name one anchor object or visual motif that can survive across scenes, because the editor needs something consistent to cut around.
Use this structure for most clips:
Prompt structure
Subject, action, setting, camera movement, lighting, color palette, visual texture, mood, continuity note.
Copy-paste templates:
- Verse template: “A lone performer in a minimal room, slow head turn, subtle hand movement, gentle camera drift, soft side light, muted blues and silver, calm and intimate, keep the face stable.”
- Chorus template: “Same performer in a larger surreal space, stronger motion, walking toward camera, dynamic push-in, bright rim light, high-contrast neon palette, energetic and expansive, preserve wardrobe and facial identity.”
- Breakdown template: “Abstract environment with one recurring symbol, slow rotational motion, low camera speed, pulsing light accents, darker palette with sharp highlights, restrained but tense, keep shapes legible.”
A few words keep pulling more weight than vague hype language:
- Specific movement verbs like push-in, orbit, glide, drift, pull back.
- Lighting cues like rim light, hard backlight, soft side light, flicker.
- Continuity anchors like same performer, same jacket, same symbol, same location.
- Temporal markers like on the downbeat, at the drop, at the section change.
- Camera limits like slow motion, locked frame, steady handheld, no subject morphing.
For beat-heavy edits, do not just say “match the beat.” Mark the actual transitions in your scene script, then tell the model what should happen on the downbeat or transient. If a shot needs to survive a chorus hit, give it one clear motion path instead of three competing ideas.
If a clip keeps morphing into a different person, the prompt is probably too open. If the motion feels random, the camera and action cues are not doing enough work.
For cleanup and iteration, I sometimes cross-check the output against a simple editor flow before re-rendering. A platform like Image Studio music video can be useful when you want to see how different scene types get assembled into one project, especially if the problem is speed between revisions, not the prompt itself.
Editing, Syncing, and Adding the Final Layer
Generation is only half the job. The edit is where the music video starts feeling intentional, because that's where the cuts, overlays, and color treatment get unified around the track. If the assembly is sloppy, even strong clips read like isolated experiments.
Cut on downbeats, not on vibes
Place major scene changes on obvious downbeats or section changes first, then use smaller transient markers for micro-cuts inside faster passages. That gives the viewer a rhythm to follow even when the visuals are highly stylized. A chorus that lands with a clean cut feels more polished than a chorus where the cut arrives half a beat late.
The final layer matters more than people expect. Lyrics or voiceover should be legible, but not so dominant that they fight the visuals. Light sound design can reinforce transitions without turning the track into a remix. A consistent color grade helps clips from different generators read as one project instead of a pile of render styles.
A short checklist that lifts perceived quality fast:
- Subtitle styling: keep captions bold enough for mobile, with a stable placement and minimal animation.
- Film grain: use it lightly to mask texture differences between generations.
- Fade rules: reserve fades for section changes, not random clip swaps.
- Motion restraint: avoid stacking multiple heavy transitions in a row.
- Lyrics overlay timing: align the text with phrases, not with long blocks of audio.
The export step matters too, because short-form platforms are unforgiving when timing drifts. The AI-music-video checklist in the brief notes that dead silence, clipping, heavy reverb, and long uploads can hurt section detection and lip-sync accuracy, and that many platforms cap uploads between 100 MB and 5 minutes (workflow constraints note). If a clip comes back slightly off after export, check the source audio first before blaming the renderer.
The platform-native mindset wins here. If the video is meant for TikTok, Reels, or Shorts, make the edit in the shape those platforms reward, vertical, readable, and fast to understand. Polish doesn't come from more effects, it comes from making every cut feel like it belongs to the beat.
Packaging and Exporting for TikTok, Reels, and Shorts
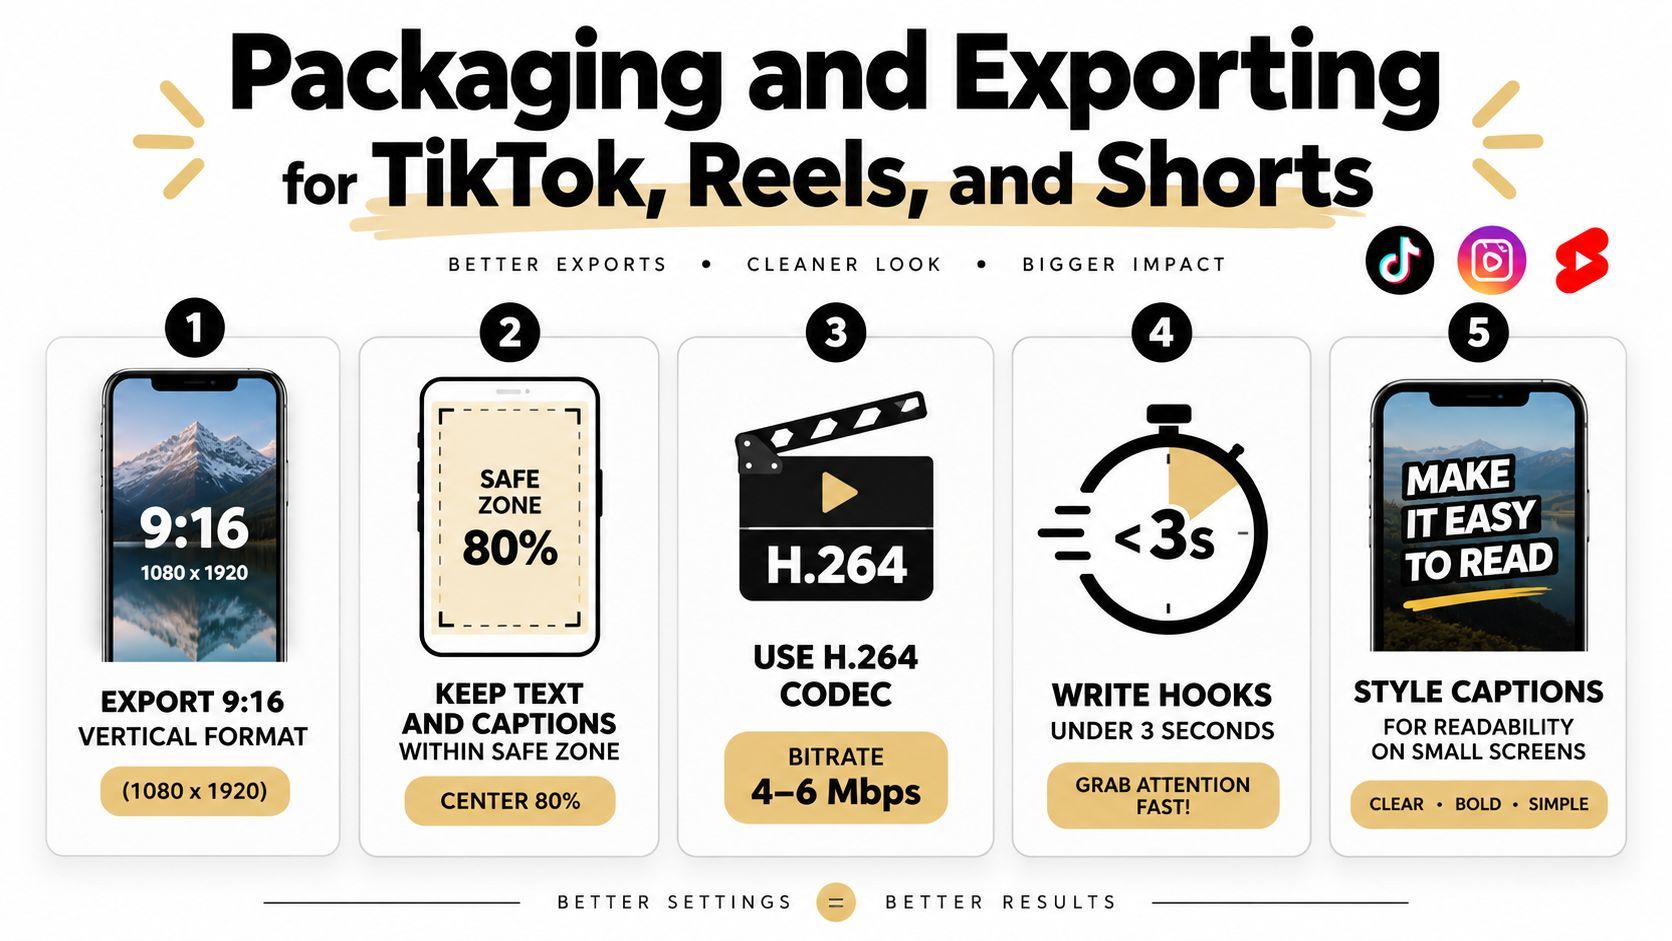
A finished video is only finished after the platform accepts it and the first three seconds keep attention. Vertical format, caption placement, and the opening frame all matter because the upload is competing against a crowded feed. For an AI generated music video, packaging often decides whether someone watches once or plays it again.
Export for the feed first
Keep the frame vertical, keep the subject inside the central safe area, and keep on-screen text readable on a phone. A clean hook frame matters more than a perfect middle section, because viewers decide fast whether the video deserves to stay on screen. If the visual starts slow, the strongest chorus may never get there.
Hooks and titles also have to survive AI stigma. That means centering the music, the visual concept, or the story instead of leading with the fact that the video was made with AI. If the audience feels the clip is honest, styled well, and musically coherent, trust rises faster than if the title tries to defend the process.
A release-day checklist keeps the rollout tight:
- Export the correct vertical format for the platform you're posting to.
- Write a title that matches the song's mood rather than overselling the tooling.
- Test the opening frame as if it were a thumbnail.
- Save at least two caption variants for quick A/B testing.
- Schedule the same master cut across channels so the release stays consistent.
If you're distributing across TikTok, YouTube Shorts, Instagram Reels, Facebook, and X, auto-scheduling cuts down the repetitive upload work. ShortGenius supports that kind of multi-channel publishing workflow, and it also keeps video assembly, captions, resize, and scene swaps in one place, which helps when you are iterating on the same music video for different feeds.
The bigger truth is uncomfortable but useful. Audience trust, not raw visual fidelity, often decides whether someone gives the video a second listen. That is why the packaging has to feel clean, musical, and deliberate from the opening frame onward.
If you want a faster way to turn song ideas into vertical videos, ShortGenius (AI Video / AI Ad Generator) can help you script, assemble, resize, and schedule music-driven content in one workflow. It fits this process well when you want to move from mapped scenes to publish-ready cuts without bouncing between separate tools. Visit it if you are ready to turn your next AI generated music video into something you can ship this week.