Master AI Color Grading for Video in 2026

Master AI color grading for video in 2026. Our guide explains how it works, compares methods, and provides practical workflows to enhance your content.
Your edits are getting faster, but your feed still looks stitched together from different worlds. One Reel is cool and contrasty, the next is yellow and flat, and the clip after that has skin tones that shift halfway through the sentence. That inconsistency makes even good content feel less intentional.
In this scenario, AI color grading is helpful. Not as a magic button, and not as a replacement for taste, but as a fast way to build a clean, repeatable base grade across a lot of short-form video.
That matters because AI grading is already part of normal post workflows. As of 2026, 47% of film editors already use AI tools for tasks including color grading and object removal, according to WifiTalents' report citing OAGP data on AI in the filming industry. For short-form creators, that's a significant shift. AI color grading isn't a curiosity anymore. It's becoming standard workflow knowledge.
The End of Inconsistent Color
Short-form creators usually don't fail on ideas. They fail on repeatability.
You shoot on different days, in different rooms, with changing window light, mixed practicals, auto white balance drift, and clips pulled from more than one camera. Then you try to make all of that feel like one brand in a timeline that needs to go live today. Manual grading can fix it, but manual grading every post is where consistency breaks.
AI color grading solves the first problem well. It can normalize exposure, balance obvious color casts, and get clips into the same visual neighborhood without making you start from zero every time. That's the 80 percent most creators need.
What creators actually need from AI
Not everyone needs a heroic cinematic grade on every upload. They need a workflow that does three things reliably:
- Match clips faster so a talking-head intro and cutaway B-roll don't look unrelated.
- Hold a recognizable look across TikTok, Reels, Shorts, and paid variations.
- Reduce decision fatigue when you're producing in batches.
Practical rule: Use AI for correction first, style second. If the footage isn't balanced, a creative look won't save it.
The biggest mistake is expecting the tool to invent taste. AI can get your footage technically closer, but it still needs direction. If your references are inconsistent, your outputs will be inconsistent too.
There's also a mindset shift here. Traditional color work trained editors to think shot by shot. AI encourages a pipeline view. Build one solid base, apply it broadly, then spend your manual time only where people notice it: faces, hero shots, product close-ups, and transitions between lighting environments.
How AI Actually Understands Color
AI grading works best when you stop thinking of it as an “auto filter” and start treating it like a fast assistant that recognizes patterns.
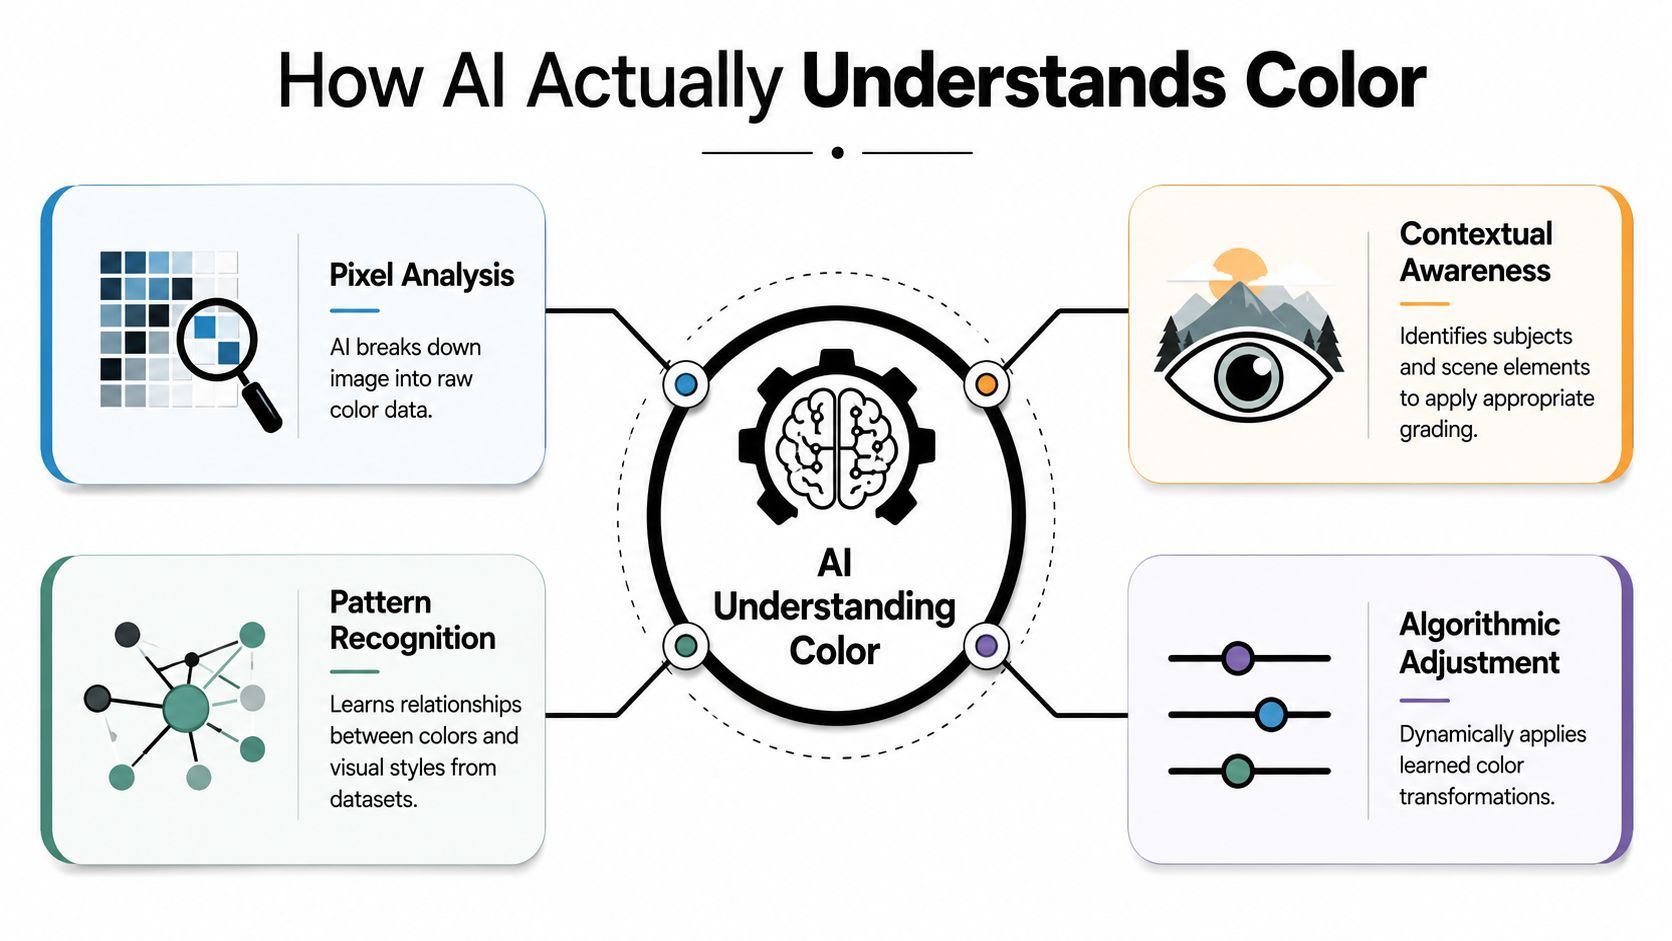
It doesn't look at your clip the way a human colorist does. It reads the image as data, then compares that data against learned visual patterns. That includes brightness relationships, contrast distribution, color separation, likely subject areas, and scene context.
It reads scenes, not just pixels
A basic correction tool treats footage like a pile of values. Better AI systems do more than that. They can interpret whether a frame behaves like a close-up, an exterior, or a scene with a dominant subject, then apply different grading logic accordingly.
That's one reason modern systems feel faster and more believable than old one-click auto correction. AI color grading systems using perceptual transforms can reach up to 22x faster processing speeds than standard algorithmic methods while analyzing shot composition to replicate reference looks with higher fidelity, as noted by Cined's coverage of Colourlab AI.
The three parts that matter in practice
Here's the simple version of what's happening under the hood:
- Pattern recognition identifies recurring visual structures. Faces, skies, interiors, foliage, neon, and low-key scenes tend to need different treatment.
- Reference learning lets the model compare your footage to a target aesthetic, whether that's a still image or a saved look.
- LUT generation turns that decision into something usable inside an editing app.
A LUT is just a color recipe. What's changed is that AI can now help create that recipe instead of forcing you to build every transform by hand.
Good AI grading doesn't “know cinema” in an artistic sense. It recognizes color relationships that humans already respond to as cinematic.
If you're building a wider workflow around short-form production, this ties nicely into broader AI video strategies for creators. Color is rarely the bottleneck by itself. It's one part of a system that includes scripting, pacing, thumbnails, and format-specific variants.
Why context matters so much
A human colorist sees a face and immediately protects skin. AI can miss that if the frame is noisy, synthetic, backlit, or heavily stylized. That's why the best results happen when the tool handles the broad correction pass and you handle judgment calls.
This is also why some AI grades look oddly generic. The model isn't being “bad.” It's averaging toward safety when the footage gives mixed signals. If you give it a clear reference and a clean clip, it behaves much better.
Automated Versus Manual Grading A Creator's Choice
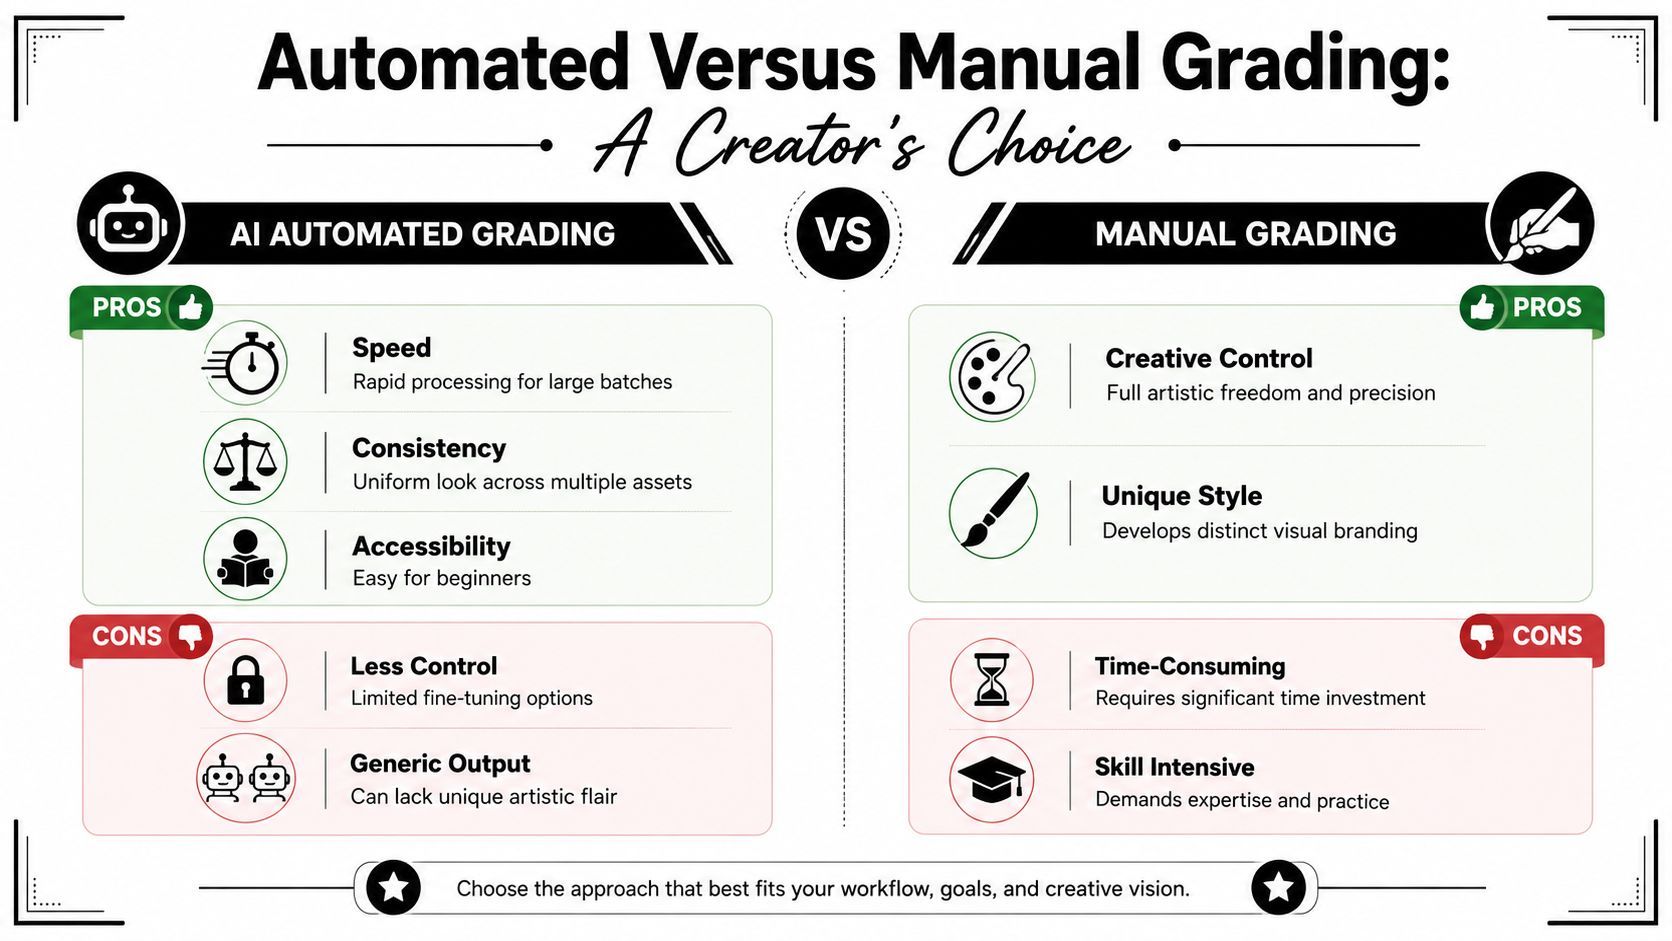
The useful question isn't whether AI is better than manual grading. It isn't. The useful question is where each one earns its place.
For short-form volume, AI wins the setup battle. For signature work, manual grading still wins the finish.
Where AI clearly helps
Studios aren't adopting AI color tools for novelty. They're adopting them because repetitive correction work is expensive in time. A 2026 Jon Peddie Research survey found that post-production studios report 40% faster turnaround times after adopting AI color correction tools, and NVIDIA data cited in the same report says AI-powered color grading can reduce manual adjustments by up to 70% for professional editors, according to this 2026 overview of AI video editing and color correction.
For creators, that usually translates into a simple advantage: you stop burning hours on clip matching.
| Criteria | AI grading | Manual grading |
|---|---|---|
| Speed | Fast for batch correction and first-pass matching | Slower, especially across many clips |
| Consistency | Strong when you're repeating one brand look | Depends on discipline and saved workflows |
| Creative control | Limited at the edges | Best for precise shaping |
| Learning curve | Easier to start | Takes longer to get right |
Where manual still matters
AI often gets you to “clean and usable.” It doesn't always get you to “intentional.”
Manual grading matters when:
- Skin is the focal point and you need subtle hue and luminance shaping.
- The product has color sensitivity like cosmetics, food, apparel, or branded packaging.
- The look needs restraint because AI tends to push obvious contrast and saturation choices.
- The footage mixes real and synthetic elements and needs selective correction.
The practical split
Most creators should use a hybrid approach.
Start with AI for balancing and shot matching. Then finish manually with a few targeted moves. Lower saturation where it feels synthetic. Tame highlights on foreheads. Adjust shadow density so the image still has shape. Protect brand colors if they drift.
The fastest workflows don't skip manual grading. They shrink it to the moments that matter.
That's the core trade-off. AI buys time. Manual work buys specificity. If you know which one you need at each stage, the workflow gets much lighter.
A Practical AI Color Grading Workflow
The best AI color grading workflow is boring in the right places. It removes repeat decisions and preserves your attention for the clips that carry the post.
Creators who move fast usually need one system that works whether they're editing in Premiere Pro, DaVinci Resolve, or Final Cut Pro. That's where AI-generated LUTs help, because they let you carry a consistent look between tools instead of rebuilding it every time.
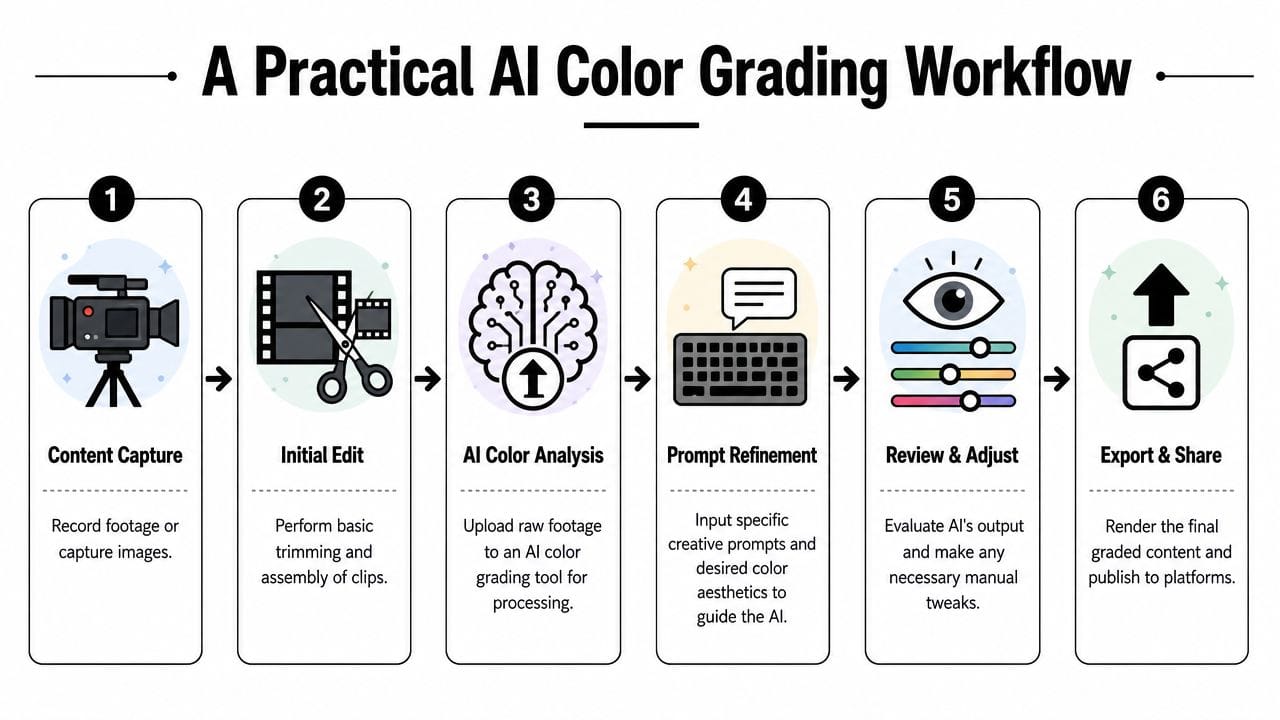
A six-step workflow that holds up
-
Edit first, grade second
Trim the sequence before touching color. There's no reason to grade dead takes, alternate hooks, or cutaways you won't keep. -
Group clips by lighting condition
Put daylight clips together, studio clips together, screen recordings together, and AI-generated inserts in their own group. AI grading behaves better when similar material gets processed together. -
Run an AI base correction pass
Use the tool to balance white balance, exposure, and broad contrast. AI excels at this. Let it solve the repetitive matching work. -
Apply a reference-driven look or generated LUT
AI-generated LUTs in .cube format can be created from text prompts or reference images and used across DaVinci Resolve, Premiere Pro, and Final Cut Pro, while reducing post-production time by up to 40% for high-volume creators, based on this walkthrough of AI-generated LUT workflows. The practical benefit isn't just speed. It's portability. -
Do a manual face pass
Check skin, teeth, under-eye shadows, and red channel overload. Even good AI passes need this. -
Export test versions before final delivery
Watch on a phone and a desktop display. If the grade falls apart on mobile, back off aggressive saturation and contrast.
What to save as presets
Don't save everything. Save the decisions you repeat.
- Correction presets for your common camera or room setups
- Look LUTs for recurring brand aesthetics
- Adjustment layers for platform variants, such as a slightly brighter mobile version
- Face protection nodes for interview and talking-head content
If you produce paid social as well as organic posts, it helps to align your grading workflow with the wider ad assembly process. This guide to AI ad production for Meta and TikTok is useful because it treats color as one piece of a faster production chain, not a separate art project.
Where creators lose time
They over-grade too early. Or they ask AI to solve footage that should have been reshot, relit, or separated into a different correction group.
The strong workflow is simple: normalize, stylize, protect skin, then check on the device where your audience will watch.
From Prompt to Palette Mastering AI Color Commands
The difference between a useful AI grade and a forgettable one usually comes down to the input. “Auto” gives you a safe correction. Prompts and references give you direction.
That matters most when you're trying to build a visual identity across a whole channel instead of making one clip look nice in isolation.

Better prompts produce better grades
Weak prompt:
- “Make this cinematic.”
Usable prompt:
- “Warm skin tones, soft highlight rolloff, lower green cast, slightly lifted shadows, premium lifestyle ad look.”
Better still:
- “Natural daylight portrait, clean skin tones, restrained contrast, subtle warm mids, neutral whites, polished but realistic social ad finish.”
The point isn't to sound poetic. It's to be specific about mood, contrast behavior, temperature, and realism. AI responds better when you describe what should happen to the image, not just the vibe.
Prompt patterns that work in short-form
A few prompt structures tend to work reliably:
-
For talking heads
“Neutral skin tones, reduced background cast, soft contrast, clear separation from backdrop, natural creator studio look.” -
For product shots
“Crisp contrast, accurate product color, controlled highlights, luxury commercial feel, clean blacks.” -
For dramatic edits
“Cool shadows, warm highlights, stronger contrast, punchy but not oversaturated, modern trailer mood.” -
For UGC ads
“Bright and believable phone-native color, healthy skin, clean whites, no heavy film look.”
Reference images beat vague language. If you have a look you like, feed the tool that look instead of trying to describe it from memory.
A strong reference image does two things. It shortens the path to a usable result, and it makes your brand more repeatable. If your last ten posts all point back to the same visual target, your feed starts to feel intentional.
Here's a useful walkthrough for seeing how prompt-led grading ideas translate into actual video outputs:
What to avoid in prompt language
Some prompt habits create bad grades fast:
- Stacking too many aesthetics like “moody, clean, vintage, luxury, sci-fi, natural.”
- Using film references loosely when you don't want the contrast or color density that comes with them.
- Ignoring subject priority so the AI grades the environment better than the person.
The best habit is to create your own small prompt library. One for bright educational content. One for direct-response ads. One for dramatic B-roll. One for product demonstrations. Once those are dialed in, your grading gets faster and more consistent without turning generic.
Real-World Troubleshooting Common AI Grading Issues
The biggest myth around AI color grading is that the hard part is choosing the tool. It isn't. The hard part is recognizing when the tool is wrong, and knowing how to fix it without starting over.
That shows up most clearly in AI-generated footage. Creators working with Synthesia, Runway, Pika, and similar systems keep running into the same issue: the “waxy skin tone” collapse, where faces lose texture, flatten out, and start looking plasticky. As discussed in this Reddit ColorGrading thread on AI-generated footage, standard auto-correction tools often fail to restore the texture and micro-contrast needed to make those faces feel real.
Fixing waxy skin in AI-generated footage
Auto correction usually makes this problem worse because it smooths broad tonal relationships without rebuilding local texture.
Use this protocol instead:
-
Back off the global correction first
If the image already looks too smooth, don't pile a stylized LUT on top. Reduce intensity before doing anything else. -
Lower skin luminance gently
Waxy faces often sit too high in the image. Bring them down slightly so they stop glowing against the rest of the frame. -
Reduce oversoft saturation
Skin that looks flat often also looks strangely uniform. Pull saturation back a little instead of pushing it. -
Add selective contrast, not global contrast
A global contrast boost hardens everything and rarely helps skin. Use curves, masks, or local tools to shape the face area more carefully. -
Reintroduce perceived texture
This is the missing step in most tutorials. Use controlled sharpening, midtone contrast, or texture tools sparingly. You're trying to restore believable surface variation, not create crunchy skin.
If the face looks like polished plastic, stop grading for “beauty” and start grading for structure.
Other failures that show up all the time
AI also misses in more ordinary ways.
Context mismatch
A tool may grade for the background instead of the subject. A bright window or colorful wall can pull the correction away from the face.
Try this:
- Mask the subject manually if your software allows it
- Reduce the strength of the automated pass
- Run separate adjustments for foreground and background
Over-saturation
This is common in lifestyle content, travel clips, food footage, and neon-heavy edits. AI often interprets “pleasing” as “more color.”
Use a short correction checklist:
- Check reds first because skin, lips, and signage break fastest
- Watch greens in mixed light because they can get synthetic quickly
- Desaturate selectively instead of lowering the whole image if brand colors matter
Screen-to-screen inconsistency
A grade can look polished on your desktop and harsh on a phone. Since short-form lives on mobile, mobile has the last word.
A fast review pass
Before export, ask four questions:
- Does skin still look human?
- Do whites read neutral enough?
- Do shadows hold detail without looking washed out?
- Does the image still work on a phone at low brightness?
Most AI grading problems aren't dramatic. They're cumulative. A slightly hot face, a slightly pushed teal shadow, a slightly fake product color. Fix those small misses and the whole edit feels more expensive.
Your New Creative Partner Not Your Replacement
You still need a finisher's eye.
AI gets short-form creators through the slow part of grading fast. It can normalize exposure, pull clips toward a consistent palette, and give a batch of videos the same baseline look before you start making taste-level decisions. That matters when you're cutting five variations for Reels, Shorts, and TikTok on a deadline.
The limit shows up right where quality starts to matter. AI does not reliably know when a beauty clip needs natural skin texture instead of plastic-looking smoothness, or when an AI-generated talking head has crossed into waxy skin and fake highlights. It also won't protect every product color, makeup shade, or brand cue unless you check it. The last 20% still comes from the editor.
For a time-poor creator, that's a good trade. Let the tool handle balancing and first-pass matching. Use your time on the calls that affect trust and conversion. Is the face believable? Does the hoodie still match the brand color? Does the grade support the hook, or is it pulling attention away from it?
Good creators build systems, not just edits. If you want to discover AI tools to save creator time, that roundup is a useful place to compare where automation helps across scripting, production, editing, and publishing.
If you want the grading piece to sit inside a broader short-form pipeline, ShortGenius for AI video workflows shows the direction many creators are heading. A significant gain is not fully automated taste. It's getting to a strong first pass quickly, then applying judgment where AI still falls short.