How to Add Music to Google Slides and Engage Your Audience
Learn how to add music to Google Slides with our complete guide. Discover how to use Google Drive, embed YouTube, and master playback for amazing presentations.
Adding music to your Google Slides is surprisingly simple. The most reliable way is to upload an MP3 or WAV file directly to your Google Drive, make sure its sharing settings are set to "Anyone with the link," and then pop it into your presentation using the Insert > Audio menu. This embeds the audio right onto the slide, giving you seamless playback control.
Why Adding Music to Your Slides Changes Everything

Let's be honest: a lot of presentations are forgettable. A silent deck of slides, packed with text and charts, just doesn't grab people's attention the way it used to. But what if you could add a layer that completely transforms the atmosphere? This is exactly where audio makes a huge difference.
The right soundtrack can turn a dry, data-heavy slideshow into a genuinely engaging experience. It’s that one simple addition that can take your content from purely informational to truly memorable. Think about a sales pitch starting with an energetic track to build excitement, or a photo slideshow for a graduation party paired with a soft, nostalgic melody to stir up emotions.
Setting the Right Tone
Music is an incredibly powerful tool for setting the mood and guiding how your audience feels. A carefully chosen track can:
- Boost Engagement: Good background music keeps your audience tuned in, preventing their minds from drifting off.
- Amplify Your Message: The right score reinforces your key points, making them hit harder and stick longer.
- Add a Professional Polish: A solid soundtrack shows you’ve gone the extra mile, making your entire presentation feel more refined and complete.
The goal isn't just to add noise; it's to add feeling. A subtle, instrumental track can make complex data feel more approachable, while a dynamic score can make a product reveal feel like a major event.
With cloud-based tools like Google Workspace becoming the norm for millions of businesses, the demand for better multimedia integration in Slides has exploded. This push is why features like inserting audio directly from Google Drive are now front and center for creators.
To make your presentations truly shine beyond just adding music, you can explore these easy slideshow maker tips for stunning presentations for more ways to capture your audience's attention.
Choosing Your Method to Add Audio
Not sure which approach to take? This table gives a quick snapshot of the primary ways to add music to your Google Slides, helping you decide which method best fits your specific needs.
| Method | Best For | Key Requirement |
|---|---|---|
| Google Drive Upload | The most reliable, professional, and seamless experience. Great for important presentations. | An audio file (MP3 or WAV) saved in your Google Drive. |
| YouTube Link/Embed | Quick access to a massive library of music without downloading files. Good for informal use. | A reliable internet connection during the presentation and comfort with a visible video player. |
Ultimately, uploading from Google Drive is the gold standard for control and reliability. Now, let's dive into the step-by-step process for getting it done.
Using Google Drive for Seamless Audio Integration
When you need full control and reliability, embedding music directly from your Google Drive is hands-down the best way to go. This method tucks the audio right into your presentation, so you don't have to worry about broken links or weird playback errors, especially in a high-stakes professional setting.
First things first, you need to get your audio file ready. Google Slides plays nicely with two formats: MP3 and WAV. Honestly, for most presentations, an MP3 is your best friend. The quality is great, and the file size is much smaller, which means everything loads faster for you and your audience.
Getting the file into Drive is a breeze. Just drag and drop it from your computer into any Drive folder, or use the “New” button to upload it.
Preparing Your File for Sharing
Okay, this next part is critical. I'd say 90% of audio playback problems happen because of incorrect sharing permissions. If you skip this, you'll be the only one hearing the music, which can be pretty awkward.
To get it right, find your audio file in Google Drive, right-click it, and hit Share. In the window that pops up, look for "General access" and change it from "Restricted" to "Anyone with the link." This one tiny change is what lets everyone else's computer access and play the file.
Pro Tip: Before a big presentation, always test your sharing settings. I like to send the presentation link to a friend or just open it myself in an incognito browser window. If you can hear the music there, you're good to go.
Now that your file is uploaded and shared correctly, you're ready to pop it into your slides.
Inserting the Audio into Your Slides
Head back to your Google Slides presentation and click on the slide where you want the music to start—usually the title slide or the one right after. Go up to the top menu and select Insert > Audio.
A new window will appear showing all the audio files you have in Google Drive. Just find the track you uploaded, click on it, and then hit the Insert button.
You'll see a little speaker icon appear on your slide. This icon is your command center for the audio. Clicking it opens up the "Format options" panel on the right, which is where all the magic happens for customizing playback. We'll dive into those options next, but for now, you've successfully embedded your music using the most reliable method there is.
Customizing Your Audio Playback Options
Getting the audio file onto your slide is just the beginning. The real magic happens when you dial in the settings to make that music work for your presentation, not against it. This is all handled in the Format options panel, which conveniently pops up on the right the moment you insert your audio.
Think of this panel as your audio mission control. It’s where you decide if the music should start on its own or wait for your cue, how loud it should be, and even whether the little speaker icon should be visible. Getting these details right is what makes a presentation feel polished and professional.
Automatic Start vs. On Click
Your first big decision is how the music kicks off. Under the "Start playing" section, you've got two clear choices:
- On click: This is the default, and it does exactly what it says. The audio won’t make a peep until you physically click the speaker icon during your presentation. It's perfect for triggering a specific sound effect at a key moment or playing a short clip to emphasize a point on a single slide.
- Automatically: Choose this, and your audio will start the second you land on that slide. This is my go-to for setting an instant mood—think of a powerful opening track for your title slide or a gentle ambient sound for a reflective section.
The choice is all about control versus atmosphere. "On click" gives you precise, manual timing, while "Automatically" creates an immediate, hands-free experience.
Creating Continuous Background Music
So, you want a single song to play across your entire slideshow? This is probably the most common request I hear, and thankfully, Google Slides makes it pretty straightforward once you know the secret. It’s all about tweaking two specific settings.
Start by clicking your audio icon to bring up the "Format options" panel again. Under "Audio playback," make sure you've set it to start Automatically.
Now, look for the checkbox right below it: Stop on slide change. This box is checked by default, which is why audio usually cuts out when you advance.
Uncheck the "Stop on slide change" box. That's it. That’s the key. With this one change, your audio will now play continuously as you move from one slide to the next, creating a seamless soundtrack. For an extra layer of polish, I also recommend checking the Loop audio box. This ensures the music will just restart if your presentation happens to run longer than the track itself.
This decision tree helps visualize the simple checks you should run through before you finalize your audio setup.
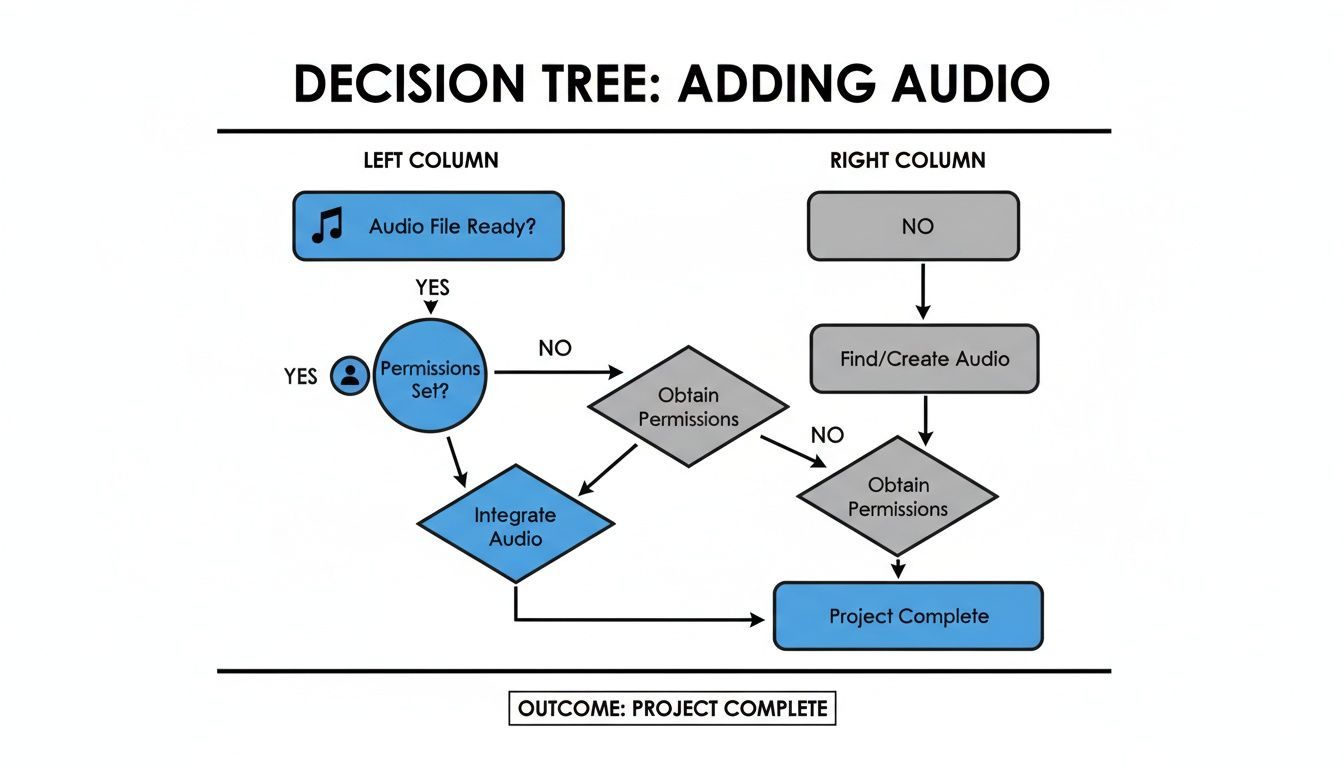
As you can see, it's not just about the settings within Slides—having the file ready and ensuring the sharing permissions are correct for your audience are just as critical.
From experience, I can tell you that file size really matters here. A 3-minute MP3 at 128 kbps is a manageable 3 MB, but the same song as a WAV file could be over 30 MB. As a rule of thumb, try to keep your background music files under 5–10 MB to avoid long load times, especially if you know some viewers might have slow internet.
Finally, for a completely clean look, check the Hide icon when presenting box. The speaker icon will be there for you in edit mode but will vanish during the actual slideshow. Your audio will play perfectly, but your audience will just see your beautiful slides.
If you're turning your presentations into videos, you might find that an AI ad generator can help take your finished project to the next level.
Tapping into YouTube’s Music Library: A Clever Workaround
What if the perfect song for your presentation is sitting on YouTube, not in an MP3 file on your computer? While Google Slides won’t let you pull audio directly from a YouTube link, there’s a fantastic trick you can use: embed the video, then make it invisible.
This approach opens up a nearly infinite library of music and soundscapes. You're essentially inserting the YouTube video like any other, but then you'll use some simple formatting tweaks to hide the visual element, leaving only the audio behind.
How to Insert and Hide the Video
First, track down the YouTube video with the audio you want and copy its URL. Head back to your Google Slides presentation, go to the slide where the music should start, and select Insert > Video.
Paste the YouTube URL into the search bar, click on the video when it pops up, and hit Insert.
Now for the magic part. With the video selected on your slide, you can make it disappear in one of two ways:
- Shrink it down: Just drag the corners of the video player inward until it’s a tiny, unnoticeable dot.
- Move it off-stage: My preferred method is to simply click and drag the entire video player off the visible slide and into the gray "backstage" area.
Even though it's out of sight, Google Slides knows the video is there, and its audio is ready to go.
Placing the video player off-canvas is a great way to maintain a clean, professional look. Your audience only hears the music, with no visual clutter to distract them from your message.
Setting Up an Audio-Only Experience
With your video neatly tucked away, the last step is to get the audio to play automatically. Click on your hidden video element to bring up the Format options panel, which usually appears on the right.
Under the "Video playback" section, you’ll see the default is "Play (on click)." You need to change this to "Play (automatically)." This little tweak tells the video to start playing its audio the second you arrive at that slide.
A couple of things to keep in mind with this method: It relies on a live internet connection to stream the video, so it's not ideal for offline presentations. Also, some YouTube videos have ads at the beginning, which could be an unwelcome surprise.
And for anyone curious about the creator side of the platform, it can be interesting to see how much YouTube pays creators for the content we all use. Just remember, this trick is best for presentations where you need the audio for one specific slide, as it won't loop or play across multiple slides like an inserted audio file would.
Best Practices for a Professional Sound Experience
It’s easy enough to drop an audio file into your presentation, but making it sound good is a completely different skill. A thoughtful approach to sound can be the difference between a presentation that's just okay and one that truly captivates your audience. It’s all about making the music support your message, not distract from it.
The last thing you want is for poorly optimized audio to create long loading times or for the volume to be so jarring it pulls people out of the moment. Let's walk through a few simple practices to make sure your soundtrack is a powerful, seamless asset.
Choose the Right Audio Format
The file format you choose has a huge impact on your presentation's performance. You might be tempted to use a WAV file for its incredible, uncompressed sound quality, but their massive size can lead to frustrating loading delays, especially for viewers on a weaker internet connection.
This is why MP3 is almost always the best choice. It strikes the perfect balance between good audio quality and a much smaller, compressed file size. Using an MP3 ensures your presentation loads quickly and the music plays without any annoying buffering.
If your audio isn't already in the right format, you might need to prepare it first. Knowing how to convert audio files is a handy skill for any presenter to have in their back pocket.
Respect Copyright and Music Licensing
I get it—it's tempting to grab the latest hit song to make your presentation pop. But dropping commercial music into a widely shared presentation can land you in serious legal trouble without the proper licenses, which are often incredibly expensive.
Given that music is used in an estimated 10–25% of slide decks, this is a bigger issue than most people realize. To stay on the right side of the law, smart creators and businesses turn to royalty-free music libraries. These services offer affordable, hassle-free licenses—sometimes for as little as $0 to $50 per track—or provide massive catalogs for a simple subscription fee.
Here are a few of my go-to places for great, legal music:
- YouTube Audio Library: A surprisingly robust and completely free resource for creators.
- Pixabay Music: Offers a huge collection of free tracks perfect for any mood or theme.
- Artlist & Epidemic Sound: These are my top picks for subscription services with incredibly high-quality, professional music.
Fine-Tune Your Audio for Impact
With the perfect, legally-sourced track in hand, a couple of final adjustments will ensure everything sounds polished and professional.
Set the Right Volume Level Jump into the Format options for your audio and slide the volume way down. Background music should be just that—in the background. It's there to set a mood, not fight for attention with your voice or the text on the screen. As a rule of thumb, I usually set my background tracks to around 15-25% volume.
Trim Your Clips You almost never need a full four-minute song. I recommend using a free audio editor like Audacity to trim your track to the exact length you need. You can even isolate a specific instrumental loop that works perfectly. This has the added benefit of making your final audio file even smaller.
A well-edited, subtle soundtrack should feel almost invisible. The audience should feel its effect—the energy, the focus, the emotion—without being consciously aware of the music itself.
By paying attention to these details, you move beyond just knowing how to add music to Google Slides and start mastering the art of creating a truly professional sound experience. For creators looking to bring that same level of polish and efficiency to their video projects, a tool for AI UGC ads can be a real game-changer.
Solving Common Audio Headaches in Google Slides
You've followed all the steps, picked the perfect track, and... silence. It's incredibly frustrating when your audio doesn't cooperate, but don't worry. Most of the time, the fix is surprisingly simple. I've run into just about every audio issue you can imagine, so let's walk through the most common ones.
Think of this as your quick-start guide to getting your presentation back on track.
"My Audience Can't Hear the Music!"
This is, by far, the number one problem people face. It almost always boils down to one of two culprits: Google Drive permissions or a spotty internet connection.
Before you tear your hair out, double-check the audio file in your Google Drive. The sharing setting must be set to "Anyone with the link." If it's on "Restricted," you're the only one who will ever hear it. It's an easy mistake to make.
Also, remember that Google Slides streams the audio, it doesn't embed it. If your audience members are on a weak Wi-Fi connection, the music might struggle to load for them. If you used a YouTube link, the problem could be a broken URL or the video might be blocked in their region.
My Go-To Trick: Always test your presentation in an incognito or private browser window before you go live. If the audio plays for you there (while you aren't logged into your Google account), you know your permissions are set correctly.
"How Do I Get One Song to Play Across the Whole Presentation?"
Getting that seamless, continuous background music is a popular request, and it’s all about nailing a specific combination of settings. First, make sure you add the audio to the very first slide where you want the music to kick in.
Once you see the little speaker icon, click on it. This brings up the Format options panel on the right. Now, here’s the magic formula:
- Under Start playing, choose Automatically.
- This is the critical part: Uncheck the box that says Stop on slide change.
- I also recommend checking Loop audio. That way, if your presentation runs longer than the song, it will just start over smoothly instead of cutting to silence.
That’s it! This setup ensures your soundtrack plays continuously as you click through your slides, giving your presentation a much more professional feel.
"What's the Best Audio Format and Size to Use?"
When it comes to Google Slides, you want the best possible sound quality without making your audience wait for a massive file to load.
For this balance, MP3 is the gold standard. It offers excellent quality at a fraction of the file size of a format like WAV.
As a rule of thumb, I try to keep my audio files under 10 MB. Smaller files load almost instantly, which prevents that awkward pause at the beginning of your presentation while the music buffers. If you have a large file, you can use a free audio editor like Audacity to compress it or, even better, just trim the song down to the exact clip you need.
Ready to create stunning videos with AI in just minutes? ShortGenius unifies scriptwriting, video assembly, and natural voiceovers into one seamless platform. Join over 100,000 creators and turn your ideas into high-quality content today by visiting https://shortgeni.us.