Turn Your PowerPoint Into Video a Practical Guide
Learn how to turn your PowerPoint into video with our guide. We cover built-in tools, screen recording, video editors, and new AI workflows.
You've spent hours crafting the perfect PowerPoint deck. The data is solid, the narrative is compelling, and the design is clean. But let's be honest: in its original .pptx format, its reach is limited. The easiest way to break it out of that box is to use PowerPoint's built-in Export function, which can turn your static slides into a dynamic MP4 file in just a few clicks.
But before we jump into the "how," let's talk about the "why." This isn't just a technical exercise in changing a file format. It's a strategic move to adapt your message for how people actually consume information today.
Think about it. An educator can transform their lecture notes into a video lesson that students can pause and re-watch. A marketing manager can take a dense webinar deck and spin it into a punchy, shareable summary for social media. Turning your slides into a video breathes new life into your work, transforming a one-time presentation into a lasting, versatile asset.
Why Video is Non-Negotiable Today
Let's face it, we live in a video-first world. The shift in audience behavior over the last decade has been seismic. Video isn't just an option anymore; it's often the preferred medium.
The numbers don't lie. The use of video in business marketing skyrocketed from 61% in 2016 to 91% by 2023. More specifically, those presentation-style videos we're talking about have gone mainstream. Today, 48% of businesses create them—that's the same adoption rate as traditional video ads. For anyone creating educational or promotional content, this makes one thing crystal clear: turning a PowerPoint into a video is no longer a "nice to have." It's a core skill.
Turning your PowerPoint into a video is a perfect example of smart, effective content repurposing strategies. You're taking an existing asset and maximizing its value by giving it a new format that can reach different people on different platforms.
Choosing the Right Path for Your Video
So, how do you decide which conversion method is right for you? It all comes down to your audience and your goal. A quick internal training video has very different needs than a polished marketing video destined for YouTube or LinkedIn.
This decision tree gives you a great starting point for thinking through your strategy.
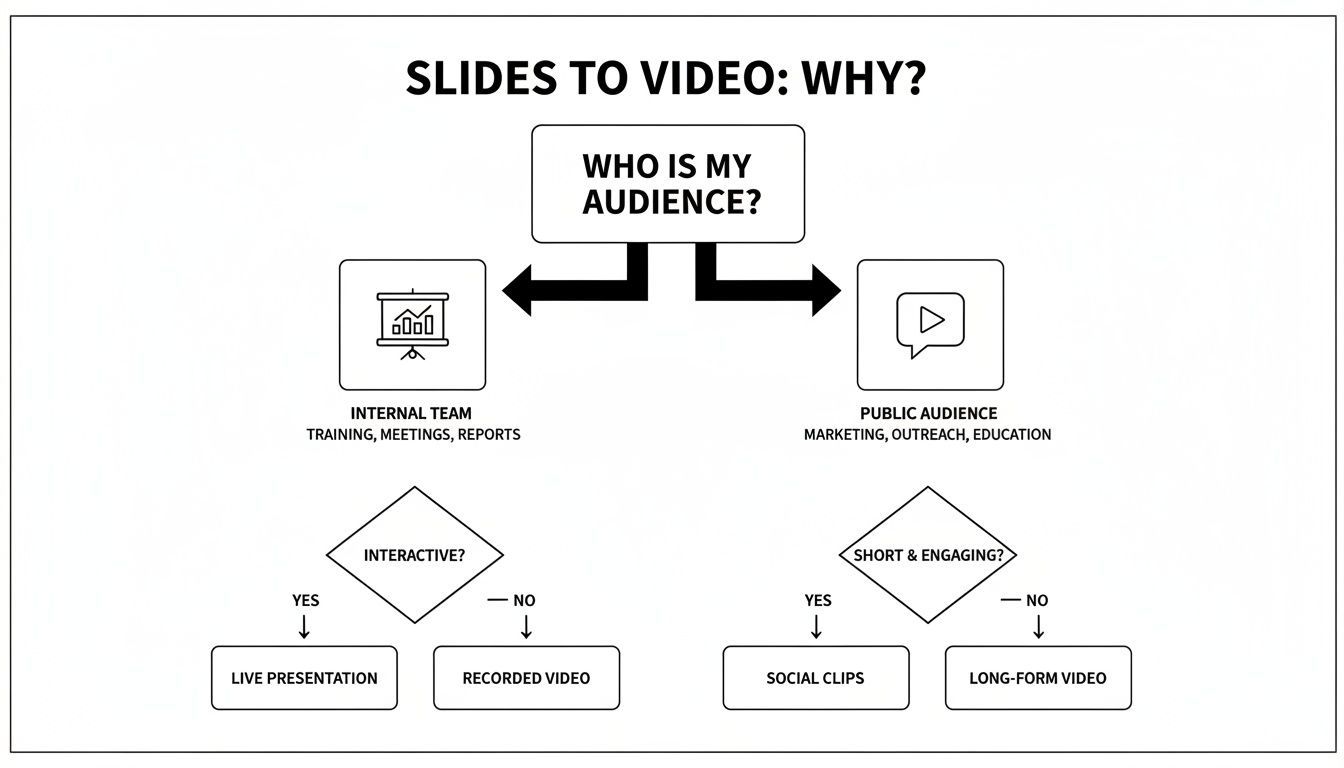
The main takeaway here is simple: internal videos can afford to be straightforward and direct. But if your content is heading out into the public domain, you'll want to aim for a more polished and engaging format that can capture and hold attention.
Comparing Methods to Turn a PowerPoint Into Video
This table gives you a quick comparison of the four main methods we'll cover, helping you choose the best approach for your specific project and skill level.
| Method | Best For | Difficulty | Key Feature |
|---|---|---|---|
| Built-in Export | Quick, simple conversions without narration or complex timing. | Easy | Creates a video with set timings for each slide; fast and requires no extra tools. |
| Record Timings/Narration | Adding a human touch with voiceover and rehearsed slide timings. | Easy | Records your voice and mouse movements directly in PowerPoint for a presentation-like feel. |
| Screen Recording | Capturing complex animations, software demos, or live presentations. | Intermediate | Offers maximum flexibility by recording everything on your screen, including other apps. |
| Export Slides as Images | Full creative control for polished, professional videos edited externally. | Advanced | Gives you individual image files for each slide to assemble in a dedicated video editor. |
Each of these methods has its place. Your choice will depend on whether you need a quick-and-dirty conversion or a highly produced final product. Let's dig into the step-by-step for each one.
Using PowerPoint's Built-In Export Function
Sometimes the simplest solution is the best one. You don't always need fancy software to turn your presentation into a video—PowerPoint has a surprisingly robust export feature baked right in. With just a few clicks, you can convert your finished .pptx file directly into an .mp4 video.
This is my go-to method for creating straightforward, self-running videos that don't need complex editing. Think of a presentation for a trade show kiosk or a simple looping video for a lobby display. It's quick, easy, and gets the job done.
Ready to try it? Just head to File > Export > Create a Video. That's it. This one command opens up all the controls you'll need to package your slides into a video file.

Understanding Your Export Options
Once you're in the "Create a Video" panel, you'll face a couple of key decisions that will shape your final video. Getting these settings right from the start is crucial for avoiding a fuzzy, low-quality export or a massive file that’s impossible to share.
First up is video quality, which directly impacts the resolution and file size. You'll see a dropdown with a few choices:
- Ultra HD (4K): This is your top-tier option. It's fantastic for massive screens or professional projects where every pixel counts, but be warned—the file sizes are enormous and the rendering time can be painfully slow.
- Full HD (1080p): This is the sweet spot for almost everything. It delivers crisp, clear video that looks great on YouTube, Vimeo, and most modern screens. It balances quality and file size perfectly.
- HD (720p): A solid choice when you need a smaller file. If you're emailing the video or embedding it on a site where load times are a concern, 720p is a good compromise.
- Standard (480p): Honestly, I'd avoid this unless you have no other choice. The quality is noticeably degraded, and it just doesn't look professional in most contexts.
For most creators, Full HD (1080p) is the way to go. Your video will look sharp and professional without creating a file that takes forever to upload or hogs all your storage.
Incorporating Timings and Narrations
The next choice is perhaps the most important: how the slides advance. This is where your video goes from being a simple slideshow to a full-fledged presentation.
You could just set a default duration using the Seconds spent on each slide option. But this makes every slide appear for the same length of time, which can feel stiff and unnatural. A complex slide with a lot of data needs more time than a simple title card.
A much better approach is to select Use Recorded Timings and Narrations. This powerful setting tells PowerPoint to use the slide timings and voiceovers you’ve already recorded with the "Record Slide Show" feature. If you haven’t recorded anything yet, this option will be grayed out, which is your cue to go back and record your presentation first.
Imagine you're on a sales team. You could record a perfect product demo, narrating each feature as you click through the slides. By exporting with your recorded timings, you create a polished, repeatable video pitch. It’s a fantastic way to ensure every potential client gets the same consistent, high-quality message.
Screen Record Your Presentation for a More Personal Touch
While PowerPoint's built-in export function is a quick and easy way to get a video file, it often lacks a personal feel. If you want to connect with your audience, show a live demonstration, or just have more say in the final cut, screen recording is the way to go. This method captures everything you do on your screen—your mouse movements, any on-the-fly annotations, and even your face via webcam.
Think about it: this is the perfect approach for creating a tutorial. Let's say you're walking your team through new software. You can seamlessly bounce between your slides and the actual application, all within one continuous recording. It brings a level of authenticity and clarity that a simple slideshow-to-video conversion just can't replicate.
Choosing Your Screen Recording Tool
You've got a couple of solid options when it comes to screen recording your presentation. The right choice really boils down to how much control you need and what features are must-haves for your project.
The Built-In PowerPoint Recorder
For a no-fuss recording that keeps you inside the PowerPoint ecosystem, the app's own tool is a great place to start. You can find it right in the "Record" tab. This feature lets you click through your slideshow, record your voiceover, and capture any movements you make with your pointer. It's incredibly straightforward and already part of your workflow, making it an excellent entry point.
Dedicated Screen Recording Software
When you need more firepower, it’s time to look at external software. Tools like Loom, Camtasia, or the incredibly powerful (and free) OBS Studio open up a whole new world of possibilities. These programs let you add a slick webcam overlay, switch between different scenes or windows, and generally produce a much higher-quality audio and video recording.
Honestly, I'd suggest starting with PowerPoint's built-in recorder to get the hang of it. But if you see yourself making videos regularly, investing a little time to learn a tool like Loom or OBS will seriously level up your content game.
How to Set Up for a Professional-Looking Recording
The final quality of your video really depends on your setup. Taking just a few minutes to prepare can be the difference between a video that looks thrown together and a polished presentation that keeps your audience hooked.
Here's a quick checklist to run through before you hit that record button:
-
Prioritize Your Audio. Believe it or not, your sound quality matters more than your video quality. Ditch your laptop's built-in mic for a dedicated USB microphone. Find a quiet room, preferably one with soft surfaces like carpets or curtains, to cut down on echo. Always do a quick test recording to make sure your levels sound good.
-
Tidy Up Your Digital Workspace. A cluttered desktop or a random notification popping up mid-sentence can instantly make your video feel unprofessional. Close every app you don't need, switch on "Do Not Disturb" mode, and ensure your presentation is the only thing on screen.
-
Check Your Lighting. If you're using a webcam, you need good light on your face, coming from the front. The simplest trick is to face a window. No window? Just place a small lamp behind your monitor. Good lighting is one of the fastest ways to look more professional on camera.
By putting in this little bit of extra effort, you’re not just making a video from a PowerPoint. You're creating a powerful, engaging piece of content that truly connects with your audience.
Rebuilding Your Slides in a Video Editor for Total Creative Control
Sometimes, the built-in PowerPoint export options just don't cut it. When you need absolute authority over the final cut—think broadcast-quality marketing videos or highly polished online courses—it’s time to bring your slides into a proper video editor.
This is the pro workflow. It involves exporting each slide as a high-resolution image and then assembling them in a tool like Adobe Premiere Pro or DaVinci Resolve. You're essentially treating your slides as raw ingredients for a much more sophisticated final product.
This approach is perfect for marketing teams who need to weave in B-roll footage and animated graphics, or for anyone who wants to turn a static presentation into a dynamic, engaging video story. It hands you the keys to every single detail.
Getting Your Slides Ready: Exporting as Images
First things first, you need to get your slides out of PowerPoint in a format your video editor can handle. Forget screenshots—they'll look blurry and unprofessional. The key is to use PowerPoint's own export function to maintain every pixel of quality.
Head over to File > Save As. In the "Save as type" dropdown, you’ll see several image formats. Your best bets are PNG or JPEG. I almost always go with PNG because it supports transparency, which is incredibly useful if you have logos or graphics that you want to overlay on other video footage.
Once you hit "Save," a dialog box will pop up asking if you want to export "All Slides" or "Just This One." You'll want to choose All Slides. PowerPoint will neatly package them into a new folder for you, with each slide named sequentially (Slide1.png, Slide2.png, and so on).
A crucial tip: When PowerPoint prompts you for the resolution, always pick the largest size possible. For a standard 16:9 widescreen presentation, this is usually 1920x1080. Anything less, and your slides will look fuzzy in the final video.
Building Your Masterpiece on the Timeline
Now for the fun part. With your folder of high-quality slide images, open up your video editor and simply import them. Most editors let you drag the entire folder right into the media bin.
From there, you can start laying them out on your video timeline. This is where the magic really happens, and you’re no longer bound by PowerPoint's linear structure.
- Fine-Tune Your Pacing: Is one slide packed with data? Stretch it out to last ten seconds. Is the next just a simple title? Shorten it to three. You have complete control over the timing of every single element.
- Add Professional Transitions: Move beyond PowerPoint's basic wipes and fades. You can now use cinematic transitions, subtle motion graphics, and effects that give your video a polished, high-end feel.
- Layer Like a Pro: This is the biggest advantage. You can place a video of yourself presenting in the corner, add animated text overlays (often called lower-thirds), or keep your company logo visible as a watermark. Your slide is now just one layer in a multi-layered composition.
This workflow also gives you precise authority over your audio. You can record a voiceover on a separate track, ensuring it syncs perfectly with your visuals. Adding a good background music track to set the tone and keep viewers engaged is just a matter of dragging and dropping a file. It’s a game-changer.
Leveraging AI for a Faster Workflow
While the hands-on methods give you a ton of control, they can also be a massive time sink. This is where AI-powered tools come in. For anyone needing to churn out social media content, this is easily the fastest and most efficient way to get your PowerPoint into video format.
The process starts out the same as the manual editing workflow I described earlier: you’ll still export your slides as high-resolution images (I recommend PNGs for quality). But that’s where the similarities end. Instead of painstakingly arranging clips in a timeline, you just upload those images into a dedicated AI video tool and let it work its magic.
From Static Images to Dynamic Video
Once your slides are in the system, the real fun begins. These tools don't just stitch images together; they analyze the text on each slide to generate a surprisingly good script from scratch. Then, it creates a lifelike AI voiceover to go with it, completely cutting out the need for you to record and edit audio.
This is a game-changer for marketers and creators who are constantly under pressure to produce more content. The AI does all the heavy lifting, turning a single presentation into a whole batch of videos ready for TikTok, YouTube Shorts, or Instagram Reels.
This isn't just about moving faster—it's about scaling up your entire operation. An AI workflow lets you take one slide deck and spin it into a dozen different video assets. You can test different hooks, voices, or visuals in the time it would normally take to create a single video by hand.
The Power of AI Automation
Think about it: you upload your slides, and an intelligent system takes over from there. Platforms in this space are built specifically for this purpose. If this approach sounds right for you, a tool like ShortGenius can handle the entire process from start to finish.
The interface here gives you a good idea of how simple it becomes. The AI automates the script, the voiceover, and even the scene timing based on your slides. It’s a completely integrated system that removes the technical headaches from video production.
But these tools do more than just the basics. They add professional touches that would otherwise require some serious editing skills.
- Automatic Captions: The AI generates and perfectly syncs subtitles. This is non-negotiable for social media, where over 80% of videos are watched on mute.
- Dynamic Animation: Your static slides get brought to life with automated camera pans and zooms, adding visual flair without you having to touch a single keyframe.
- Brand Consistency: Many tools let you upload a brand kit. This ensures every video automatically uses your specific fonts, colors, and logos, keeping everything on-brand.
If you're looking to integrate AI more deeply into your workflow, exploring the best AI tools for content creation can reveal even more ways to save time. This whole approach really marks a shift in how we think about video, making high-volume production a realistic goal for anyone, regardless of their editing background.
From Good to Great: Polishing Your PowerPoint Video
So, you've learned the different ways to get your PowerPoint into video format. That's a great start, but it's really just the beginning. If you want to create something that actually grabs and holds your audience's attention, you need to focus on the details that make a video feel professional.
A few smart decisions can be the difference between a basic slide-to-video export and a truly polished, compelling piece of content.

This is about more than just what's on your slides. It’s about thinking like a video creator: optimizing for the viewing platform, making sure your audio is flawless, and ensuring your message is accessible to everyone.
Match Your Aspect Ratio to the Platform
One of the first things you have to get right is the shape of your video—its aspect ratio. A one-size-fits-all approach just doesn't fly anymore. Every platform has a preferred format, and forcing the wrong one leads to weird cropping, black bars, and viewers who scroll right past.
Here’s a quick cheat sheet:
- 16:9 (Widescreen): This is your standard, horizontal format. It's what you see on YouTube and Vimeo. It fills a computer monitor or TV screen perfectly, so it’s ideal for detailed tutorials, webinars, and company presentations.
- 9:16 (Vertical): This is the tall, skinny format that dominates mobile. Think TikTok, Instagram Reels, and YouTube Shorts. If your audience is on their phone (and they are), this format provides an immersive, full-screen experience that just works.
Nailing this at the start saves you a world of pain later. You won't have to worry about your carefully crafted visuals or important text getting chopped off.
Prioritize Crystal-Clear Audio
Let's be blunt: people will forgive a video that isn't perfectly sharp, but they will absolutely not sit through bad audio. Muffled narration, distracting background noise, or a hollow echo will have viewers clicking away in seconds.
Investing in a decent external USB microphone is probably the single best upgrade you can make to your video’s quality. You don't need a professional studio setup, just a mic that sounds better than your laptop's built-in one.
Pro Tip: Find a quiet spot to record. A room with carpets, curtains, or even a closet full of clothes can work wonders to absorb sound and kill echo. Always do a quick test recording before you launch into the full session—it can save you from a massive re-recording headache.
Add Captions for Accessibility and Engagement
Whatever you do, don't skip the captions. Subtitles are essential for making your content accessible to viewers who are deaf or hard of hearing, but their impact goes so much further. A huge number of people watch social media videos with the sound off. Without captions, your message is completely lost.
While PowerPoint can generate live subtitles during a presentation, for an exported video, you’ll need to add them in. You can burn them into the video file using a video editor or an AI captioning tool. This simple addition can dramatically boost how long people watch and how well they understand your content.
A Few Common Questions You Might Have
Even after you've done this a few times, converting a PowerPoint into a video can throw a curveball your way. Here are some of the most common questions I hear, along with quick answers to get you past those final hurdles.
What If I Need to Edit the Video After Exporting?
This is a big one. Once you export your presentation as a video file (like an .MP4 or .WMV), it's essentially locked in. You can't just open that video file back up in PowerPoint and start making changes.
If you catch a typo or realize an animation is off, you’ll have to go back to your original .pptx file. Make your edits there, and then go through the export process all over again. It's always a good idea to do one final, thorough review of your slides before you hit that export button.
My Exported Video File Is Huge! How Can I Make It Smaller?
It's pretty common to end up with a massive video file, especially on your first try. The file size really comes down to three things: resolution, the length of your video, and the bitrate (how much data is packed into each second). A 10-minute video exported at Ultra HD (4K) is going to be a beast compared to a short 2-minute clip at HD (720p).
The easiest fix? Just re-export it at a lower resolution. If your file is too big to upload or email, try again using Full HD (1080p). For almost everything you'd post online, it's the perfect sweet spot between great quality and a manageable size.
Help! My Video Has No Sound.
I've been there. This is a classic snag, and thankfully, it's usually a simple fix. If your final video is silent, it's almost always one of two things related to your recording and export settings.
Here’s your troubleshooting checklist:
- Did you actually record a voiceover? You have to use the "Record Slide Show" feature to capture your voice for each slide.
- Did you check the right export box? When you go to export, you absolutely have to select "Use Recorded Timings and Narrations." If you skip this and use the default time-per-slide setting, PowerPoint will completely ignore all the audio you so carefully recorded.
Tired of wrestling with export settings and troubleshooting? You could just let ShortGenius handle it. Our AI can take your slides and whip them into an engaging video in minutes—complete with a script, a professional voiceover, and captions.