How to Upload a Video to YouTube A Complete Guide for 2026
Learn how to upload a video to YouTube with this complete guide. Go beyond the basics to master settings, SEO, and discoverability on desktop and mobile.
Uploading a video to YouTube is easy. You hit the 'Create' icon, pick your video file, and you're off. But making a video successful on YouTube? That’s a whole different ball game. The real work—the strategic part—begins after you select your file.
Why Mastering the YouTube Upload Is Critical for Growth
Let's be honest, just throwing your video onto YouTube and hoping for the best doesn't work anymore. The platform is packed. To stand out, you have to treat every single upload like a product launch. This mindset is no longer optional; it’s the baseline for anyone serious about building an audience.
Think about the sheer scale of the competition. In 2026, every minute, creators are uploading over 500 hours of new video content. That’s 720,000 hours of new footage hitting the platform every day—a volume that has been consistently high since 2022. You're not just competing for views; you're fighting for a sliver of attention from massive audiences, like the 467 million users in India or the 246 million in the US.
From Manual Curation to AI-Driven Discovery
It’s hard to believe now, but back when YouTube launched in 2005, founders Chad Hurley, Steve Chen, and Jawed Karim were supposedly reviewing videos by hand. That's a universe away from today's reality, with 2.7 billion people logging in monthly and watching over 1 billion hours of content daily.
Today, YouTube runs on a sophisticated AI recommendation engine. This algorithm is the gatekeeper, and it uses the data from your upload to decide who—if anyone—sees your video.
Your title, description, thumbnail, and tags are no longer just simple labels. They are direct commands you are feeding to the YouTube algorithm. Getting them right is the most powerful way you can influence who sees your content.
A well-planned upload gives the algorithm a clear roadmap: this is what my video is about, this is who it's for, and this is why it's worth watching. If you skip this, your video could get lost, shown to the wrong people, or simply buried.
The New Standard for Content Creators
For anyone using YouTube professionally—creators, marketers, brands—the work isn't over when you export the final cut. The upload process is a crucial stage of production that demands its own strategy.
Here’s what a strategic upload looks like in practice:
- SEO-Driven Titles: Writing headlines that are not only attention-grabbing but are also full of keywords people are actually searching for.
- Compelling Descriptions: Using that space to hook the viewer, add context, drop important links, and sprinkle in more relevant keywords.
- High-Impact Thumbnails: Designing a custom thumbnail that pops on the screen and accurately signals what the video is about.
- Strategic Tagging: Applying a mix of general and highly specific tags to give YouTube a complete picture of your video’s subject matter.
Nailing these details is fundamental to getting discovered. In the same way, creating compelling video ads requires its own unique approach, which you can learn more about with our guide on the AI ad generator. In the crowded world of YouTube, every piece of metadata matters.
Uploading Your Video to YouTube on a Desktop
While uploading from your phone is quick and convenient, the desktop version of YouTube Studio is where you can really fine-tune your video for success. Think of it as your channel's command center. It gives you the most control and is the go-to method for any creator who's serious about their video’s performance and reach.
Getting started is simple. Head over to your YouTube Studio, click the ‘Create’ button in the top-right corner, and select ‘Upload videos’. From there, you can just drag your video file into the pop-up window or browse your computer to find it. This one action starts the upload, but it's the details you fill in next that truly make a difference.
If you’re looking for a bird's-eye view of the entire process, this complete guide on how to post on YouTube from start to finish is a fantastic resource. It’s great for newcomers and a solid refresher for experienced creators alike.
Crafting a Powerful Title
The first thing you’ll work on is the Title, and it’s arguably the most important piece of text you'll write. It has two jobs: it needs to grab a person's attention and it needs to tell YouTube's algorithm exactly what your video is about. You get 100 characters, so make every one count.
A common mistake I see is a vague title like "My Thoughts on Summer." It’s just not enough. A far better option would be something like "5 Must-Have Summer Gadgets for 2026 (You Won't Believe #3)." See the difference? The second one is specific, uses the keyword "Summer Gadgets," and sparks curiosity. Always try to put your main keyword near the beginning of the title to give it more weight with the algorithm.
Pro Tip: Before you even hit upload, rename your raw video file to include your target keyword. For example, "summer-gadgets-2026-review.mp4." It’s a small, behind-the-scenes trick that gives YouTube an early clue about your video’s topic.
Building Your Description for Discovery
Next is the Description, a space that is so often overlooked but is a goldmine for getting your video discovered. This is where you sell your video, provide extra value, and feed the algorithm more context. The first two or three lines are crucial because they're what viewers see in search results before they have to click "Show more."
Use that valuable space to expand on the promise you made in your title. For our gadget video, a good hook would be: "Ready to upgrade your summer? In this video, I'm unboxing and testing five amazing gadgets that will change the way you enjoy the season."
Below that initial hook, structure the rest of the description to serve both your audience and the algorithm.
- Expand on Your Content: Write a short summary of the video's key points. You can also add timestamps to create chapters, which not only helps viewers navigate but can also lead to better visibility in search.
- Include Important Links: This is your spot for affiliate links, social media profiles, your website, or links to other relevant videos on your channel.
- Add Relevant Hashtags: Drop up to three key hashtags at the very bottom (e.g., #SummerGadgets #TechReview #2026Tech). These will appear above your video's title and help YouTube categorize it.
Configuring Audience and Playlists
As you scroll down the "Details" page, you'll hit the Audience section. This is a big one, and it's required by law. You have to declare whether your video is "Made for Kids." Getting this wrong can result in penalties and will disable key features like comments and personalized ads, so be sure to answer honestly.
Playlists are another tool that can have a surprisingly big impact. Adding your video to a playlist takes just a second, but it encourages viewers to binge-watch your content. When one video ends, the next in the playlist starts automatically, which drives up your channel's total watch time—a critical metric for the YouTube algorithm.
Finally, you get to the Thumbnail. This might be the single most important decision you make. YouTube will offer some auto-generated options, but you should always upload a custom thumbnail. Make sure it has a resolution of 1280x720 pixels and is under 2MB. Use bold, easy-to-read text and high-contrast colors to make it pop. A great thumbnail is what earns the click; without it, all your other hard work might go unnoticed.
How to Upload Videos From Your Phone
In a world where trends catch fire in minutes, being able to upload a YouTube video directly from your phone isn't just a neat trick—it's a core part of a modern creator's toolkit. This is how you jump on a trend, share a spontaneous moment, or get a Short live before the conversation moves on. Knowing your way around the mobile upload process is a huge advantage.
It all starts right inside the YouTube app. Just tap the big ‘+’ button you see at the bottom of your screen. This brings up your creator menu, where you’ll want to hit ‘Upload a video’. From there, you can grab any video file straight from your phone's camera roll. That simple connection is what makes capturing and sharing moments on the fly so incredibly effective.
Getting Your Mobile Upload Started
After you've picked your video, the app takes you to the 'Add details' screen. Think of this as your mobile command center for getting the video ready to go. It may look a lot simpler than the desktop version, but all the essentials for a solid launch are right here.
This is where you'll punch in your title and description and decide on the video's visibility. You’ll also get to pick a thumbnail. While YouTube will offer a few random frames from your video, I always recommend uploading a custom image from your phone’s photo gallery. It makes a world of difference in catching a viewer's eye.
Being able to go from recording to uploading in just a few taps is a game-changer. It’s easy to forget that before 2012, this was a clunky, desktop-only process. The arrival of mobile apps that year completely changed the game, sparking a massive surge in creators worldwide.
This accessibility has been a huge driver of YouTube's growth. In fact, channels that post daily can see 5-10x faster growth than those posting just once a week—a pace fed by the platform's mind-boggling 200 billion daily views. With YouTube on track to hit 2.7 billion users by 2026 (led by India's 467 million), mobile creation is more important than ever. You can see more data on these trends and YouTube's history in these in-depth YouTube statistics.
Key Differences: Mobile vs. Desktop Uploads
The mobile app is built for speed, but that speed comes with a few trade-offs. It's crucial to know what the app does well and what's better left for your computer. This helps you decide whether to publish immediately or save some optimization for later.
What You Can Do Easily on Mobile:
- Upload and Publish: Get your video out there fast.
- Write Titles & Descriptions: Handle the basic metadata.
- Set Visibility: Switch between Public, Private, or Unlisted.
- Add to Playlists: Keep your content organized on the go.
- Select a Thumbnail: Use a generated frame or a custom image.
What's Better on Desktop:
- Advanced Tagging: The dedicated tag section in the desktop Studio is far easier to use and manage.
- End Screens and Cards: These crucial interactive elements can only be added from a computer.
- Custom Chapters: While you can manually type timestamps in the mobile description, the desktop's automatic chapter tool is a huge time-saver.
- Monetization Details: Fine-tuning your ad settings really requires the space and control of the desktop interface.
- Uploading Subtitles/Captions: Managing .srt files and other caption formats is a desktop-only job.
So, what's the best workflow? For a lot of creators, it's a hybrid approach. If you're using a tool like ShortGenius to create quick, timely content, the mobile upload is perfect. You can generate a video and push it to YouTube instantly to ride a trend.
For bigger, evergreen videos, you might upload from your phone to get the process started, but keep it Unlisted. Then, when you're back at your computer, you can add the finishing touches—end screens, detailed tags, and precise chapters—before hitting publish. This gives you the best of both worlds: the speed of mobile and the power of the desktop studio.
Going Beyond the Basics: Mastering YouTube’s Advanced Upload Settings
So you’ve got your title, description, and thumbnail locked in. That's a great start, but don't hit publish just yet. So many creators miss the boat by ignoring the settings that come next, and honestly, this is where the magic happens.
These advanced options are your secret weapons for boosting a video’s performance. They’re what separate a simple upload from a strategic launch. Think of it as the final polish that helps you keep viewers hooked and tells the YouTube algorithm that your content is top-notch. It’s the difference between just putting a video out there and truly knowing how to make it succeed.
To get the most out of every upload, you need to think beyond the basics and learn how to optimize your videos for YouTube by mastering everything from metadata to these crucial advanced settings.
Using Video Elements to Keep Viewers Watching
Once you're past the initial details, YouTube presents you with Video Elements. This is your chance to add interactive features directly into the video player, creating clear paths for viewers to dive deeper into your channel.
-
End Screens: In the final 5-20 seconds of your video, you can pop up clickable graphics. This is prime real estate! Use it to suggest another one of your videos, push for that subscribe button, or even link to an approved website. A well-placed End Screen is your best defense against a viewer bouncing off to another channel. For instance, if you have a cooking channel, you could link your "Perfect Sourdough" video to your "Sourdough Starter 101" video.
-
Cards: These are much more subtle. Cards are small, clickable notifications that can appear at any point in your video. They're perfect for referencing another piece of content without breaking the viewer's focus. Let's say you're reviewing a new smartphone and you mention a separate video where you tested its camera—you can have a card pop up at that exact moment to link to it.
Passing YouTube's Automated 'Checks'
Next up is the Checks screen. This part is completely automated, but it’s incredibly important. YouTube scans your video in the background for two main things: copyright claims and ad-suitability issues.
If you’ve accidentally used a snippet of copyrighted music, this is where it’ll get flagged. The system gives you a heads-up before you publish, so you can fix the problem and avoid having your video demonetized or, even worse, blocked.
Choosing the Right Visibility Setting
With the checks cleared, you’ll land on the Visibility screen. This step is critical—it determines who sees your video and when. Picking the wrong option can completely undercut your launch strategy, so let's break down what each setting really means.
Choosing the right visibility setting is a core part of any content strategy. This table breaks down what each option does and the best scenarios for using it.
YouTube Visibility Settings Explained
| Setting | Who Can View | Where It Appears | Best Use Case |
|---|---|---|---|
| Private | Only you and people you invite via email. | It's completely hidden and won't appear anywhere publicly on YouTube. | Storing video backups, or sharing an early draft with a client or collaborator for feedback. |
| Unlisted | Anyone who has the direct link. | Won't show up in search results, suggestions, or on your channel page. | Sharing a video with a select group, like for a private webinar, or sending a link to family and friends. |
| Scheduled | Becomes public at a date and time you set. | Stays private until the scheduled time, then acts just like a public video. | Building a content backlog and publishing consistently at peak hours for your audience. |
| Public | Everyone on YouTube. | Appears in search, recommendations, and on your channel. Subscribers are notified. | For all your main content releases when you're aiming for maximum reach and engagement. |
As you can see, each setting has a specific purpose. For most creators, Scheduled is the go-to for maintaining a consistent upload schedule without having to be at your computer for every single launch.
Pro Tip: When you schedule a video, you can also set it as a Premiere. This creates a public watch page before the video goes live, complete with a countdown and a live chat. It turns a standard upload into a community event and builds some serious hype.
Adding Chapters and Captions for a Premium Experience
Don't sleep on chapters and captions. I know, they take a little extra effort, but the payoff in viewer experience and discoverability is huge.
Chapters break your video into timed sections, each with its own title. This lets viewers skip to the parts they're most interested in, which is a lifesaver for longer tutorials or reviews. You can add them just by typing timestamps (like 0:00 Intro and 1:15 Setting up your camera) into your video's description.
This simple diagram shows the basic flow for a mobile upload, from selecting your file to setting its visibility.
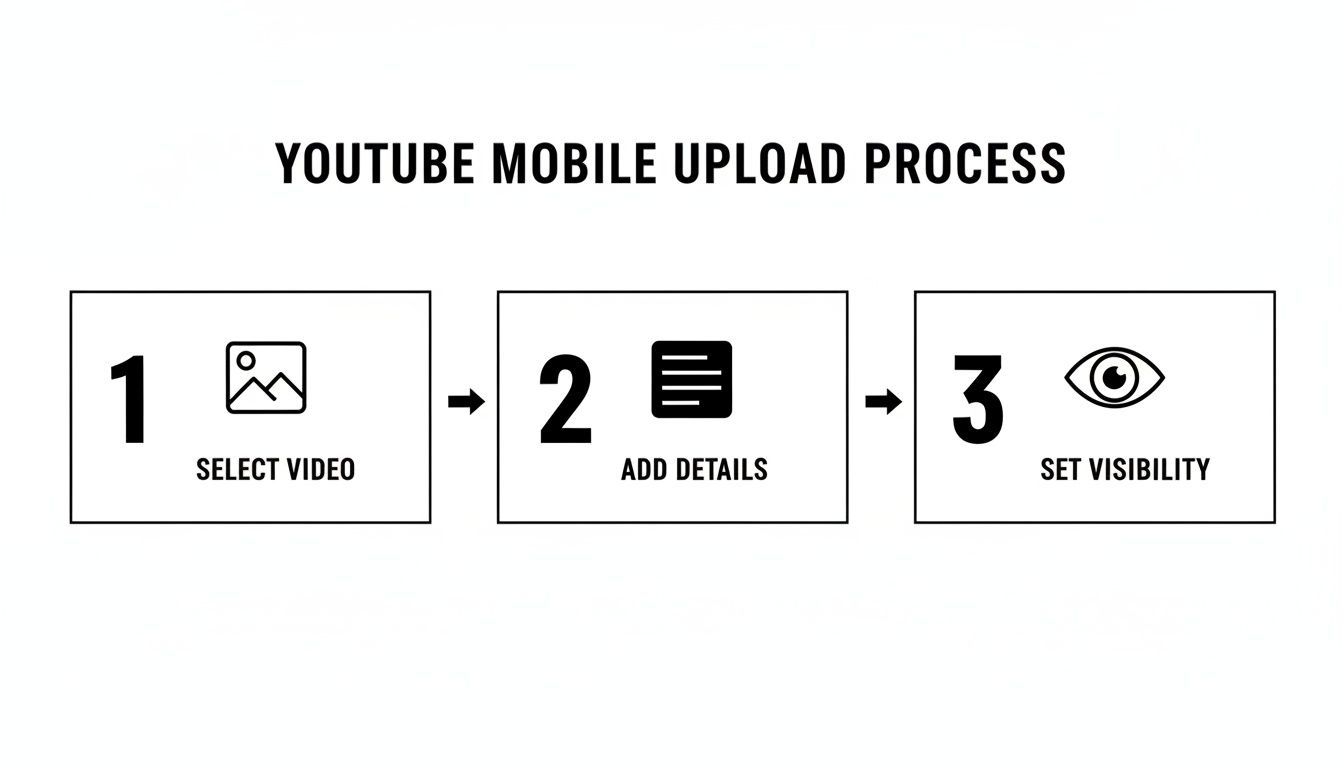
While it looks like a simple three-step process, that middle "Add Details" stage is where you'll find the options to add things like timestamps for chapters, which are crucial for helping viewers navigate your content.
Captions, or subtitles, are an absolute must. They make your videos accessible to viewers who are deaf or hard-of-hearing, and let's not forget the 73% of people who watch videos with the sound off. YouTube’s auto-captions have improved, but uploading your own custom caption file (.srt) guarantees accuracy. As a bonus, all that text is indexed by YouTube and Google, which helps your video show up in more search results.
For more advice on creating accessible and visually stunning content, including tips on making great thumbnails, check out our guide on the ShortGenius image editor.
Automating Your Workflow with Smart Tools
Let's be honest—the YouTube grind is real. Staying consistent is key to growing your channel, but it’s also the fastest way to burn out. The cycle of brainstorming, filming, editing, and uploading can feel relentless. This is where a smart workflow can make all the difference, turning your channel from a source of stress into a sustainable system.
The secret is to stop treating every video as a frantic, one-off sprint. Instead, think about building a content pipeline. Your goal should be to get ideas from your brain to your audience with as little friction as possible. When you nail this down, you free up incredible amounts of mental energy to focus on what really matters: creating amazing content.
A steady publishing rhythm doesn't just keep your audience coming back for more; it also sends powerful signals to the YouTube algorithm. When YouTube sees you're consistently active, it's more likely to start recommending your channel and helping you find new viewers.
Building a Content Engine with AI
This is where modern tools can be a total game-changer. What if you could generate a polished, branded video—script, voiceover, and all—in just a few minutes? That’s not some far-off fantasy. It’s exactly what platforms like ShortGenius are built for.
This isn't about having a robot do your job. It's about letting AI handle the tedious parts so you can focus on the creative side. You can start with a simple concept or even an old blog post, and the AI will help structure a script, generate a natural-sounding voiceover, and piece together a draft video.
Don't think of AI as a replacement for your creativity. Think of it as your new production assistant. It takes care of the repetitive work, giving you more time to polish your ideas and engage with your community.
I’ve seen marketing teams use this to incredible effect. They’ll take a single case study, plug the main points into an AI tool, and walk away with a dozen short video variations for YouTube, TikTok, and Instagram in less than an hour. That kind of speed and scale used to require a whole production team. This is also an amazing way to quickly create video content from your existing text, and you can see how text-to-video models work.
The Strategic Power of Scheduling
Once you’ve got your video, don't just hit "Publish." Scheduling your uploads is more than a convenience; it's a huge strategic advantage. By building up a backlog of content, you can stop the last-minute scramble and start publishing with intention.
You can actually use data to your advantage here. Dive into your YouTube Analytics and find out when your audience is most active. By scheduling your videos to go live just before those peak hours, you ensure your content lands in front of your subscribers at the perfect time, boosting those crucial initial views.
Here’s a simple workflow for building a powerful scheduling habit:
- Batch Your Work: Set aside a specific block of time each week—say, a Tuesday morning—to create several videos at once.
- Create a Backlog: As you finish each video, upload it to YouTube and set its visibility to "Private" or "Unlisted."
- Schedule for Peak Times: Go into your content library and use the "Scheduled" visibility option to set each video to go public at the optimal times you found in your analytics.
This process transforms your channel into a well-oiled machine. You're no longer living deadline to deadline. Instead, you're always working a few weeks ahead, which gives you the breathing room to experiment, connect with your viewers, or even take a break without your channel going dark.
Common Questions About Uploading to YouTube
Even the most seasoned creators run into snags during the upload process. From mysterious processing delays to confusing file formats, it’s easy to get derailed. I’ve seen it all, and I’ve put together this quick-reference guide to tackle the most common questions I hear from other creators.
Think of this as your personal cheat sheet for troubleshooting. We’ll get these problems sorted out fast so you can get back to what matters: creating great content.
How Long Does a YouTube Upload Take?
That’s a question I get all the time, and the honest answer is: it varies wildly. The time it takes for your video to go from your computer to YouTube’s servers really comes down to three things: the file size of your video, your internet upload speed, and how much traffic YouTube’s servers are handling at that moment.
For example, a short, 10-minute video in 1080p might be ready in minutes on a fast fiber connection. But a beefy 30-minute 4K file? That could easily take an hour or more, even with decent internet.
The good news is that YouTube gets a standard-definition (SD) version of your video ready first, so it can be watched almost immediately after the initial upload. The HD and 4K versions will continue to process in the background.
Here's a pro-tip: once the initial upload bar hits 100%, you can close the browser tab. The rest of the processing happens on YouTube's end, and you don’t need to babysit it. The higher-resolution versions will pop up as soon as they're ready.
What Is the Best Video Format for YouTube?
Don't overthink this one. For 99% of creators, the answer is MP4.
To get a little more technical, your best bet is an MP4 file using the H.264 video codec and AAC-LC audio codec. This is the gold standard for a reason—it gives you a fantastic balance of quality and compatibility, ensuring your video looks and sounds great everywhere.
Always, always upload your video in the highest resolution you filmed it in. YouTube compresses every single video, so you need to give it the best possible source file to work with. If you shot in 4K, upload in 4K. It’s the only way to make sure the final product looks crisp for your audience.
And when it comes to YouTube Shorts, the same rules apply, just with a vertical twist:
- Format: Stick with MP4 (H.264/AAC).
- Aspect Ratio: A vertical 9:16 ratio is a must.
- Resolution: Aim for 1080x1920 pixels for the sharpest look.
Why Is My Video Stuck on Processing?
There's nothing more maddening than seeing your upload stuck at "95% processed" for hours on end. It’s a common issue, and it's almost always caused by a corrupted video file that YouTube's system can't quite figure out.
Before you panic, try this simple fix: cancel the upload and re-export the video directly from your editing software. This one step solves the problem a majority of the time by creating a fresh, clean file. If it’s still stuck, try clearing your browser's cache or even switching browsers. And remember, massive 4K or 8K files can genuinely take hours to process, so sometimes a little patience is part of the game.
Can I Change Video Details After Publishing?
Yes, you absolutely can! This is one of YouTube's most forgiving features. Once your video is live, you can jump back into the YouTube Studio at any time to tweak and optimize almost everything.
You can freely update the:
- Title
- Description
- Tags
- Thumbnail
- Visibility (from Public to Unlisted, for example)
- Monetization status
- Playlists it belongs to
The only thing you can’t change is the actual video file. If you notice a mistake in the edit after publishing, your only option is to delete the video and re-upload the corrected version. Just be warned: doing this resets all of your stats to zero. You will lose every view, comment, and all the watch time associated with the original video.
Ready to stop wrestling with your content workflow and start building a powerful, consistent presence on YouTube? With ShortGenius, you can generate and schedule high-quality videos in minutes, not hours. Let our AI handle the heavy lifting so you can focus on what you do best: creating. Get started with ShortGenius today!