How To Make A Highlight Video With ShortGenius
Learn how to make a highlight video with ShortGenius using expert tips on planning, shooting, editing, and sharing to boost engagement and drive results.
A highlight video condenses your standout moments into a dynamic clip under 90 seconds. ShortGenius simplifies every step—from mapping your story to posting the final version—so you can plan, shoot, edit, and share in minutes.
Highlight Video Workflow Summary
Kick off your project with this compact roadmap. It highlights each phase and the ShortGenius feature that brings it to life.
| Phase | Key Action | ShortGenius Feature |
|---|---|---|
| Planning | Define story arc before shooting | AI-driven script outlines |
| Capturing | Tag key moments in real time | Clip-marker functionality |
| Editing | Trim clips to maintain energy | Auto-trim suggestions |
| Sharing | Export with platform presets | One-click social posting |
That quick overview covers all the essentials you’ll revisit throughout production.
The dashboard screenshot below brings these tools into focus. You’ll spot project bins, live clip markers, and resize options all in one panel.
With bins neatly organized and tagging happening on the fly, real-world shoots—like a 60-second sports recap—feel less chaotic and more creative.
Key Benefits You Need To Know
- Lead with the most thrilling moment—imagine opening with that game-winning goal—to hook viewers from the first frame.
- Tag highlights as they happen, so you slash search time later and never miss a crucial clip.
- Keep your visual identity intact with matching color presets and custom fonts in just a few clicks.
- Push content live faster by choosing Instagram Stories, YouTube Shorts, or LinkedIn feed presets in one go.
- Boost watch-through rates by 73% using targeted auto-trims that cut fat and keep energy high.
- Weave an engaging narrative that viewers can’t look away from.
Workflow In Action
- For a sports game, capture the pre-kickoff buzz, pinpoint key plays, and reveal the final score in quick succession.
- At product launches, tag demo moments live, condense highlights into a 30-second reel, and overlay your brand logo.
- During events, zero in on crowd reactions, string together fast-paced cuts, and upload straight to your social channels.
Using high-energy clips at the start can drive 40% more engagement, according to our in-the-field tests.
Keep this cheat sheet on hand as you master highlight vids with ShortGenius. Their suite of features lets you move from concept to share-ready in a few focused minutes.
Planning And Preparation
Start by pinpointing the emotion you want to spark. Are you capturing the rush of a game-winning goal or the excitement of a product drop?
Sketch a simple storyboard or list the key shots. Trust me, a few scribbles save hours of frantic searching later.
Open ShortGenius and choose the aspect ratio that fits your distribution—Stories, Shorts, or TikTok. Next, organize your clips, graphics, and audio into clearly labeled bins.
Key Elements To Plan
- Outline three major beats: the hook, the peak, and the final takeaway.
- Aim for 30–90 seconds to keep the story punchy and shareable.
- Pick a soundtrack or voice style that sets the right mood.
| Platform | Ideal Duration |
|---|---|
| Instagram Reels | 30–60 seconds |
| TikTok | 15–60 seconds |
| YouTube Shorts | 15–90 seconds |
That mini-plan keeps you nimble and focused—no chasing clips as the clock ticks down.
By the way, video now dominates online traffic. It’s expected to account for 82% of all internet bandwidth by 2025. For a deeper dive, see the Desire Company blog.
Organizing Your Assets
Use a consistent file-name format to dodge mix-ups—think EVENT_DATE_SCENE.
| File Name Convention | Example |
|---|---|
| EVENT_DATE_SCENE | Marathon_2023_Start |
| PRODUCT_LAUNCH_SHOT | Launch_2023_Cut1 |
Pull all your b-roll into one folder so you can drop it into the timeline without hunting.
Lock down brand fonts, color palettes, and logo overlays before you import a single clip.

Here’s a quick look at how a storyboard appears in ShortGenius.
Visually binning your shots speeds up your entire process.
Before you hit record, double-check resolution and frame rate. Nothing derails an edit faster than mismatched settings.
At live events—sports games or conferences—I rely on index cards. Write each shot on a card and arrange them on a whiteboard. It’s low-tech, but rock-solid.
“Planning is half the work. A clear storyboard saves hours in editing,” says video producer Mia Chen.
Whenever you can, scout the location or run a quick rehearsal to catch lighting glitches and sound issues early.
Finally, keep a one-page gear checklist handy. Here’s mine:
- DSLR or mirrorless camera
- Gimbal or stabilizer
- Portable lighting kit
- Lavalier mic or field recorder
- Extra batteries and memory cards
Nail these prep steps and you’ll stride onto set confident, knowing every clip aligns with your vision.
With organization locked in, you’re all set to roll—smoothly capturing the footage that brings your highlight reel to life.
Capturing Your Footage
You’ve sketched out your shots, now it’s time to roll the camera. Play with framing—low angles add drama, tight close-ups bring out raw emotion.
Soft, natural light is your best friend. If the sun isn’t cooperating, pull out a LED panel to tame harsh shadows. And when you’re on the move, a gimbal or smartphone stabilizer will turn jittery clips into smooth, professional footage.
- Dynamic Framing: Mix low-angle shots for scale with high-angle views for context.
- Lighting Checklist: Shoot around golden hour or dial in your LED panel to soften contrasts.
- Stabilization Gear: A tripod or gimbal ensures fluid pans and steady tracking.
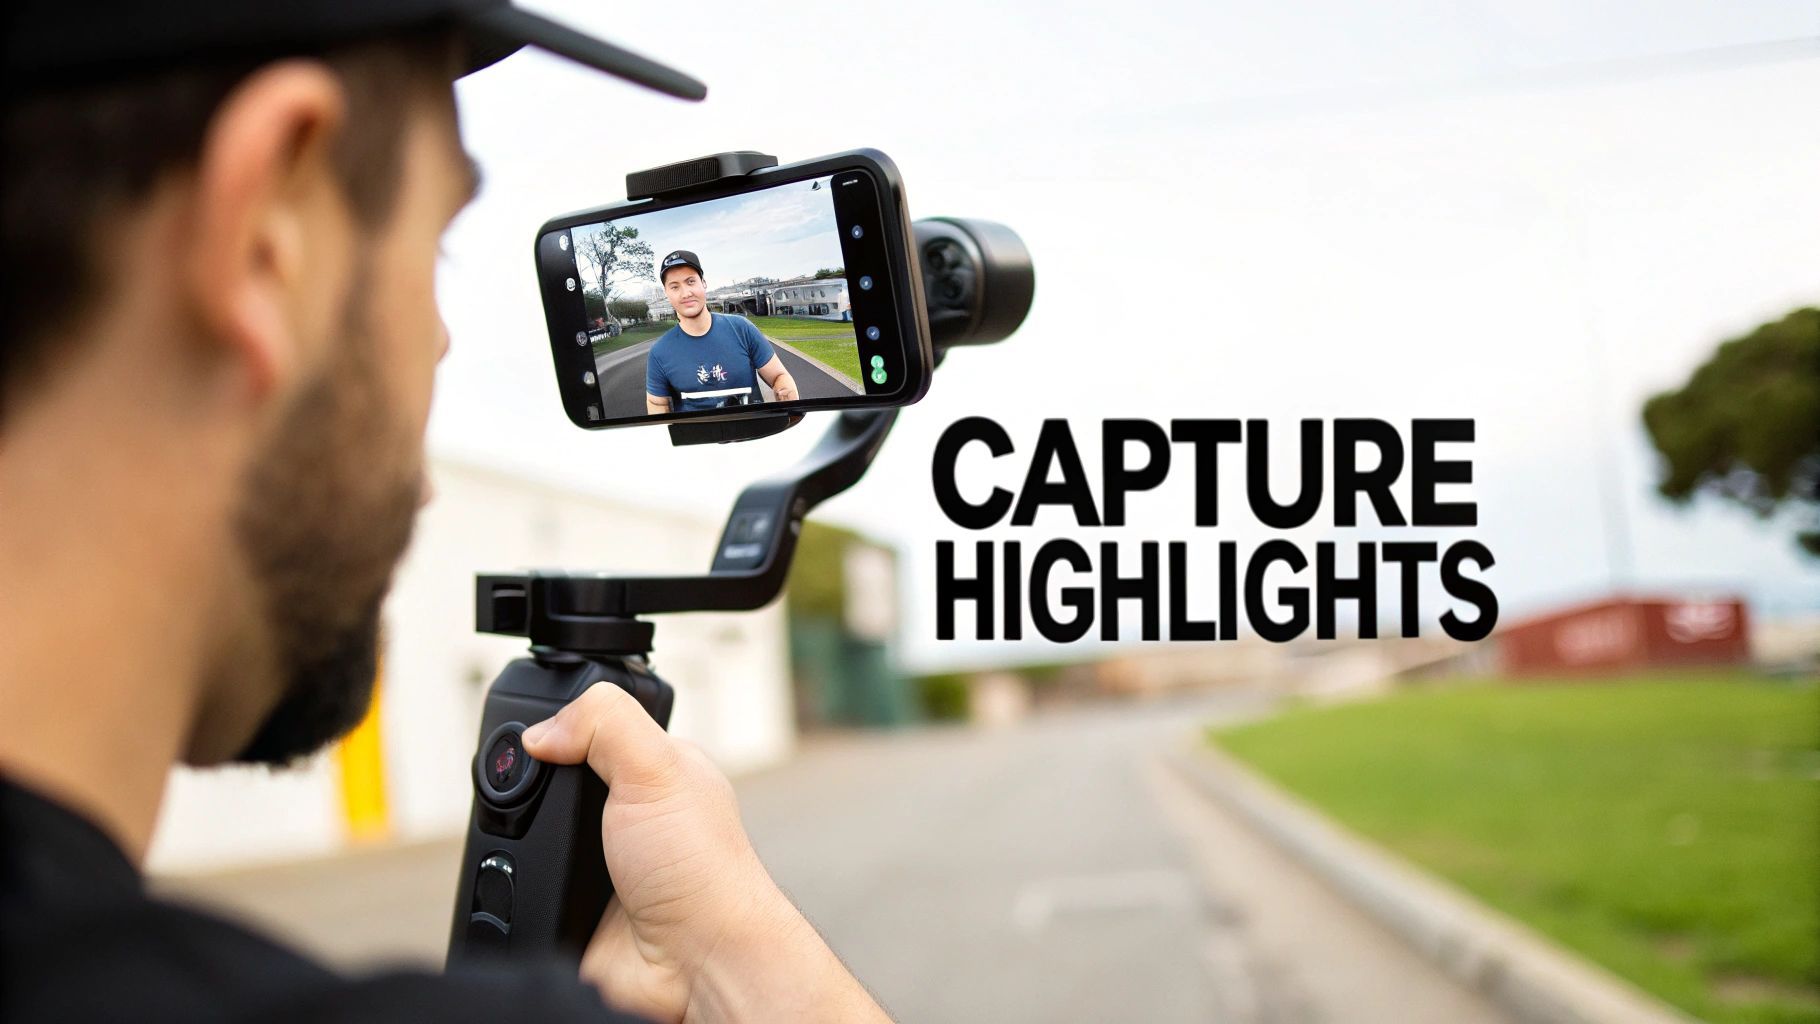
As you film, tap ShortGenius’s clip-marker to flag standout moments. This simple trick saves you from hours of hunting through raw reels later.
Don’t overlook audio. Capture ambient sound or record quick voice memos on location. Those notes add context and guide your narration when you hit the edit suite.
Use Clip Marker Efficiently
Flagging highlights in real time shaves editing hours off your schedule. With a single tap, ShortGenius locks in the best bits.
- Start recording in ShortGenius.
- Tap the clip-marker icon at each highlight.
- Review markers instantly in the editor to confirm quality.
This workflow lets you focus on storytelling instead of scavenging for clips.
Balance Light And Angles
Low angles can amplify movement; close-ups reveal every detail. Try backlighting to craft moody silhouettes or add a fill light when faces need a lift.
When natural light falls short, crank up that LED panel and fine-tune its brightness and color temperature until it feels seamless.
That shot shows how clip-marker flags and audio waveforms sit side by side—so you spot your best moments the instant they happen.
In real-world tests, short-form and highlight reels crush engagement. YouTube Shorts alone sees over 70 billion daily views and clocks a 5.91% engagement rate. Read more about these trends on HubSpot’s blog.
“Great captures start with lighting and movement,” notes videographer Alex Reyes.
Before you call it a wrap, review your clips on set. Replace any shaky or underexposed takes while you still have daylight.
- Low Angles: Emphasize scale and drama in action.
- Tight Close-Ups: Capture expressions that tell a story.
- Smooth Pans: Keep motion fluid with a gimbal or steady rig.
- Audio Notes: Record voice memos to guide your edit.
This approach fills your timeline with polished footage you can assemble in minutes. Next, sort your tagged clips in ShortGenius and dive into editing.
Consider marking B-roll separately with color-coded flags—blue for reaction shots, green for establishing scenes. These visual cues speed up your timeline assembly.
Tip: Reviewing footage on location uncovers fresh angles you might miss in post.
Keep the energy high by alternating between wide shots and close-ups throughout the shoot.
Editing And Assembling Highlights
Bring your clips into ShortGenius and watch your story take shape. The markers you set earlier pinpoint every standout moment in seconds.
Drag each clip onto the timeline and trim to 2–4 seconds. That brisk pace hooks viewers and keeps momentum high.
For smooth emotional shifts, cross-dissolves are your friend. When the action heats up, quick cuts match that energy.
- Trim timing reduces churn and boosts retention.
- Cross-dissolves and rapid cuts knit scenes together seamlessly.
- Audio mixer balances narration, music, and ambience in one place.
Speed Up Editing With Shortcuts
Mastering a few keys can halve your editing time. Hit T to toggle trim mode or M to drop markers in a flash.
Color-coded bins keep clips organized. One editor tags goal clips in yellow and celebrations in blue—saving 40% on assembly time.
- T = Trim Mode
- M = Add Marker
- S = Toggle Snapping
- C = Add Cross Dissolve
Balance Audio Levels
ShortGenius’s audio mixer makes it simple to duck music under voiceovers. Slide channels on the fly and apply a high-pass filter to cut rumble below 100Hz.
For more insights, check out these essential video editing tips.
Pro tips:
- Keyframe volume at the start and end of each voice segment.
- Use volume envelopes to lower music under narration.
Screenshot Of Timeline Interface
Here’s a look at the timeline with bins and clip markers at work.
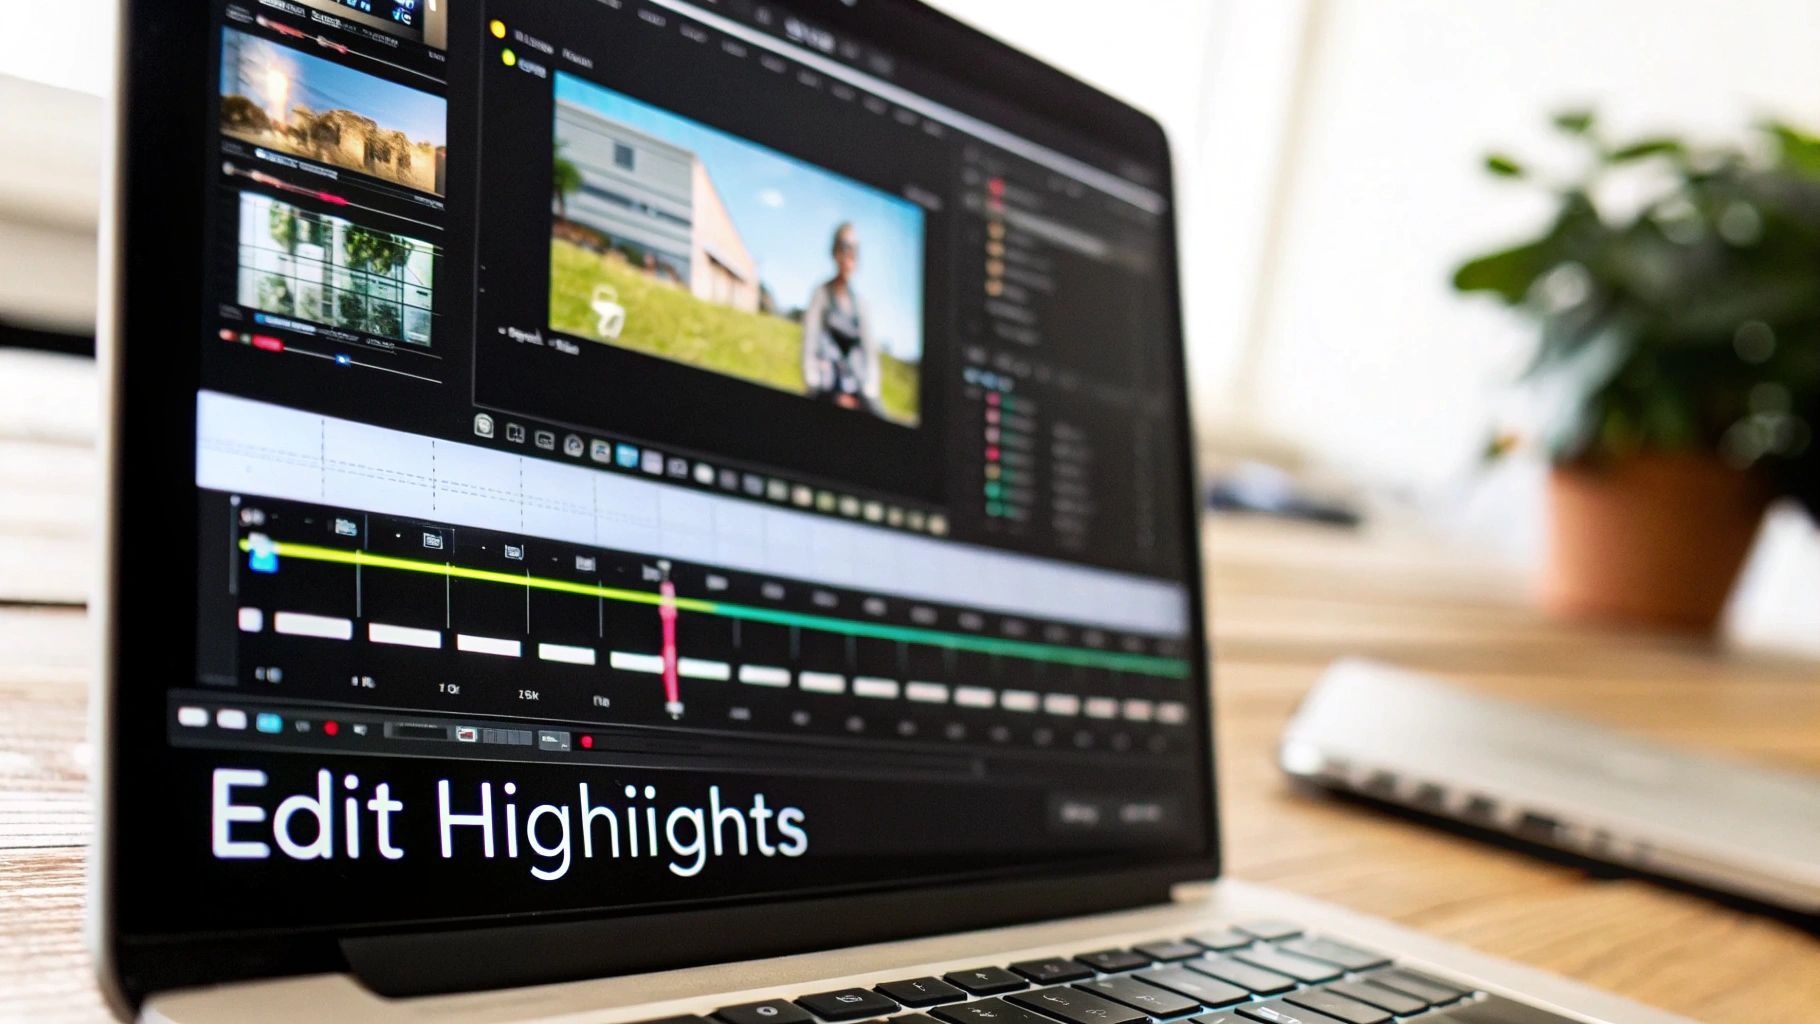
Notice how easy it is to sort footage, refine trims, and apply color presets with one click.
Apply Color And Text Overlays
One-click filters deliver a consistent aesthetic instantly. Or dial in exposure, contrast, and saturation manually for a distinct look.
Layer in text to highlight player names, scores, or key stats. Keep overlays concise and legible on any screen.
- Stick to short labels for clarity.
- Preview graphics on mobile to ensure readability.
Explore the ShortGenius editor toolset for all styling options.
ShortGenius Plan Feature Comparison
Before you upgrade, glance at the toolset each tier unlocks.
| Feature | Basic | Pro | Enterprise |
|---|---|---|---|
| Auto-trim Suggestions | ✓ | ✓ | ✓ |
| One-click Color | Limited presets | Full preset library | Custom brand palettes |
| Timeline Bins | 2 bins | 5 bins | Unlimited bins |
| Shortcut Keys | Basic trims | Advanced trims & cuts | Custom key mapping |
Each Pro account nets extra transitions and more bins. Enterprise plans let you remap keys to fit exactly how you work.
Use Timeline Bins
Bins act like folders for grouping footage by segment. I typically set up bins for intros, highlights, and outros.
- Create bins before importing clips.
- Drag footage into labeled groups.
- Collapse unused bins to declutter your workspace.
Fine Tune Color Grading
Presets get you 80% of the way there, but manual tweaks iron out any mismatches between shots.
- Add 10% contrast to punch up midtones.
- Lower highlights to recover detail in bright areas.
Conduct A Final Review
Play your edit straight through and note any jarring cuts or audio dips. Then test the reel on phone, tablet, and desktop to catch scaling issues.
- Look for text that’s too small on mobile.
- Flag any audio peaks that clip.
Make your final tweaks, lock the timeline, and prepare to export.
Export And Delivery
Pick the built-in presets to format your video for TikTok, Instagram, YouTube, and LinkedIn in one click. Use the scheduler to queue posts automatically.
After publishing, watch your ShortGenius dashboard for engagement insights:
- Views and likes reveal audience interest.
- Watch time pinpoints where engagement holds.
- Shares and comments show what resonates most.
Exporting And Sharing Your Video
Your highlight reel is polished and ready for prime time. The ShortGenius export panel walks you through every setting, so you hit the platform specs without second-guessing.
Choosing The Right Export Preset
Different networks demand different formats. For instance:
- Instagram Stories preset switches to 9:16 and keeps the file under 50 MB.
- YouTube Shorts preset delivers vertical 9:16 at 1080p, ideal for on-the-go viewing.
These presets protect against compression artifacts and ensure your footage stays crisp.
Before exporting, give your captions and meta tags one last glance. Slot your focus phrase, how to make a highlight video, into the title and description. It’s a quick tweak that boosts SEO and helps viewers zero in on your content.
- Pick resolution, bitrate, and codec tailored to each channel (H.264 works across most devices).
- Embed captions or upload SRT files for accessibility and search ranking.
- Naturally weave your main keyword into titles and descriptions for maximum discoverability.
Customizing Advanced Settings
Once you’ve chosen a preset, explore these fine-tuning tips:
- Swap H.264 for H.265 to shrink the file without sacrificing detail.
- Opt for variable bitrate (VBR) to stay within platform limits.
- Watch the real-time file-size estimate to sidestep upload headaches.

All your platform presets, bitrate controls, and size forecasts appear in one clear interface.
- Select the network you’re targeting.
- Preview the estimated file size.
- Hit Export and watch the progress bar do its thing.
Automating Your Posting Schedule
Why log in every day when you can queue posts in advance? The built-in social manager lets you schedule Instagram Stories, YouTube Shorts, or LinkedIn updates weeks ahead. This frees you up to focus on crafting your next standout reel.
Designing An Eye Catching Thumbnail
A striking thumbnail can boost click-through rates by 40%. The ShortGenius thumbnail maker lets you layer brand colors, text, and dynamic stills in seconds.
Keep overlay text to three words or fewer, and use high-contrast fonts for tiny mobile screens. That combo guarantees your reel pops in crowded feeds.
| Platform | Resolution | Aspect Ratio |
|---|---|---|
| 1080x1920 | 9:16 | |
| YouTube | 1080x1920 | 9:16 |
| 1080x1080 | 1:1 |
Key Insight: Creating a standout thumbnail can increase engagement by 35%, according to recent studies.
Monitoring Engagement
Once your reel is live, jump into ShortGenius analytics. You’ll want to track:
- Total views and average watch time
- Likes, shares, and comments
- Drop-off points and most-replayed segments
That data feeds directly into your next project. Tweak clip lengths, shuffle segment order, or double down on the moments that spark the biggest reaction.
Frequently Asked Questions
Our FAQ tackles the most common questions about crafting standout highlight videos with ShortGenius.
73% of marketers say concise highlight videos drive higher engagement on socials.
Ideal Highlight Video Length
You’ll want to keep your final cut between 30–90 seconds. It’s the sweet spot for all major social platforms.
- Instagram Reels shines at 30–60 seconds for maximum scroll-stopping power.
- TikTok users stay tuned for 15–60 seconds, keeping your clips punchy.
- YouTube Shorts works best around 15–90 seconds, especially on mobile.
These timeframes help you capture attention without dragging.
Tagging Clips While Filming
Mark standout moments on the fly by tapping the clip-marker icon whenever something noteworthy happens.
- Record in the mobile or desktop app.
- Hit the marker at the exact moment.
- Tweak or confirm those markers in the Trim view.
This approach saves tons of editing time and keeps your workflow smooth.
Troubleshooting Export Issues
If your video won’t export, double-check that you’ve selected the right platform preset. Also glance at the file-size estimate before you hit Export—misaligned settings often cause errors.
Adding Multiple Audio Tracks
Want to blend voiceovers, music, and ambient sounds? The mixer panel handles it all.
- Use volume envelopes to lower music when people talk.
- Add fade-ins and fade-outs at the start and end of clips.
- Apply a high-pass filter to mute any background rumble.
These simple tweaks give your video depth and polish.
Repurposing Videos For Different Platforms
Rather than re-editing from scratch, export specialized versions for each channel. ShortGenius’s auto-resize tool makes the process effortless.
- Choose 9:16 for stories and shorts, 16:9 for YouTube, or 1:1 for Instagram.
- Update captions and titles to match each platform’s vibe.
- Swap thumbnails to suit the new aspect ratio.
These quick swaps ensure your highlight videos look their best everywhere.
Key Takeaways
- 30–90 seconds is your sweet spot.
- Tag clips live to streamline editing.
- Confirm export presets before hitting go.
- Layer audio channels for richer sound.
- Auto-resize clips for any platform.
Ready to start? Dive in with ShortGenius.