A Creator's Guide to Adding Watermark to Videos
Learn the best methods for adding watermark to videos to protect your content. This guide covers tools, placement, and automated workflows for creators.
Adding a watermark is more than just dragging a logo onto your video. It's about embedding your identity into your footage, stamping it as yours before it ever hits the internet. Think of it as your digital signature—a simple but crucial step to protect your work and get credit where it's due.
Why Watermarking Your Videos Is Non-Negotiable
In the blink of an eye, your video can be screen-recorded, downloaded, and reposted across a dozen platforms. If your name isn't on it, you just gave away your hard work for free. Adding a watermark isn't just a nice-to-have; it's a core business move for any creator who's serious about their brand.
Without a watermark, your content is up for grabs. It's an open invitation for others to claim it as their own, which kills your reach and muddies your brand's reputation. It's the digital equivalent of an artist forgetting to sign their painting.
Secure Your Digital Ownership
Let's be real: the main reason to add a watermark is to stop people from stealing your content. While it won't stop a truly determined thief, it makes your video a much less appealing target for the casual reposter.
A clearly visible watermark means someone has to either credit you (which is the goal!) or put in the work to crop it out or blur it, usually making the video look terrible. That little bit of friction is often enough to deter the majority of content theft you'll see online.
Build Unmistakable Brand Recognition
Good branding is all about consistency. When your logo or social handle is on every video you post, people start to recognize it instantly. That repetition is how you build a memorable brand.
Imagine a fitness trainer's workout video goes viral on TikTok. If their Instagram handle is watermarked neatly in the corner, thousands of viewers can find their profile with zero effort. Without it? The video is just another anonymous clip, and a huge growth opportunity is completely lost. The watermark turns every view into a potential follower.
Key Takeaway: A watermark transforms your content into a mobile billboard. It works for you 24/7, building brand awareness long after you hit "publish."
Project Professionalism and Authority
A clean, well-placed watermark instantly makes your content look more professional. It tells viewers you’re serious about your work and have a legitimate brand. It's a small detail that subconsciously elevates your video from just a random clip to a piece of professional media.
For anyone doing client work, like marketing agencies or video editors, this is an absolute must. Sending drafts with a watermark is standard practice. It protects the work-in-progress and reinforces your brand’s high standards, building trust and showing you mean business.
Choosing Your Watermark Workflow: Manual vs. Automated
When it comes to adding a watermark, you're really choosing between two paths: total hands-on control or streamlined efficiency. The workflow you pick—either painstakingly placing it yourself or letting an automated tool handle it—will have a huge impact on your production speed, brand consistency, and, frankly, your sanity as your content library grows.
Most of us start out doing things the manual way. You open up your favorite video editor for every single clip, drag your logo onto the timeline, and position it just right. It’s a rite of passage for many creators.
This decision tree gives you a great visual on why and when you might need to protect your work, whether it’s for branding, asserting ownership, or simply looking more professional.
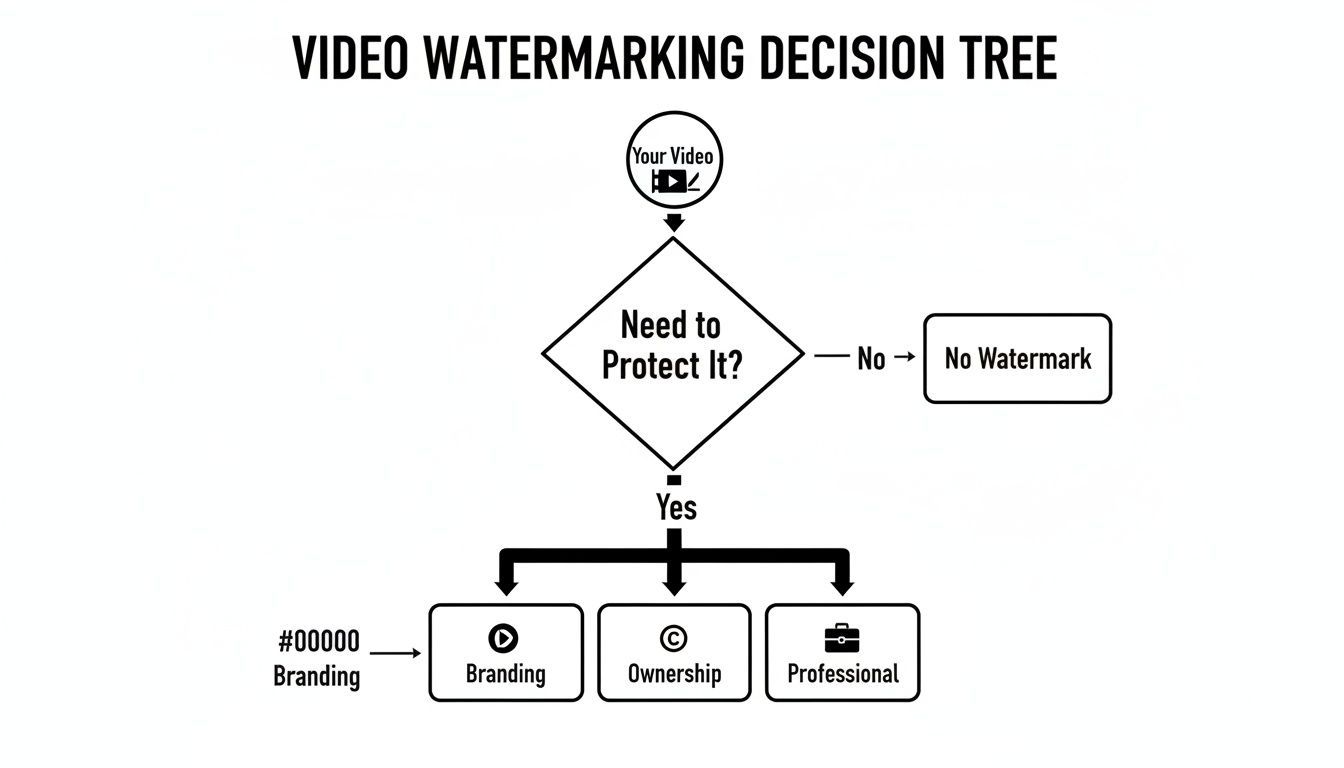
As you can see, it all stems from the core need to protect your content, which then branches out into crucial pillars like building a brand and proving you're the original creator.
The Manual Method: Hands-On But Time-Intensive
Using a professional editor like Adobe Premiere Pro or DaVinci Resolve, or even a mobile app like CapCut, gives you absolute authority. You can animate your watermark, shift its position to complement a specific scene's composition, or fine-tune its opacity frame-by-frame. This is ideal for that one big, high-stakes project where every last pixel has to be perfect.
But let’s be real: that level of control costs you dearly in one resource you can't get back—time.
Say you're churning out five short-form videos a week. Manually adding, positioning, and exporting each one might only add a few minutes per video. That sounds manageable, right? But do the math. That’s nearly two hours of your month spent on a repetitive, mind-numbing task. As your output grows, this job quickly turns into a major bottleneck.
And the biggest risk? It isn't just the time suck; it's simple human error. In a rush to get content out, it's incredibly easy to forget the watermark entirely or, even worse, export the wrong version without it.
The Automated Approach: Speed Meets Consistency
This is where automated workflows come in to save the day, solving the dual problems of scale and consistency. Tools designed for automation, like ShortGenius, work on a "set it and forget it" principle. You do the setup once, and the system takes over from there.
A feature like a Brand Kit is an absolute game-changer here. Instead of hunting for your logo file and trying to remember the exact X/Y coordinates for placement every single time, you just upload it once. You define its default position, size, and opacity, and the platform automatically bakes it into every video you process.
This kind of automated consistency is what builds a strong brand. Every piece of content you publish is perfectly on-brand, reinforcing your identity without you having to lift a finger for it. It removes the mental load and the chance of forgetting.
The demand for this kind of efficiency is exploding. The market for digital watermarking is projected to jump from USD 2.01 billion in 2024 to an incredible USD 6.01 billion by 2032. This growth is all about the need to embed data directly into video frames without hurting the quality. You can dive into the full digital watermarking technology market research to see just how fast this space is moving.
Manual vs Automated Watermarking: A Quick Comparison
Laying it all out side-by-side can make the choice a lot clearer. Here’s a quick breakdown of how each approach stacks up in the areas that matter most to a busy creator.
| Feature | Manual Method (e.g., Premiere Pro) | Automated Method (e.g., ShortGenius) |
|---|---|---|
| Speed | Slow; requires individual attention for each video. | Fast; applies watermarks instantly during creation. |
| Consistency | Prone to human error; placement can vary. | Flawless; uses pre-set Brand Kit for every video. |
| Scalability | Becomes a significant bottleneck as output increases. | Effortless; scales from one video to hundreds. |
| Control | Granular, frame-by-frame control over placement. | Less granular, but offers easy overrides when needed. |
| Best For | One-off artistic projects or creators with low volume. | High-volume creators, agencies, and marketing teams. |
So, what's the verdict? For a solo creator just starting out, the manual process is probably fine. But for anyone serious about building a content engine—social media managers, marketing agencies, or full-time influencers—automating this step becomes non-negotiable.
It frees up hours of your time that are far better spent on strategy, engaging with your community, or actually creating your next great video. The right workflow isn't just about sticking a logo on something; it's about building a smarter, more sustainable system for your content.
How ShortGenius Makes Watermarking Effortless
Let's be honest, manually adding your logo to every single video is a grind. It's one of those final, often-rushed steps that can easily get forgotten. This is where moving to an automated system completely changes the game. Tools like ShortGenius build your branding right into the creation workflow, so you never have to think about it again.
The secret sauce here is the Brand Kit. Think of it as your brand's digital locker—you set it up once, and the platform handles the rest. Every video you create will automatically pull your logo and apply it consistently, saving you from that tedious, repetitive task.
Your One-Time Brand Kit Setup
The Brand Kit is where you'll spend a few minutes upfront to save hours down the road. It’s where you define your brand’s visual rules, so the system can apply them perfectly every time.
Here's what that initial setup usually looks like:
- Upload Your Logo: You'll want to use a high-resolution PNG file with a transparent background. This is non-negotiable. It ensures your logo floats cleanly over the video, avoiding that ugly, amateurish boxy outline.
- Pick a Default Spot: Decide where you want your watermark to live. Most creators choose the bottom-right or top-right corners because they're less likely to be covered up by social media buttons and icons.
- Dial in Opacity and Size: Set your preferred transparency and scale. I find that starting somewhere around 30-50% opacity is a sweet spot—it’s visible enough for branding but doesn’t scream at your viewers.
Once this is done, you're set. No more fumbling around trying to remember the exact size or opacity you used on your last video. The system now has your back.
A well-configured Brand Kit is your secret weapon for scaling content. It empowers you to pump out dozens of videos a week, knowing that every single one is flawlessly branded. That consistency is exactly what builds brand recognition with your audience.
Applying Watermarks to New Projects
With your Brand Kit in place, the real magic begins. Kick off a new video project in ShortGenius, and you'll see your watermark appear automatically, just as you defined it. No more dragging, dropping, or tweaking settings for every single clip.
The screenshot below shows just how simple managing your brand assets becomes.
By centralizing your logo, colors, and fonts like this, you create a simple, repeatable process that makes content creation a breeze.
This kind of automation is more important than ever. As AI-generated content floods our feeds, proving your work is authentically yours is a real concern. It's no surprise that industry leaders like Digimarc and Verimatrix saw a 25% jump in video watermark usage in early 2026, largely as a way to combat the rise of synthetic media. You can dig deeper into these trends in the AI watermarking market report from datainsightsreports.com.
Making Quick Adjustments When Needed
Automation is fantastic for consistency, but creativity sometimes requires breaking the rules. What if your default bottom-right watermark covers up crucial on-screen text in one specific video? A great system has to be flexible.
This is where you need the ability to make a quick, one-off change without wrecking your default settings. ShortGenius lets you easily override your Brand Kit presets for individual videos.
Just click the watermark directly in the editor to:
- Reposition It: Drag it to another corner or a spot that better fits the shot's composition.
- Resize It: Scale it up for a stronger brand presence or shrink it down to be more subtle.
- Change the Opacity: Make it more transparent for a cinematic feel or more solid for a hard-hitting promo.
Any tweaks you make here only apply to the video you're currently working on. Your Brand Kit defaults remain untouched, ready for the next project. It’s this hybrid approach—the speed of automation combined with the freedom of manual control—that truly makes watermarking a seamless part of your workflow instead of a final chore.
Mastering Watermark Placement, Opacity, and Design
A great watermark walks a fine line. It has to be visible enough to stake your claim but subtle enough that it doesn't distract your audience and wreck the whole viewing experience. Getting this balance right comes down to a few key things: where you put it, how transparent it is, and the design of the mark itself.

Just slapping your logo in the middle of the frame is a total rookie move. It's distracting and, honestly, signals a lack of confidence in your own content. The real art is weaving your watermark into the video so it feels like a natural, professional touch.
Of course, to do any of this effectively, you need the right tools. You can explore some of the best video editing software out there to really dial in your watermarking workflow.
Strategic Placement for Maximum Impact
You might be surprised how much placement matters. The goal is to find a spot that’s tough to crop out without interfering with the main action or getting buried under the user interface of different social media platforms.
A watermark dead in the center is just asking to be cropped out for a vertical 9:16 video. There's a reason placing your mark in one of the four corners is the standard—it forces a content thief to make a much bigger crop, usually ruining the video's entire composition in the process.
But you also have to think about what each platform overlays on top of your video:
- YouTube: That progress bar along the bottom will swallow up any watermark placed too low.
- TikTok & Instagram Reels: The bottom and right sides are a chaotic mess of icons, text, and buttons.
- Facebook: The corners can get covered by overlays for likes, comments, and shares.
From my experience, the top-right and bottom-right corners are usually the safest bets. They tend to have the least UI clutter across the big platforms. Before you export, always scrub through your video to make sure your watermark doesn't accidentally cover something important, like on-screen text or a person's face.
Finding the Sweet Spot for Opacity
Opacity is just a fancy word for transparency. Set it to 100%, and your watermark becomes a solid, obnoxious blob. Dial it down to 10%, and it’s so faint it’s practically useless. The magic is somewhere in between.
I’ve found that an opacity level between 30% and 60% is the sweet spot for most videos. It’s visible enough to clearly identify your brand if you look closely, but transparent enough to blend into the background, letting viewers actually focus on your content.
The perfect level really depends on your watermark's design. A big, bold logo might look great at 30% opacity, while a thin, text-only watermark might need to be closer to 60% just to stay legible. Play around with this setting in your Brand Kit until you find what feels right for your specific logo.
Designing a Watermark That Works
Finally, the design of the watermark itself is critical. A poorly designed one can make your entire video look amateurish, which completely defeats the purpose of building a professional brand.
Here are a few non-negotiable design rules I live by:
- Always Use a PNG: Your logo file must be a PNG with a transparent background. A JPG with a clunky white box around it is the fastest way to signal you're an amateur.
- Keep It Simple: A complex, multi-colored logo is a huge distraction. The most effective watermarks are often monochromatic—think all white, all black, or a neutral gray—and have a simple design. This helps them sit cleanly on top of any footage without clashing.
- Ensure Legibility: Your watermark has to be readable against both light and dark backgrounds. A pro trick is to have two versions of your logo, one light and one dark. For a simpler approach, use a logo with a very subtle drop shadow or a thin outline to help it pop against any color.
When you combine smart placement, balanced opacity, and a clean design, your watermark transforms from a simple security tag into a powerful branding element that elevates your video's quality.
Advanced Watermarking for Multi-Channel Creators
If you're juggling content for YouTube, Instagram, TikTok, and Facebook, you know the feeling of spinning plates. What works perfectly on one platform can look totally out of place on another, and that goes for your watermark, too. A one-size-fits-all approach just doesn’t cut it when you’re serious about building a brand across multiple channels.
Creators who really scale their content understand that each platform has its own unwritten rules. Your branding needs to adapt to fit in, and that’s where a smarter watermarking strategy is essential.
Tailoring Watermarks for Each Platform
Think about the videos you make. A long, detailed tutorial for YouTube needs a different touch than a punchy, 15-second Instagram Reel. Your watermark should reflect that.
A great workflow is to create different watermark variations within a single tool. For instance, using a Brand Kit in a platform like ShortGenius lets you set up multiple profiles for your branding.
Here’s how you might approach it:
- For YouTube: Your full, professional logo works best. I usually place it in a corner where it’s visible but doesn't get in the way of on-screen text or demonstrations. It signals an established brand.
- For Instagram Reels & TikTok: I’d switch to a simple, text-based watermark, like just your social handle (e.g., @YourBrand). This feels native to the platform and makes it easy for people to find your profile. The key is keeping it subtle and away from the app's own UI elements.
- For Facebook: A semi-transparent logo is often the most flexible choice here since videos get shared everywhere from personal feeds to groups.
This approach makes your branding feel intentional and professional on every channel. Instead of forcing one style everywhere, you’re adapting to what your audience on each platform expects.
The goal is to make your watermark feel like an integrated part of the video, not a clunky sticker slapped on as an afterthought. Customizing it for each channel is a sign of a mature content strategy.
The Power of Batch Processing
Picture this: you've just finished filming an entire online course with 20 video modules. Are you really going to open, edit, and export each file one by one just to add a watermark? That’s a fast track to burnout.
This is where batch processing becomes your best friend.
Batch processing lets you apply the exact same watermark settings—position, size, opacity—to a whole folder of videos at once. You just set the rules, click a button, and let the software handle the repetitive work. For anyone producing content in bulk, like a tutorial series or a month's worth of social clips, it's a massive time-saver.
It's not just about speed, either. This kind of automation guarantees perfect consistency across every single video, ensuring your brand looks the same everywhere without you having to check each file manually.
The Future of Content Protection
The conversation around watermarking is also getting much more serious. With AI tools making it easier than ever to alter or steal media, proving your content is authentic is a real concern. The market for AI watermarking is projected to jump from USD 579.8 million in 2024 to a staggering USD 3.1 billion by 2034.
This growth shows just how urgent the need for smarter content verification is.
For creators who want to get ahead of the curve, it’s worth looking into what advanced tools like forensic video analysis software can do. While most of us won't need forensic-level protection, understanding the technology helps you appreciate why a clear, identifiable mark on your work is so important. At the end of the day, it's about creating a verifiable link back to you, the original creator.
Answering Your Top Questions About Video Watermarks
Even after you've got the hang of adding watermarks, a few questions tend to pop up again and again. Let's clear the air on some of the most common concerns I hear from creators, so you can protect your work without any second-guessing.
"But Can't Someone Just Remove My Watermark?"
I get this one a lot. The honest answer is that a determined person with the right (and often expensive) software can attempt to remove a watermark, but it's rarely a clean job. It's not like plucking an icon off your desktop.
A well-designed watermark—one with some transparency that overlaps with different colors and textures in your video—is a nightmare to remove cleanly. Trying to paint it out or use an AI removal tool usually leaves behind a blurry, distorted patch that screams "this video was stolen."
The point of a watermark isn't to be an impenetrable fortress. It's about being a major deterrent. It makes stealing your content more trouble than it's worth. For most would-be content thieves, it's far easier to just move on, which is exactly the outcome you want.
"Will a Watermark Ruin My Video Quality?"
This is a complete myth, but a persistent one. Adding a watermark, whether it's a simple text layer or a PNG logo, has zero impact on the quality of your original video footage.
Think of it this way: your video editor works in layers. The video is the bottom layer, and your watermark is just a new layer placed on top. When you export the final file, the software simply renders them together. It doesn't re-compress or degrade the pixels of the original video.
Key Insight: Your final video quality comes down to your camera settings and, more importantly, your export settings (bitrate, resolution, etc.). A small branding overlay isn't the culprit for a pixelated video. Don't let this fear stop you from protecting your work.
"Should I Use a Logo or Just Text?"
This is a great question, and the answer really comes down to your goals. There's no single "best" option; each serves a slightly different strategic purpose.
-
A Logo Watermark is all about building brand recall. It's professional, it's clean, and it helps your audience immediately recognize your content in a crowded feed. If you're building a distinct brand identity, a logo is the way to go.
-
A Text Watermark (like your website or @handle) is a direct call to action. It's less about subtle branding and more about pure attribution. It makes it incredibly easy for someone who stumbles upon your video to find its source. This is perfect if your main goal is driving traffic or gaining followers.
Personally, I see a lot of smart creators using a hybrid approach. They might use a polished logo for their main YouTube videos but switch to a simple "@YourHandle" text watermark for TikToks and Reels, where quick attribution is everything.
Ready to stop messing with manual watermarks and get back to creating? ShortGenius lets you set up your branding once with its Brand Kit, and then it's applied automatically. You can produce consistently on-brand, professional videos in a fraction of the time. Give it a try and feel the difference at https://shortgenius.com.