انسٹاگرام ریلز سائز ریفرنس: اسپیکس اور ٹپس

انسٹاگرام ریلز سائز کی حتمی اسپیکس، سیف زونز، ایکسپورٹ سیٹنگز اور AI ری سائزنگ ورک فلو کو ماسٹر کریں، بے داغ اور ہائی انگیجمنٹ ریلز کے لیے۔
آپ ایک Reel export کرتے ہیں، یہ آپ کے editor میں تیز نظر آتا ہے، اور پھر Instagram اسے نرم کر دیتا ہے، نیچے کا متن کاٹ دیتا ہے، یا آپ کے احتیاط سے رکھے گئے title کو interface کے پیچھے آدھا چھپا کر دیتا ہے۔ یہی وہ لمحہ ہے جب زیادہ تر creators کو احساس ہوتا ہے کہ “صرف vertical بنائیں” کافی نہیں ہے۔
Reels size Instagram کی specs درست کرنا جزوی طور پر resolution کے بارے میں ہے، لیکن بڑا مسئلہ layout discipline ہے۔ ایک Reel کو ایک ساتھ کئی viewing contexts کا سامنا کرنا پڑتا ہے: full-screen playback، feed preview، profile grid، اور interface overlays جو text اور calls to action کو ڈھانپ سکتے ہیں۔ اگر آپ کا workflow صرف canvas size چیک کرتا ہے، تو آپ اہم تفصیلات کھو دیں گے۔
یہ guide Reels کو production format کی طرح treat کرتی ہے، نہ کہ loose template۔ یہ actual spec categories کا احاطہ کرتی ہے جو اہم ہیں، feed اور grid میں کم واضح crop behavior، upload کے بعد برداشت کرنے والے export settings، اچھے footage کو ضائع کرنے والی عملی غلطیاں، اور ایک AI resizing workflow جو ایک vertical master کو multiple placements میں adapt کرنے کے لیے edit کو scratch سے rebuild کیے بغیر۔
تعارف
زیادہ تر Reel problems Instagram پر شروع نہیں ہوتے۔ وہ edit میں شروع ہوتے ہیں۔
ایک creator wide sequence پر کاٹتا ہے، footage کو scale کرتا ہے جب تک یہ “اچھا لگے”، subtitles bottom کے قریب add کرتا ہے، large file export کرتا ہے، اور سمجھتا ہے کہ platform باقی کا خیال رکھے گا۔ پھر upload live ہوتا ہے اور نتیجہ مانوس ہے: blurred edges، awkward framing، hidden captions، یا cover image جو actual playback frame سے مختلف نظر آتی ہے۔
یہی وجہ ہے کہ Reels size Instagram کی بات ایک number سے آگے بڑھنی چاہیے۔ ہاں، canvas اہم ہے۔ لیکن duration limits، playback requirements، feed میں crop behavior، اور text، faces، اور CTAs کی safe placement بھی۔
جو کام کرتا ہے وہ repeatable workflow ہے۔ صحیح canvas پر build کریں، multiple displays کے لیے frame کریں، Instagram کے encoder کے لیے export کریں، اور صرف clean master سے resize کریں۔ یہ process post-upload ٹھیک کرنے سے زیادہ وقت بچاتا ہے۔
Specification Categories اور Overview
Instagram Reel specs کو manage کرنا آسان ہو جاتا ہے جب آپ انہیں ایک setting کی بجائے constraints کے stack کی طرح treat کریں۔ کچھ image quality کو affect کرتی ہیں۔ دوسری visibility کو۔ چند upload کو متاثر کرتی ہیں کہ وہ آپ کی مرضی کے مطابق perform کرے یا نہ۔
یہ breakdown وہ mental model ہے جو میں کسی بھی edit سے پہلے استعمال کرتا ہوں۔
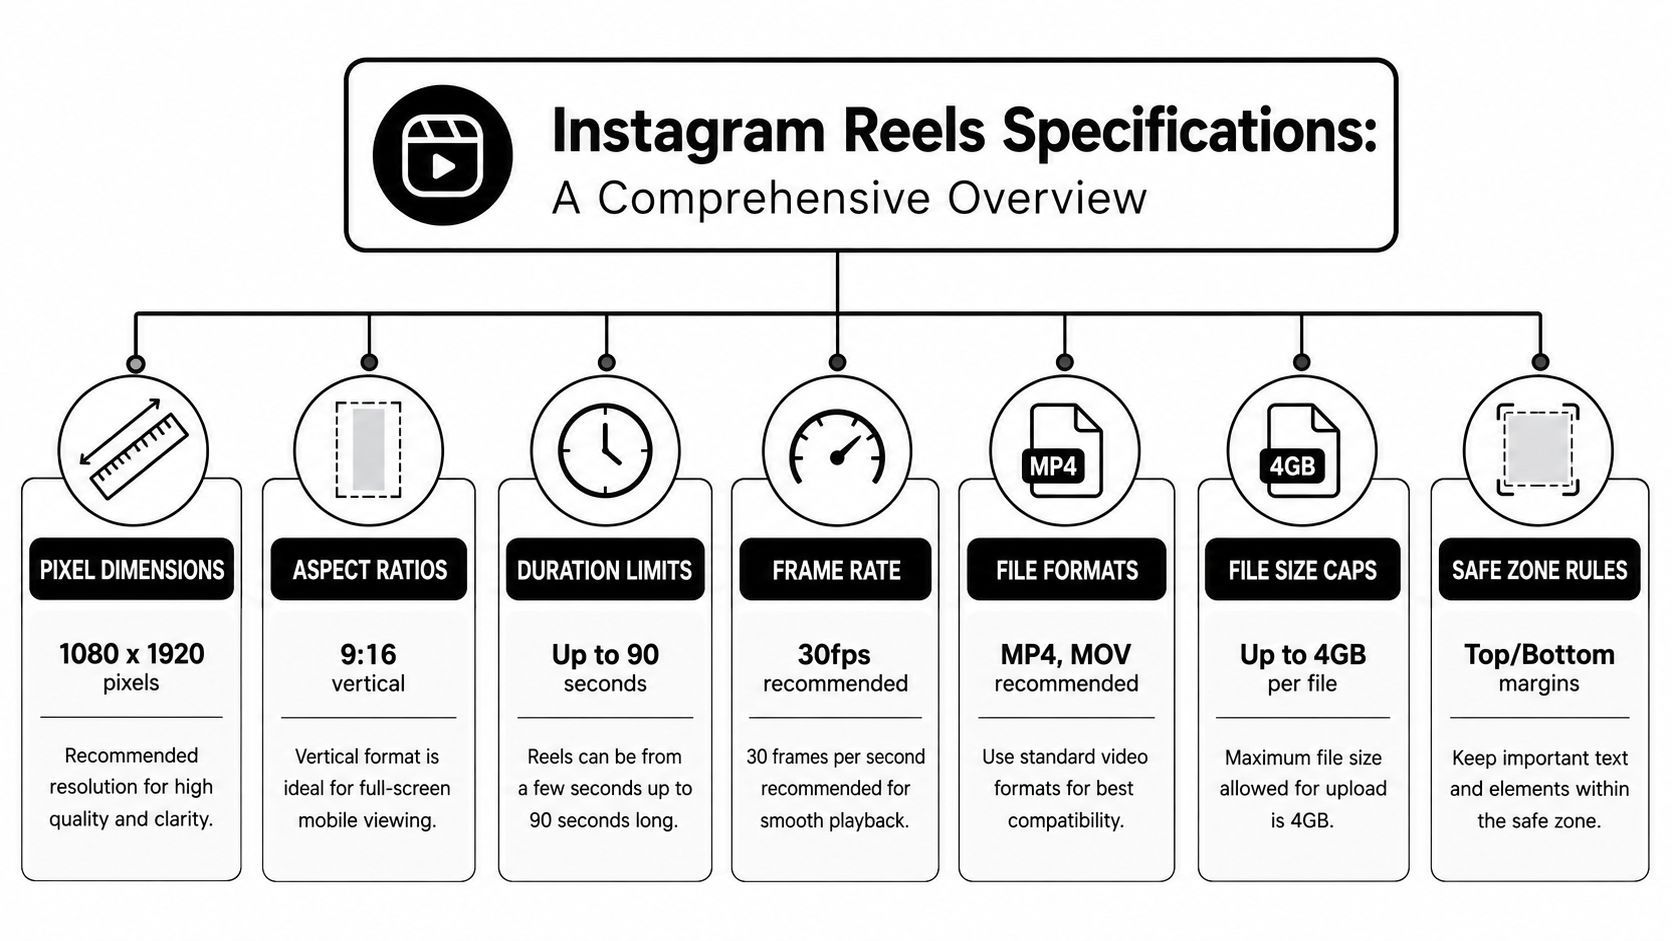
Core production categories
ٹاپ level پر، Reel specs ان گروپس میں آتی ہیں:
- Canvas specs۔ Resolution اور aspect ratio working frame کو define کرتے ہیں۔ اگر یہ غلط ہے، تو ہر بعد کی adjustment corrective بن جاتی ہے بجائے intentional کے۔
- Playback constraints۔ Duration اور frame rate piece کو platform پر native feel دینے اور smooth playback رکھنے کو affect کرتے ہیں۔
- Compression inputs۔ File format، codec، bitrate، اور file size Instagram کے re-encode کرنے کو shape کرتے ہیں۔
- Display rules۔ Feed preview، profile grid، اور full-screen playback ایک جیسا crop نہیں دکھاتے، تو composition کو ایک سے زیادہ views کا سامنا کرنا پڑتا ہے۔
- Safe-zone planning۔ Text، faces، logos، اور CTAs کو placement rules چاہیے، نہ کہ guesswork۔
How the categories interact
عام غلطی ایک category کو optimize کرنا ہے جبکہ downstream اگلی کو ignore کر دیا جائے۔
مثال کے طور پر، ایک creator خوبصورت source footage shoot کر سکتا ہے، لیکن اگر غلط canvas پر export کیا، تو Instagram کو intervene کرنا پڑتا ہے۔ Technically valid upload اہم text کے low بیٹھنے پر fail ہو سکتا ہے۔ Longer video upload rules meet کر سکتی ہے لیکن feed میں sluggish feel ہو سکتی ہے جو fast decisions اور repeat views کے لیے بنایا گیا ہے۔
Practical rule: اپنے Reel کو پہلے full-screen vertical asset کی طرح treat کریں، پھر export سے پہلے feed اور grid کے لیے pressure-test کریں۔
ایک simple hierarchy مدد کرتی ہے:
| Category | What it controls | Why it matters |
|---|---|---|
| Canvas | Frame shape and resolution | Prevents distortion and unnecessary scaling |
| Duration | Runtime | Affects pacing and how likely viewers are to finish or loop |
| Motion | Frame rate | Keeps movement clean and playback stable |
| Compression | Codec, format, bitrate, file size | Reduces visible degradation after upload |
| Display | Feed and grid appearance | Protects framing outside full-screen view |
| Safe zone | Placement of text and key visuals | Prevents overlays and crops from hiding the message |
ایسا سوچنے سے Reel production calm ہو جاتی ہے۔ آپ اب single screen کے لیے edit نہیں کر رہے۔ آپ format کے لیے edit کر رہے ہیں جو viewer کے encounter کرنے کی جگہ کے مطابق shape بدلتا ہے۔
Pixel Dimensions اور Aspect Ratio Details
ایک Reel آپ کے editor میں perfectly framed لگ سکتی ہے اور Instagram پہنچتے ہی off feel ہو سکتی ہے۔ وجہ simple ہے۔ آپ ایک view کے لیے design نہیں کر رہے۔ آپ full-screen 9:16 canvas کے لیے design کر رہے ہیں جو feed اور grid میں tighter crops میں preview بھی ہوتا ہے۔
Production spec اب بھی straightforward ہے: 1080 pixels wide by 1920 pixels tall میں 9:16 aspect ratio پر export کریں۔ یہی Reels کا working canvas ہے، اور یہ Instagram کو unnecessary resizing سے بچاتا ہے۔
Higher-than-1080 exports وہ جگہ ہے جہاں creators وقت ضائع کرتے ہیں۔ 4K vertical file کاغذ پر safer لگتی ہے، لیکن practice میں Instagram کو shrink اور recompress کرنا پڑتا ہے۔ یہ extra step edges، text، اور skin detail کو soften کر سکتا ہے بجائے preserve کے۔ میں final master کو 1080×1920 پر رکھتا ہوں جب تک larger archive version نہ چاہیے other platforms یا future recuts کے لیے۔
Under-resolution uploads مختلف طریقے سے fail ہوتے ہیں۔ اگر source بہت چھوٹا ہے، تو آپ editor سے upscale اور Instagram سے compress مانگ رہے ہیں۔ یہ stack muddy detail، weak text rendering، اور motion میں less stable image دکھاتی ہے۔
بہتر workflow delivery canvas سے start کرنا ہے:
- Sequence کو 1080×1920 پر set کریں
- Editing کے دوران canvas کے اندر shots reframe کریں
- Export سے پہلے text size اور subject placement چیک کریں
- Instagram کو resize کرنے کی بجائے Reel master export کریں
اگر آپ paid placements بھی چلاتے ہیں، تو organic creative کو Koast's ad dimension insights سے compare کریں۔ Ad placements اور organic Reels اکثر same base canvas share کرتے ہیں، لیکن crop اور overlay ہمیشہ same نہیں ہوتے۔
Hidden issue preview behavior ہے۔ Full-screen playback entire 9:16 frame استعمال کرتا ہے۔ Feed preview tighter ہے، commonly 4:5 crop دکھاتا ہے، یعنی top اور bottom trim ہوتے ہیں جہاں creators captions، product labels، یا hand gestures رکھتے ہیں۔
یہی وہ جگہ ہے جہاں spec charts کافی نہیں رہتیں۔
Perfectly technical dimensions والی Reel distribution کے لیے poorly framed ہو سکتی ہے۔ اگر face بہت high بیٹھا ہے، تو feed crop اسے crowd کر سکتا ہے۔ اگر callout بہت low ہے، تو preview views cramped feel کر سکتے ہیں viewer کے Reel کھولنے سے پہلے۔ Grid thumbnails centered composition کو reward کرتے ہیں cinematic edge placement سے زیادہ۔
میرا rule simple ہے۔ Motion اور visual energy کے لیے full 1080×1920 canvas استعمال کریں، لیکن compose کریں جیسے center tighter crops کا survive کرے۔ Practice میں، text، faces، logos، اور product proof کو extreme top اور bottom سے دور رکھیں جب تک decorative نہ ہوں۔
یہی وہ جگہ ہے جہاں AI resizing workflow وقت بچاتا ہے۔ Manually variations rebuild کرنے کی بجائے، ShortGenius جیسے tools resize، reframe، اور preview vertical assets تیز کر سکتے ہیں تاکہ upload سے پہلے crop problems پکڑ سکیں۔ Point automation نہیں، بلکہ یہ دیکھنا ہے کہ same Reel full-screen، feed، اور grid میں کیسے hold up کرتا ہے Instagram کے decisions سے پہلے۔
Duration اور Frame Rate Details
ایک Reel Instagram کے upload rules meet کر سکتی ہے اور پھر بھی drag کر سکتی ہے کیونکہ timing off ہے۔
Length retention، replays، اور preview surfaces پر survive کرنے کو affect کرتی ہے بغیر slow feel کے۔ Instagram short Reels support کرتا ہے اور کچھ accounts کے لیے longer uploads۔ Day-to-day production میں useful question simple ہے۔ کیا idea ہر second کو earn کرتا ہے؟
Length limits in real production
میں runtime hook clear ہونے کے بعد choose کرتا ہوں، پہلے نہیں۔ Joke، reveal، product movement، یا quick transformation tight cut میں best کام کرتے ہیں۔ Tutorial، reaction، یا story longer چل سکتی ہے، لیکن صرف اگر ہر beat نئی information add کرے۔
Practical editing rule: visual جو explain کر چکی setup remove کریں۔ اگر viewer پہلے shot سے point سمجھ سکے، تو caption یا voiceover straight payoff پر جائے۔
Job کے مطابق duration استعمال کریں:
- Short Reels reveals، before-and-afters، visual hooks، اور simple product moments کے لیے fit ہیں۔
- Mid-length Reels ایک idea کے ساتھ quick setup اور payoff کے لیے fit ہیں۔
- Longer Reels walkthroughs، commentary، اور tutorials کے لیے fit ہیں جو sequence اور explanation چاہتے ہیں۔
Shorter automatically better نہیں۔ Dead time core issue ہے۔ 20-second Reel clean pacing کے ساتھ usually 10-second padded Reel کو outperform کرے گی pauses، slow title cards، یا repeated clips سے۔
Frame rate is a quality control choice
Frame rate کے لیے 30 FPS safe default ہے۔ یہ Reels کی common viewing match کرتا ہے اور Instagram recompress کے بعد motion issues سے بچاتا ہے۔
Problems mixed-camera edits میں start ہوتی ہیں۔ Creator phone footage 30 FPS پر shoot کرتا ہے، B-roll 24 FPS پر drop کرتا ہے، screen recordings different frame rate پر add کرتا ہے، timeline settings چیک کیے بغیر export کرتا ہے۔ Upload through ہو سکتا ہے، لیکن motion uneven لگ سکتا ہے، text animation less clean، اور fast hand movement mismatch پہلے دکھاتی ہے۔
یہ simple standard استعمال کریں:
| Editing choice | What usually happens |
|---|---|
| Timeline کو start سے 30 FPS پر set کریں | Motion export کے ذریعے consistent رہتا ہے |
| Source clips mix کریں بغیر conforming frame rate | Playback choppy یا inconsistent لگ سکتا ہے |
| Edit timeline سے lower export کریں | Compression artifacts اور motion issues noticeable ہوتے ہیں |
اگر footage 60 FPS پر capture ہوئی smoother motion یا light slow motion کے لیے، تو edit intentional رکھیں۔ True 30 FPS timeline deliver کریں یا clip intentionally slow کریں۔ Randomly 30 اور 60 mix کرنا بہت سی Reels کو amateur feel دیتا ہے۔
میرا production bias simple ہے۔ Completion کے لیے cut کریں، پھر motion polish کریں۔ اگر Reel attention رکھے اور 30 FPS پر cleanly playback ہو، تو یہ اپنا job کر رہا ہے۔
Safe Zone اور Crop Guidance
آپ Reel finish کرتے ہیں، editor میں balanced لگتی ہے، اور upload پھر بھی اہم چیز کاٹ دیتا ہے۔ Usually hook text feed preview میں، subtitle line Instagram UI کے نیچے، یا face جو 9:16 میں centered تھی profile grid لے لے تو cramped feel ہو۔
Safe-zone planning یہ ٹھیک کرتی ہے۔ Spec charts canvas size بتاتی ہیں۔ Usually یہ نہیں بتاتیں کہ same Reel Reels viewer، home feed، اور grid میں کتنا different دکھایا جاتا ہے۔ ان display changes میں good edits careless لگنے لگتی ہیں۔
Put the message in the center, not just the frame
میں Reel کا middle protected area treat کرتا ہوں۔ Hook، face، product، price، اور CTA کو vertical canvas کے central square region کے ارد گرد cluster رکھیں۔ Top اور bottom motion، background action، texture، یا supporting text carry کر سکتے ہیں، لیکن core message tighter crop survive کرے۔
یہ trade-off matters۔ Dramatic full-height composition editor میں stronger لگ سکتی ہے، لیکن اگر sale price، subtitle، یا talking head edge کے قریب ہے، تو feed اور grid punish کریں گے۔
Practical placement order:
- Faces اور speaking subjects center کے قریب رہیں تاکہ eye contact tighter previews میں کام کرے۔
- Hook text lower interface area سے اوپر اور top edge سے نیچے بیٹھے، دونوں sides enough padding کے ساتھ۔
- CTAs کے ارد گرد space چاہیے۔ اگر button language یا URL cue bottom کے قریب ہے، تو یہ پہلے crowded ہوتا ہے۔
- Logos, disclaimers, اور fine detail صرف read ہونے کی ضرورت ہو تو safer positions میں، ورنہ secondary treat کریں۔
The hidden crop problem is not only vertical
بہت سے creators top اور bottom clearance چیک کرتے ہیں، grid crop بھول جاتے ہیں۔ یہی miss ہے۔
Reel full-screen playback میں fine لگ سکتی ہے اور profile پر fail ہو سکتی ہے کیونکہ grid preview tighter اور less forgiving ہے۔ اگر thumbnail text left یا right wide push پر depend کرتا ہے، یا subject low framed style کے لیے، تو grid clear composition کو confusing بنا دیتا ہے۔ Feed previews میں بھی same، جہاں visible area original edit سے زیادہ square feel ہوتا ہے۔
میرا simple rule۔ اگر Reel glance پر idea sell کرنا ہے، تو center square خود sense بنائے۔
Bottom overlays cause the most avoidable mistakes
Instagram interface elements screen کے lower part پر place کرتا ہے۔ Burned-in captions سب سے پہلے اس area سے collide کرتی ہیں، خاص طور پر large، multiline، یا animated ہوں۔
Lower-third text کو editor میں necessary سے higher رکھیں۔ Extra margin design hurt rarely کرتی ہے، اور common upload surprise روکتی ہے جہاں subtitles، offer text، یا “follow for part 2” UI کے نیچے land ہو۔
اگر text barely safe لگے، تو safe نہیں ہے۔
A fast crop check before export
Rendering سے پہلے یہ check چلائیں:
- Guides off کے ساتھ edit view کریں اور پوچھیں کہ main idea center-heavy crop میں پڑھا جائے۔
- Cover frame پر pause کریں اور square grid view میں check کریں۔
- Lower edge کے قریب subtitles، price points، اور CTAs دیکھیں۔
- Borderline text کو export سے پہلے inward nudge کریں۔
اگر workflow میں بعد میں ShortGenius جیسے AI resizing tools استعمال کریں، تو یہ check matter کرتا ہے۔ AI resize اور reframe تیز کر سکتا ہے، لیکن ہمیشہ guess نہیں کر سکتا کہ کون سا word، face، یا product label ہر Instagram surface پر visible رہے۔ Fastest workflow crop changes mind میں compose کرنا ہے، پھر AI safe variations generate کرنے کے لیے استعمال کریں weak layout repair کی بجائے۔
Export Recommendations اور Best Settings
ایک Reel editor میں sharp لگ سکتی ہے اور Instagram پر upload کے بعد softer، tighter، یا cramped پہنچ سکتی ہے۔ Export settings quality decide کرتے ہیں، لیکن framing compression اور feed، grid، full-screen shifts survive کرنے کو بھی affect کرتے ہیں۔
Export goal clean، predictable file ہے۔ Instagram recompress کرے گا، تو oversized master detail protect کی بجائے weight add کرتا ہے۔
Safest baseline MP4 with H.264 video اور AAC audio ہے۔
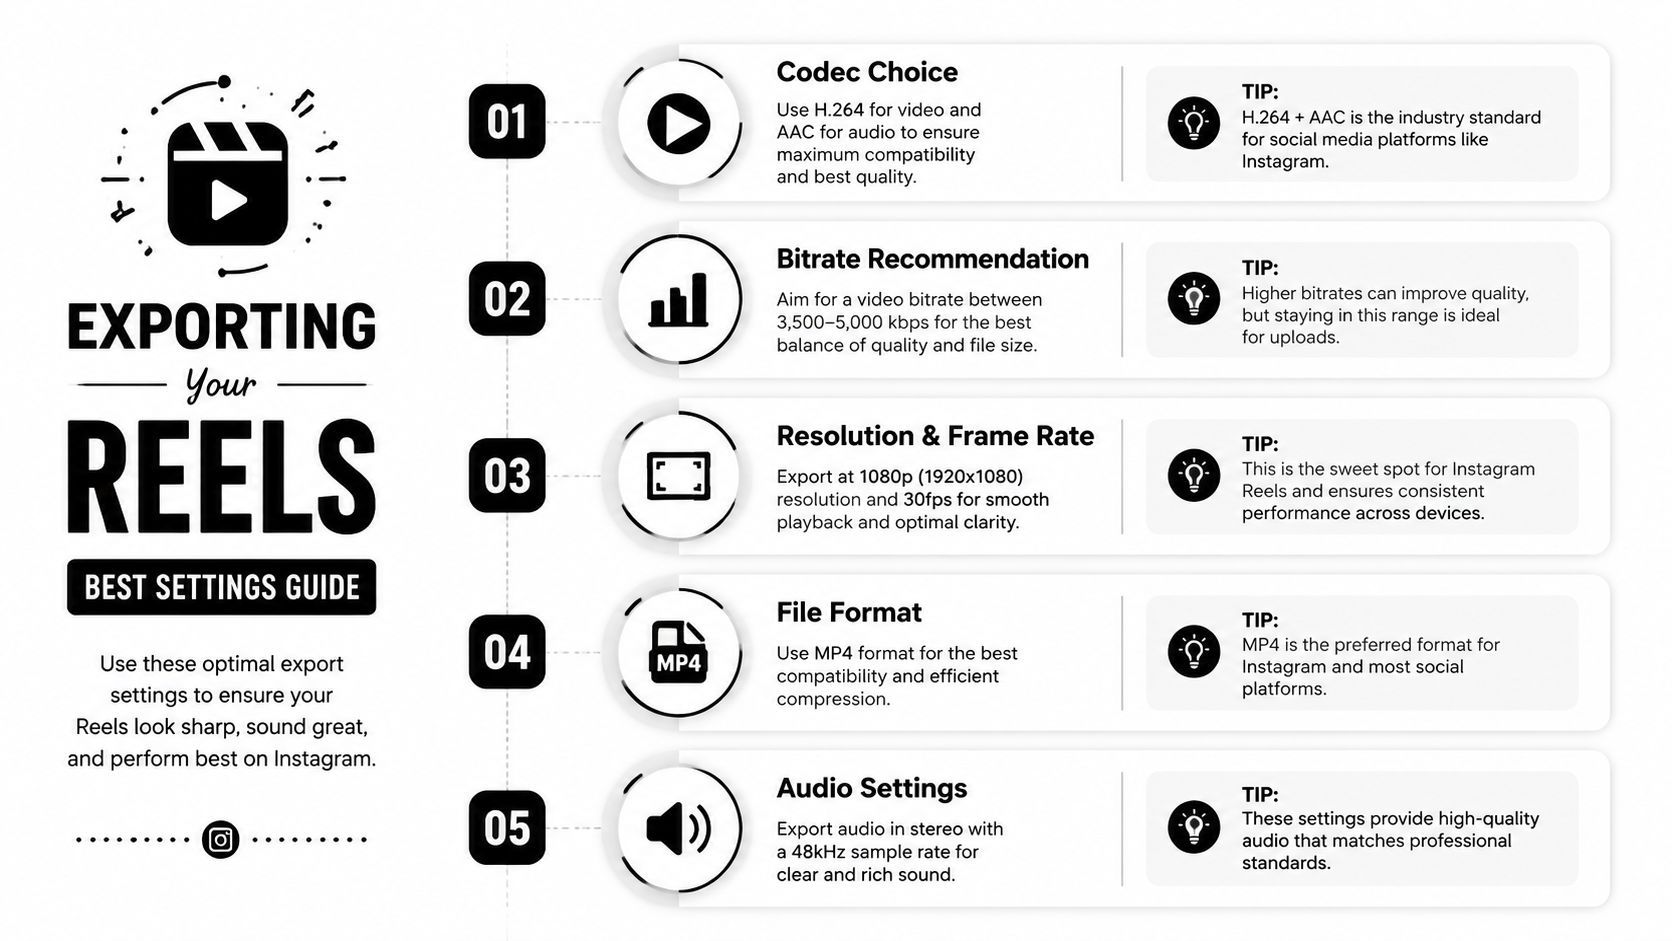
Export settings that hold up
یہ preset ہے جو میں standard Instagram Reel delivery کے لیے استعمال کرتا ہوں:
- Format: MP4
- Video codec: H.264
- Audio codec: AAC
- Canvas: final Reel sequence match کریں
- Frame rate: edit same frame rate پر export
- Bitrate: moderate, not excessive
Bitrate وہ جگہ ہے جہاں creators overdo کرتے ہیں۔ Heavily compressed source huge export سے clean نہیں بنتا، اور oversized file Instagram کو final transcode پر more work دیتا ہے۔ اگر source good ہے، تو moderate bitrate bloated settings سے بہتر hold up کرتا ہے۔
File size workflow کے لیے بھی matter کرتا ہے۔ Exports light رکھیں تاکہ mobile پر cleanly finish ہوں اور archival کی بجائے social delivery کے لیے نہ بنیں تو avoidable compression نہ ہو۔
Practical editor workflow
Edit start میں vertical canvas set کریں۔ Basic لگتا ہے، لیکن delivery problems solve کرتا ہے export سے پہلے۔
Premiere Pro میں، sequence final Reel dimensions میں رکھتا ہوں، H.264 سے export، اور phone پر rendered file check کرتا ہوں upload سے پہلے۔ Desktop preview کافی نہیں۔ In-program comfortably placed text Instagram interface add کرنے پر low feel کر سکتا ہے۔
Final Cut Pro یا DaVinci Resolve میں same rule۔ Final frame کے لیے build کریں، پھر exactly approved export کریں۔ اگر Reel elsewhere reuse ہوگی، تو platform-specific version بنائیں one master اور last-minute crops stack کی بجائے۔
یہ trade-off worth ہے۔ One universal export minutes بچاتا ہے۔ Separate exports post بچاتے ہیں۔
Where export and cropping intersect
Export quality half job ہے۔ دوسری half composition preserve کرنا ہے Instagram surfaces پر جو Reel same نہیں دکھاتے۔
Frame export پر technically correct ہو سکتا ہے اور feed preview یا profile grid میں fail ہو کیونکہ subject high، text low، یا cover tighter area check کیے بغیر chosen۔ یہی وجہ ہے کہ export final quality pass treat کرتا ہوں، نہ کہ render button۔ Actual output check، cover پر pause، اور confirm center composition message carry کرے اگر Instagram presentation trim کرے۔
اگر ShortGenius سے same creative multiple placements کے لیے resize یا adapt کریں، تو پہلے clean vertical master export کریں۔ پھر AI alternate versions اور reframing handle کرے۔ یہ compression file soften کرنے کے بعد weak crop rescue کرنے سے fast ہے۔
Quick troubleshooting table usual problems پکڑنے میں مدد کرتی ہے:
| Problem | Likely cause | Fix |
|---|---|---|
| Soft image after upload | Weak scaling یا oversized render سے export | Final target canvas سے export |
| Visible artifacting | Multiple compression rounds سے re-exported files | Cleanest master استعمال کریں اور export passes limit کریں |
| Audio issues | Codec یا export mismatch | MP4 میں AAC stick کریں |
| Text feels cramped after posting | Framing problem, not encoding | Export سے پہلے elements reposition کریں |
Common Mistakes to Avoid
ایک Reel editing timeline میں right لگ سکتی ہے اور Instagram different surfaces trim کرنے پر fail ہو سکتی ہے۔ میں یہ full-screen playback کے لیے بنے videos میں most often دیکھتا ہوں جو صرف اس view سے judge کیے جائیں۔ Feed preview اور profile grid mistakes fast expose کرتے ہیں۔
Costly errors rarely obviously technical ہوتی ہیں۔ Framing، timing، اور workflow mistakes ہیں جو end میں weak crop force کرتی ہیں۔
Mistakes that keep showing up
- Horizontal master سے start اور later vertical force کرنا۔ File cleanly export ہو سکتی ہے، لیکن composition break ہو جاتی ہے۔ Faces high، captions squeezed، frame center کام نہیں کرتا۔
- Text صرف full-screen viewer comfortably دیکھ سکے وہیں place کرنا۔ Reel playback میں readable اور feed preview یا grid cover میں messy ہو سکتی ہے۔ مختلف checks ہیں۔
- Tighter crop test کیے بغیر cover choose کرنا۔ Most overlooked problems میں سے ایک۔ Full frame میں balanced cover profile grid پر face، title، یا product کاٹ سکتی ہے۔
- Wrong canvas سے oversized files render کرنا۔ Large exports quality protect نہیں کرتے اگر upstream poor scaling ہو۔ بس Instagram کو more file recompress کرنے کو دیتے ہیں۔
- Edit late arrive ہونے دینا۔ Long intros، slow title cards، delayed hooks retention hurt کرتے ہیں point پہنچنے سے پہلے۔
ایک habit several cause کرتی ہے۔ Creators edit finish، export، upload، اور تب notice کرتے ہیں کہ speaking subject feed کے لیے low ہے یا grid پر cover text clipped ہے۔
یہ avoidable ہے۔
میرا rule simple۔ Posting سے پہلے three views میں approve کریں: full-screen playback، feed preview، profile grid cover۔ اگر message صرف ایک میں کام کرے، تو framing finish نہیں ہوئی۔
The mistake behind the mistake
بہت سی weak Reels bad edits نہیں۔ Bad adaptations ہیں۔
Teams one version build کرتے ہیں، پھر ہر placement accept کرنے کی کوشش کرتے ہیں۔ Better workflow strong vertical master build، subject اور key text center کے قریب، اور alternate crops create اگر same asset elsewhere کام کرے۔ ShortGenius resizing کے لیے استعمال کریں تو first reframing pass handle کرے، پھر manually review cover crop اور feed visibility کے لیے۔ AI time بچاتا ہے، لیکن ہمیشہ نہیں جانتا کہ کون سا word، face، یا product edge most matters۔
Practical test blunt ہے۔ اگر کوئی Reel tiny lower text یا edge detail پر rely کیے بغیر understand کر سکے، تو asset safe ہے۔ اگر story frame perimeter پر depend، تو upload کے بعد problems expect کریں۔
Cross-Posting اور Display Variations
ایک single Reel Instagram اندر ہر جگہ same نہیں دکھتی۔ یہی وجہ ہے کہ one master playback میں perfect اور profile یا main feed میں off لگ سکتا ہے۔
Platform creators کو layers میں سوچنے کو کہتا ہے۔ Full-screen immersive ہے۔ Feed selective۔ Grid stricter۔ اگر differences ignore کریں، تو content inconsistent feel کر سکتا ہے technically correct file ہونے کے باوجود۔
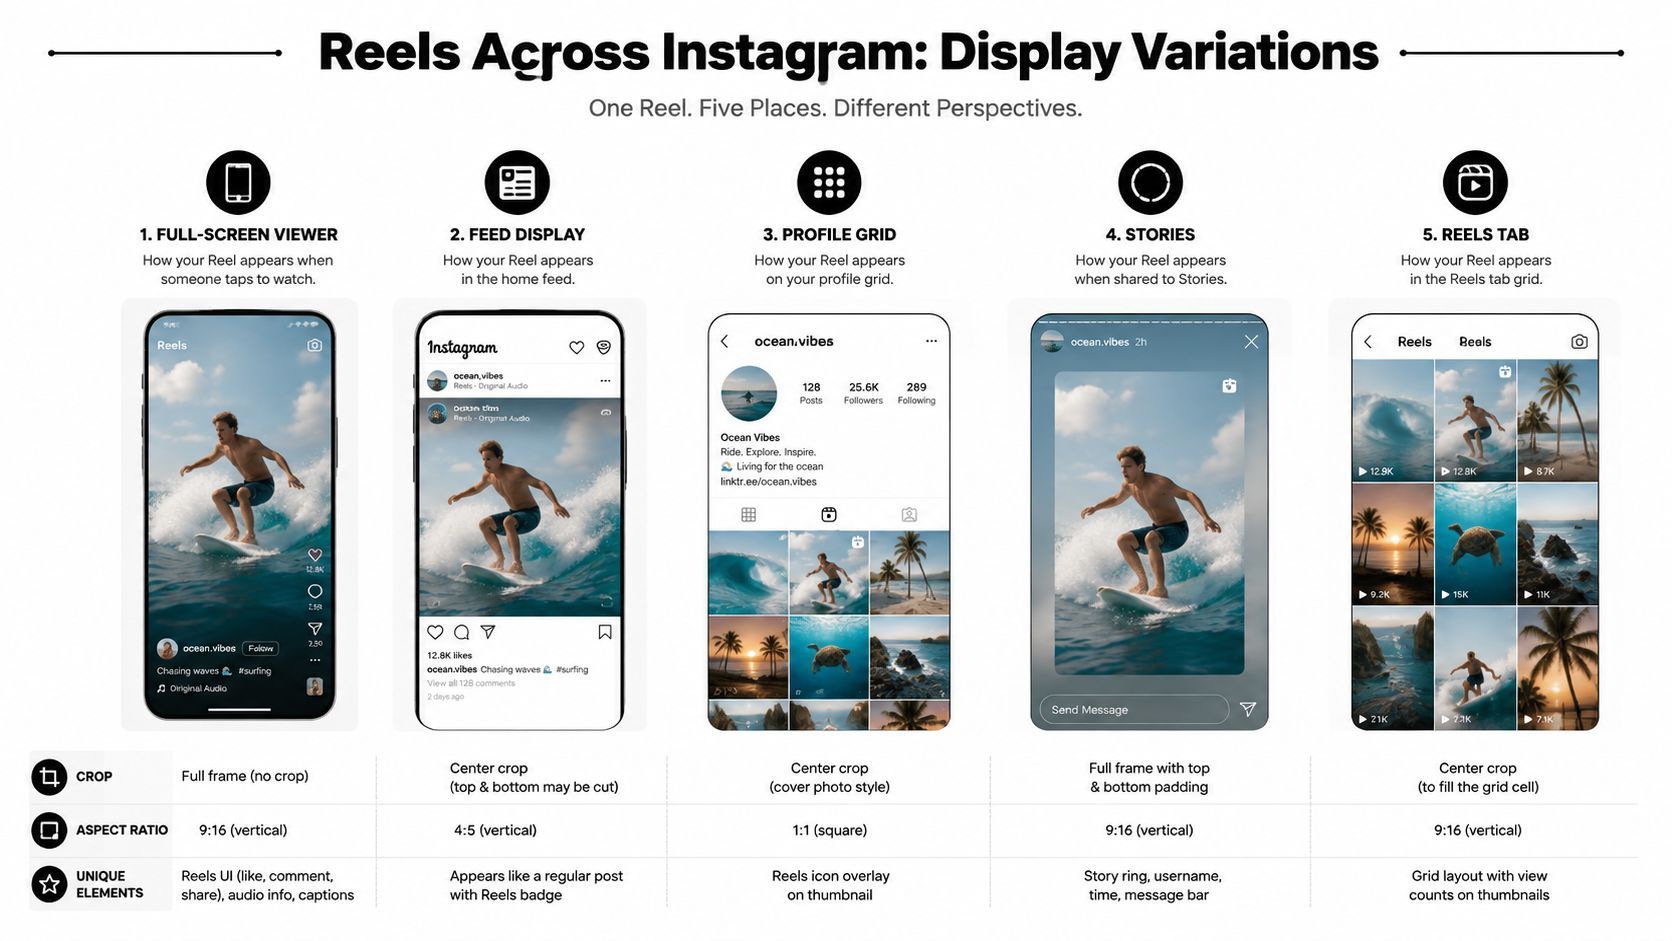
How one Reel shifts across placements
Practical comparison:
| Placement | What changes | What to watch |
|---|---|---|
| Full-screen viewer | Reel intended edit کے قریب feel کرتا ہے | Immersive framing great، overlays matter |
| Main feed | Preview restrictive بن جاتا ہے | Center clarity top/bottom سے زیادہ matter |
| Profile grid | Crop selective ہو جاتا ہے | Covers اور title placement زیادہ matter |
| Stories share | Context اور interface change | Tiny text rely کیے بغیر message readable |
| Reels tab | Vertical browsing native feel | Strong opening frames زیادہ matter |
When one canvas is enough and when it isn't
اگر Reel simple ہے جیسے talking head، product demo، یا clean motion graphic، تو one well-framed vertical master کافی ہے۔ Key elements کی disciplined placement چاہیے۔
اگر dense text، side-by-side layouts، یا edge-driven design، تو separate versions extra step worth ہیں۔ Feed preview اور profile presentation same composition equally carry نہیں کر سکتے۔
Few practical habits:
- Deliberate cover image choose کریں random frame trust کی بجائے۔
- Publishing سے پہلے profile grid crop check اگر page aesthetic matter کرے۔
- Central message area کے ساتھ build تاکہ reduced display space survive کرے۔
- Tiny labels اور fine print avoid جو صرف full-screen میں کام کریں۔
Instagram اندر cross-posting duplication کی بجائے resilience کے بارے میں ہے۔ Good Reel platform frame change کرنے پر meaning رکھتا ہے۔
Quick Resizing Workflow Using ShortGenius
Clean vertical master ملنے کے بعد، fastest repurpose master سے resize ہے، previously exported crop سے نہیں۔ یہ composition logic preserve کرتا ہے اور compression stack یا misaligned graphics chance کم کرتا ہے۔
Teams جو multiple versions quickly چاہتے ہیں، ShortGenius AI-assisted resizing، brand kit application، اور single source file سے formats export handle کر سکتا ہے۔
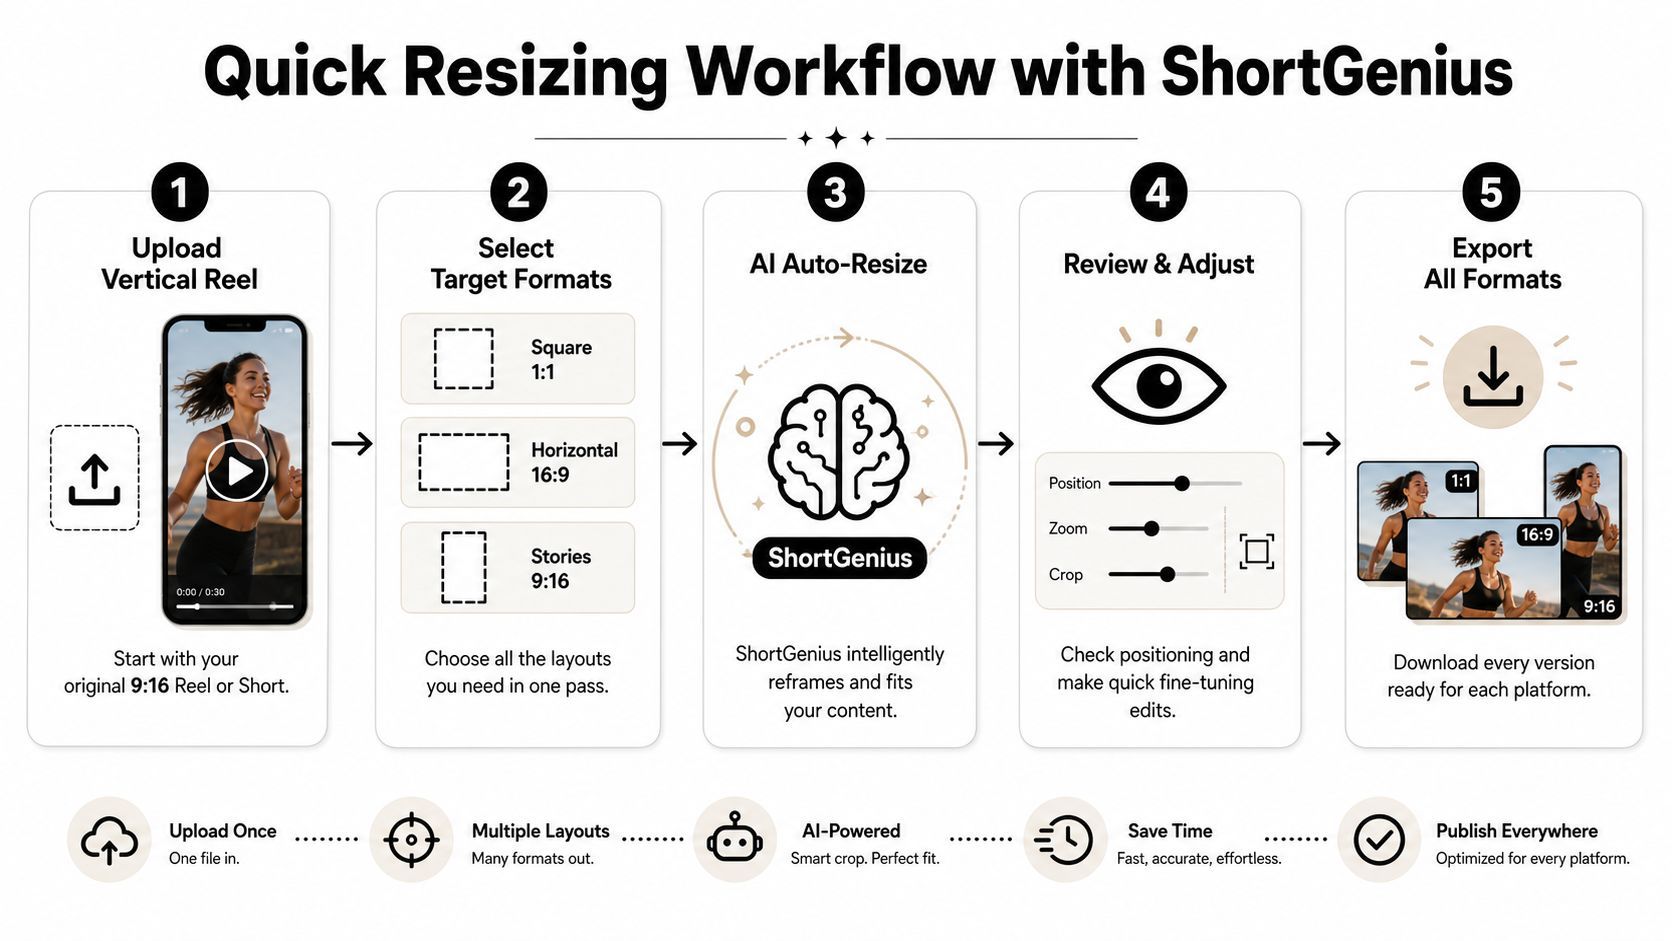
A practical resizing sequence
Raw clips کی بجائے finished vertical master سے start کریں۔ Master approved timing، captions، visual rhythm contain کرتا ہے۔
-
Approved Reel master upload کریں
Crop safety اور subtitle placement check کرنے کے بعد final vertical file لائیں۔ -
Target formats select کریں
Placements choose کریں جیسے feed-heavy channels کے لیے square، broader reuse کے لیے horizontal، یا Stories/short-form کے لیے another vertical۔ -
AI resize pass run کریں
Tool frame reposition اور layout adapt automatic first pass میں کرے۔ Time savings real production میں apparent، کیونکہ manual reframing multiple outputs repetitive اور wrong ہو سکتا ہے۔
What still needs a human check
AI heavy lifting handle کر سکتا ہے، لیکن review بغیر final approval نہ دے۔
Check focal framing
اگر subject زیادہ move کرے، تو crop right person/object prioritize کرے confirm کریں۔ Auto-framing close آتا ہے، لیکن face، product، یا demo point ہو تو “close” کافی نہیں۔
Check overlays and captions
Good automated resize بھی text کو new aspect ratio کے لیے weak position push کر سکتا ہے۔ All title cards، lower-thirds، subtitles، اور CTA screens original Reel safe-zone mindset سے review کریں۔
Resizing tool mechanical work shorten کرے۔ Framing اور readability judgment replace نہ کرے۔
Export the full set together
Biggest gain all versions one pass میں approve کرنا ہے۔ Separate timelines میں captions، logos، scene crops manually rebuild کی بجائے، once adjust، confirm، اور channels across publishing ready package export کریں۔
ایسا system agencies، social managers، اور solo creators کے لیے useful ہے جو same idea several places publish کریں بغیر fresh edit کے۔
Quick Reference Cheat Sheet
Deadline پر، long guide reread نہیں چاہتے۔ Short list چاہیے جو export اور framing clean رکھے۔
یہ working cheat sheet ہے جو میں Reel edit کے پاس رکھوں گا۔
Instagram Reels Quick Reference
| Parameter | Recommended Value |
|---|---|
| Resolution | 1080 × 1920 |
| Aspect ratio | 9:16 vertical |
| Minimum accepted length | 3 seconds |
| Standard upload limit for most users | 90 seconds |
| Extended maximum for select creators | 15 minutes |
| Best-performing short range | 7 to 15 seconds |
| Strong reach and completion range | 7 to 30 seconds |
| Minimum resolution floor | 720 pixels |
| Frame rate | 30 FPS minimum |
| File format | MP4 |
| Video codec | H.264 |
| Audio codec | AAC |
| Recommended bitrate | ~3,500 kbps |
| File size cap | 4GB |
| Practical file-size target | Under 512MB |
| Feed preview appearance | 1080 × 1350 |
| Safe placement area for key content | Central 1:1 square |
| Lower UI caution area | Keep bottom 14% clear |
یہ sheet apply کرنے کا most useful way simple ہے۔ Right canvas پر edit build، center protect، lower area clear، runtime tight، اور Instagram actual delivery behavior کے لیے export editor preview کی بجائے۔
اگر آپ one Reel کو repeatable content system بنا رہے ہیں، ShortGenius (AI Video / AI Ad Generator) generate، resize، edit، اور platform-ready short-form videos single workflow سے package کرنے میں مدد کر سکتا ہے، جو Instagram-ready vertical outputs کے ساتھ other channels versions کے لیے especially useful ہے۔